


DIY: Paper Crafts for Halloween
-
 By
Lauren DiPalma
By
Lauren DiPalma
- Oct 22, 2020
DIY: Paper Crafts for Halloween
Are you excited for "spooky season" but don't know how to celebrate? Well, you've come to the right place! In this article, we'll tell you how to make four super easy DIY Paper crafts for Halloween. These crafts are more than just a simple time passer. Use your fun creations to decorate your windows, doors, and parties. You can even use them to spruce up your invitations! They are the perfect tool for making October festive.
Things You'll Need:
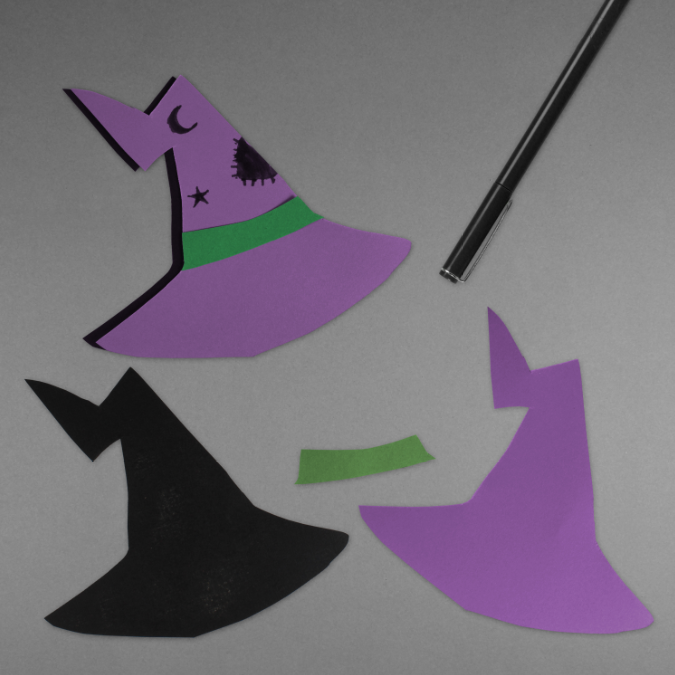
Witch Hat
Steps:
- Trace the outline of your witch hat on a piece of colored paper (it can be as big or small as you like!)
- With a black sheet of paper behind, cut out your shape! (This way you will end up with two identical hats, one of them being black and the other purple)
- As seen in the above photo, glue your purple hat on top of the black one. Make sure to leave some of the black hat showing on either the right or the left. This gives the illusion of a shadow, creating a 3-D effect.
- Cut out a green strip of paper to attach on just the purple hat in order to make a belt.
- Finally, take a black fine tip marker and add some decoration! We accessorized our hat with a patch, star, and crescent moon!
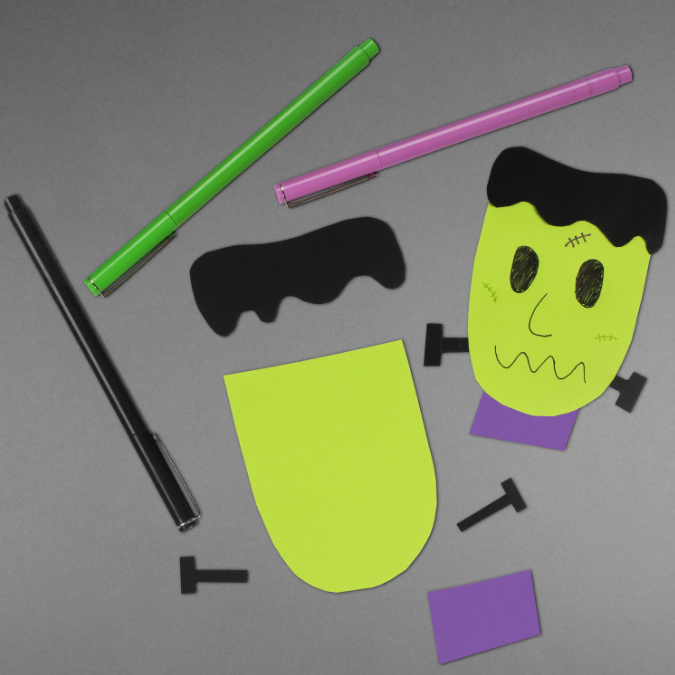
Frankenstein
Steps:
- Grab your green paper, trace the outline of an oval with a flat top, and then cut it out. This is going to be Frankenstein's face.
- Next, take a black piece of paper and cut out the hair. Make sure to measure this to the size of the head you just made.
- Glue the black hair on top of Frankenstein's head.
- Then cut out two bold-small "T's" (these are going to be his bolts) and glue them to the bottom of his chin going out sideways.
- Now let's give him a collar. Cut out a purple rectangle and glue it underneath his chin to create the effect of clothes.
- Finally, take your markers and give him a face and some scars! (You can copy ours or make it your own!)
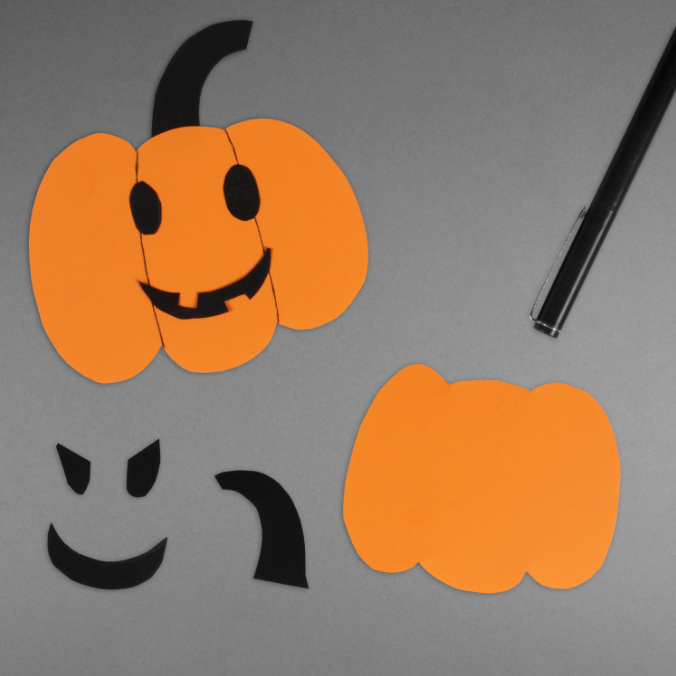
Pumpkin
Steps:
- Take some orange card stock and trace the outline of a pumpkin.
- After cutting out your pumpkin, take a fine tipped marker and draw some curved lines down the middle to create a "plump" 3-D look.
- Take some black paper and cut out a curved or straight stem.
- Glue stem on the back of the pumpkin cut out.
- Lastly, you can draw your Jack-O-lantern's face on or cut it out using black paper as well!
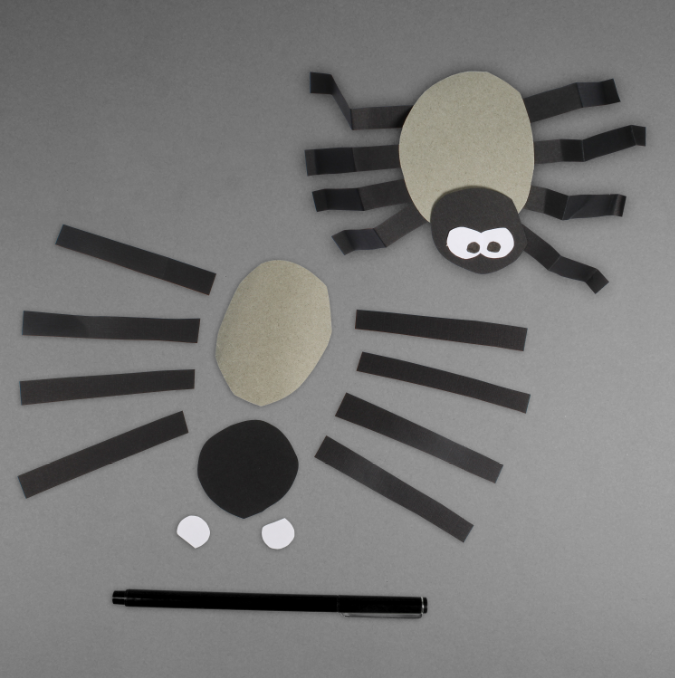
Spider and Spider Web
Steps:
- Grab your grey paper and a pair of scissors.
- Cut out a medium sized oval for the spider body.
- Now take your black paper and cut out a smaller sized circle for the head.
- Glue the small black circle on the top of the grey oval.
- Now cut out 8 long skinny rectangles for the legs.
- Glue the legs underneath the grey belly of the spider, putting four on each side.
- Take some white paper and cut out two small circles for the eyes. (Make sure to make these small enough so they both fit on top of the head of the spider!)
- Glue the eyes towards the top of your spider face.
- Now it's time to add some features! Take a black marker and draw some pupils on the eyeballs to add some character.
- Finally, take each leg and bend it inwards so it can stand up on it's own! This will make your spider come to life!
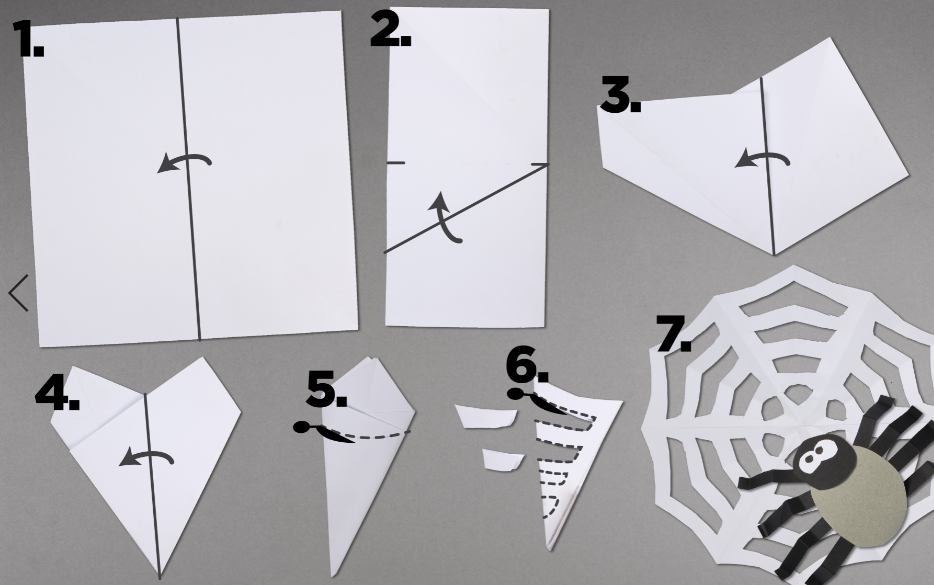
Steps:
- First, grab a square white piece of paper
- Fold the paper in half. Once folded, mark where the middle of the rectangle is.
- Where the middle of the paper meets, create a fold another fold and crease it at a 45 degree angle.
- Do the same to the other side
- Next, draw a curved line towards the end of the paper fold and cut it off
- Continue to cut curved pieces off of the folded triangle until you no longer can fit any more. it should look like a slanted comb.
- Lastly, unfold your web! But make sure to be careful because the more you cut, the more delicate it becomes.
- *Optional* Attach your spider to your web to give it a home :)
Whether you're a parent, teacher, student, or just an overall craft lover, we hope this article gave you some ideas on how to spruce up your Halloween this year! With COVID-19 around us it may seem difficult to celebrate your favorite holidays, but here we can provide easy and safe ways to enjoy them! Don't forget to leave comments down below. We'd love to hear how these DIY paper crafts for Halloween worked for you. And if you have any suggestions don't be shy, we're all ears! For more crafty ideas make sure to look out for more blog posts and follow us on Instagram and Pinterest!
DIY: Paper Crafts for Halloween
Looking for creative and budget-friendly ways to decorate your home for Halloween? DIY paper crafts are the perfect solution! With just a few simple supplies like colored paper, scissors, and glue, you can create spooky and stylish decorations that will impress your guests. From paper pumpkins and bats to intricate paper lanterns, the possibilities are endless. Not only are DIY paper crafts a fun and affordable way to get into the Halloween spirit, but they also allow you to add a personal touch to your decor. Whether you're hosting a Halloween party or just want to spruce up your home, DIY paper crafts are a fantastic option.
Benefits of DIY Paper Crafts for Halloween
One of the main benefits of DIY paper crafts for Halloween is the cost-effectiveness. Instead of spending a fortune on store-bought decorations, you can create unique and eye-catching pieces at a fraction of the cost. Additionally, DIY paper crafts allow you to unleash your creativity and customize your decorations to suit your personal style. You can also involve your family and friends in the crafting process, making it a fun and bonding activity. Furthermore, by using recyclable materials, you can reduce your environmental impact while still enjoying the festive season.
Use Cases for DIY Paper Crafts for Halloween
DIY paper crafts for Halloween can be used in a variety of ways to enhance your holiday celebrations. From creating handmade greeting cards and party invitations to crafting intricate centerpieces and garlands, there are endless possibilities. You can also use DIY paper crafts to adorn your windows, walls, and tabletops, adding a touch of spookiness to every corner of your home. Additionally, these crafts can be a great way to entertain and engage children, allowing them to express their creativity and contribute to the Halloween decorations.
Alternatives to DIY Paper Crafts for Halloween
If you're looking for alternatives to DIY paper crafts for Halloween, you may consider using other materials such as fabric, wood, or clay to create your decorations. However, paper crafts offer the advantage of being lightweight, easy to work with, and versatile. They also allow for intricate and delicate designs that may be challenging to achieve with other materials. Ultimately, the choice of materials depends on your personal preferences and the specific aesthetic you want to achieve.
Tips for Using DIY Paper Crafts for Halloween
When creating DIY paper crafts for Halloween, it's important to choose high-quality paper that is durable and suitable for the intended purpose. Consider using themed or patterned paper to enhance the festive vibe of your decorations. Additionally, make sure to follow tutorials and instructions carefully to achieve the best results. Don't be afraid to experiment with different techniques and designs to find what works best for you. Finally, have fun and let your imagination run wild as you bring your Halloween decor to life with DIY paper crafts.
Adding a Personal Touch with DIY Paper Crafts for Halloween
One of the most rewarding aspects of DIY paper crafts for Halloween is the ability to add a personal touch to your decorations. Whether you're creating custom treat bags, spooky silhouettes, or eerie paper lanterns, each piece will reflect your unique style and creativity. By incorporating DIY paper crafts into your Halloween decor, you can set your home apart from the standard store-bought decorations and showcase your crafting skills. Furthermore, the satisfaction of seeing your handmade creations come to life will make your Halloween celebrations even more memorable.