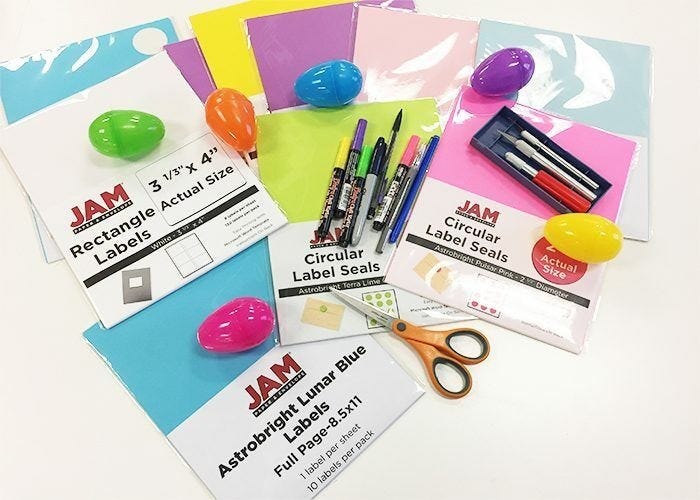
Easter will be here on April first, which is this coming weekend! Thankfully, this quick and easy craft will help you get ready in time while having some creative fun! Egg decorating is a favorite pastime of many, but there are always new ways to do time-tested activities. In this post, I will show you how to make fun and easy, personalized Easter stickers for decorating eggs and any other surface you or your kids would like to brighten up for the holiday. This is a great craft for parents and children or for any DIY-ers looking for something quick ans cute to make for Easter! You will need:
JAM Paper labels in the colors of your choice a pencil scissors markers and pens a craft knife colored eggs
This craft is easiest with full page and 3 1/3 x 4 inch sized labels, although you may use any size or shape, depending on the size and shape of the stickers you choose to make. The label colors shown above are White, Astobright Lunar Blue, Astrobright Terra Lime, Astrobright Pulsar Pink, Astrobright Planetary Purple, Baby Blue, Baby Pink, and Brite Hue Ultra Yellow.
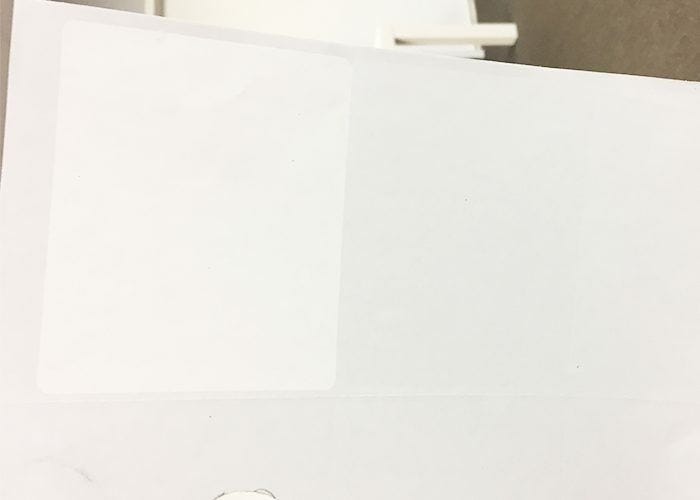
Step 1:
Begin with a sheet of labels appropriate for the size of the sticker you want to make. Flip the sheet over so that the back of the sheet (the non-label side) is facing you.
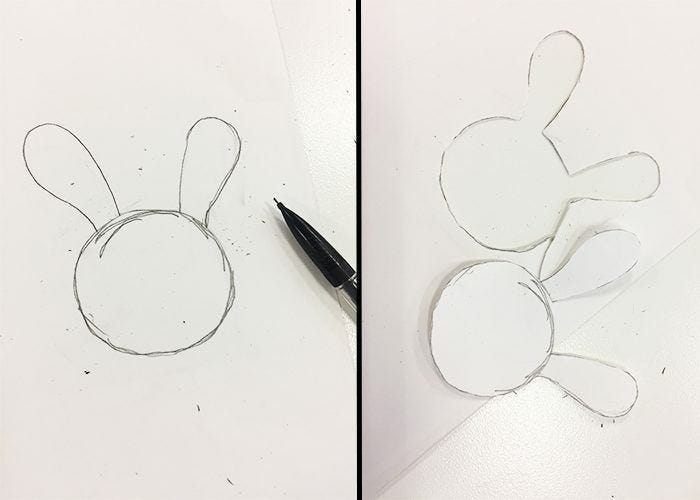
Step 2:
Next, take your pencil and draw the shape of the sticker you want to make on the back of the label sheet, making sure that your drawing stays within the space occupied by one single label. The shape below is for a basic rabbit head sticker. If you do not feel confident in your drawing skills, or if you are doing this craft with young children, feel free to use stencils!
Step 3:
Use your scissors to carefully cut out the shape you have drawn. Flip it right side up so that the label side is facing you.
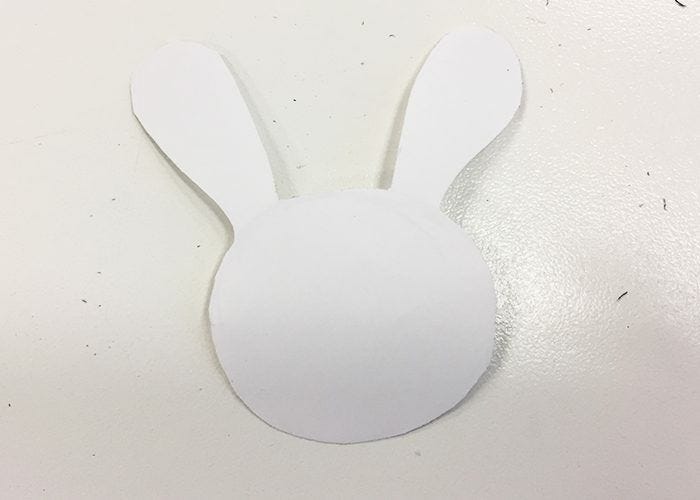
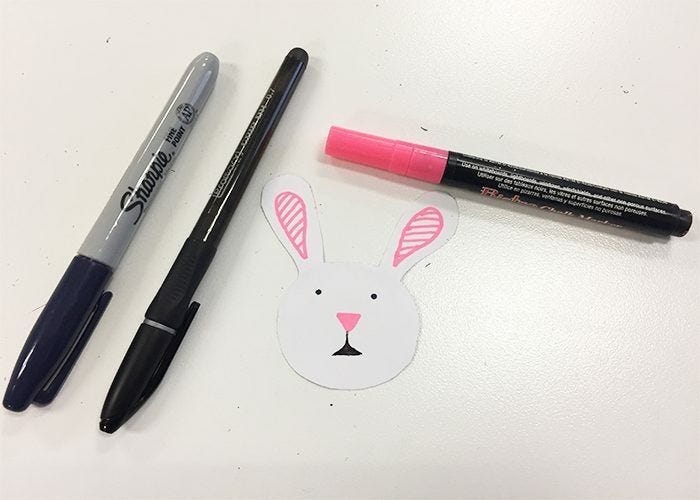
Step 4:
Now, you can further customize your sticker by using pens and markers to give it detail and color! For the rabbit face below, I used a black pen, a dark blue Sharpie marker, and a pink chalk marker.
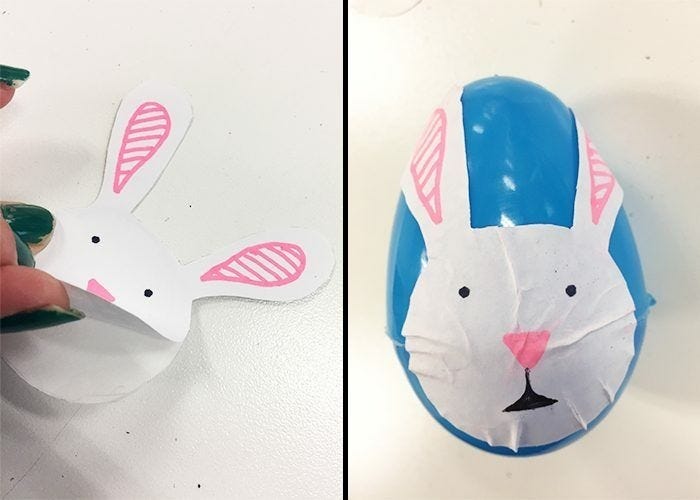
Step 5:
Once you are done detailing your sticker, peel it away from its backing and carefully place it on an Easter Egg or other surface. If you are placing your sticker on an egg or another rounded surface, note that some wrinkling is normal.
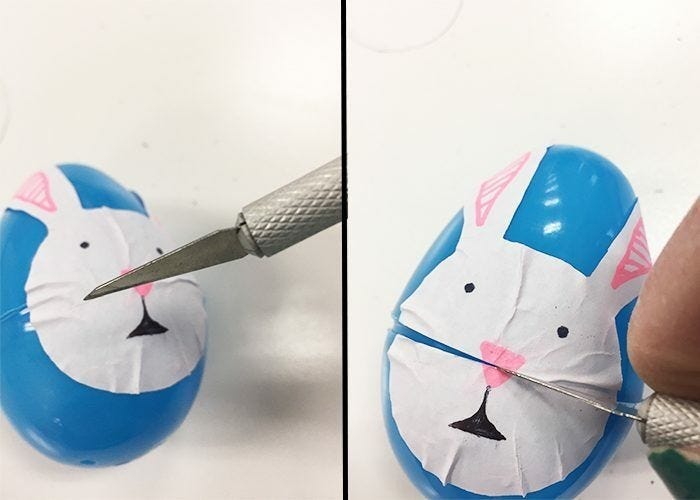
Step 6:
If you, like I have done, are placing your stickers on plastic Easter Eggs, you're going to need to get those eggs open without disrupting the sticker. That will be easy to do as long as you complete this step! Pop the egg open slightly and then use your craft knife to cut through the sticker along the edge of the bottom of the egg as shown below.
Note: If you are doing this craft with children under 10, please help or supervise them with this step as craft knives are often very sharp.
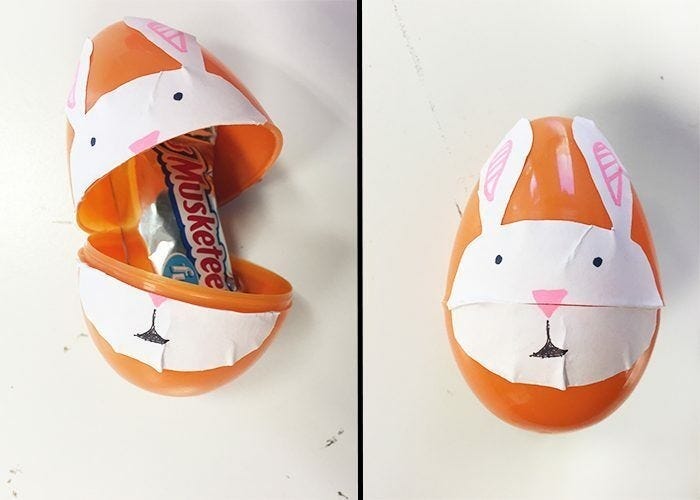
Now you can open your egg to put in or take out the treats inside! When you close it, the image on the sticker remains whole and unbroken!
I decorated a total of six eggs. Some of them have only sticker while others feature a sticker on both sides. Have fun with this craft, and make as many stickers in as many different Easter shapes as you would like!
If you tried this craft, let us know in the comments below! We would love to see pictures of the stickers you made and to hear from you about your ideas!
This article will provide a step-by-step guide on how to create DIY Easter stickers for decorating eggs.
The article will include detailed information on materials needed, the process of creating the stickers, and tips for successful egg decorating.
Key findings will cover materials needed, process of creating stickers, tips for successful egg decorating, real-world use cases, and examples of the topic in action.
As DIY projects continue to gain popularity, creating personalized decorations for holidays like Easter has become a fun and rewarding activity. In this article, we will explore how to make DIY Easter stickers for decorating eggs, providing a detailed guide on materials needed, the sticker-making process, and tips for successful egg decorating. Whether you're looking to add a personal touch to your Easter decorations or simply enjoy crafting, this article will help you create beautiful and unique Easter eggs with homemade stickers.
Detailed Information and Supporting Headings:
Materials Needed
When creating DIY Easter stickers for egg decorating, you will need a few key materials. These include sticker paper, markers or colored pencils, scissors, and any additional embellishments you may want to use. Sticker paper can be found at most craft stores or online retailers, and it is available in various sizes and finishes. If you're on a budget, you can also use regular paper and glue to create your stickers.
Process of Creating Easter Stickers
To create Easter stickers for decorating eggs, start by sketching out your designs on the sticker paper using markers or colored pencils. Once you are satisfied with your designs, carefully cut them out using scissors. Make sure to leave a small border around each sticker to help it adhere better to the egg. To ensure the stickers stick properly, gently press them onto the egg and smooth out any air bubbles.
Tips for Successful Egg Decorating
For successful egg decorating with DIY stickers, consider experimenting with different techniques. You can try layering stickers to create a more intricate design or using multiple colors to add depth to your decorations. To preserve your decorated eggs for longer periods, store them in a cool, dry place away from direct sunlight. You can also coat the stickers with a layer of clear nail polish to help protect them from smudging or fading.
Additional Tips for Egg Decorating
When decorating eggs with DIY stickers, it's important to choose eggs with smooth surfaces to ensure the stickers adhere properly. If you're having trouble getting the stickers to stick, try wiping the egg with a damp cloth before applying them. Additionally, consider using a small paintbrush to apply a thin layer of glue to the back of the stickers for extra adhesion. This will help prevent the stickers from peeling off prematurely.
Who Can Benefit from This Product
DIY Easter stickers for egg decorating are perfect for:
Families looking for a fun and creative activity to do together during the Easter holiday.
Crafters who enjoy making personalized decorations for special occasions.
Individuals who want to add a unique touch to their Easter celebrations.
Teachers or educators looking for a hands-on craft project for their students.
Anyone interested in exploring their creativity and trying out new crafting techniques.
When to Utilize This Product
You can use DIY Easter stickers for egg decorating:
During the Easter holiday season to add a festive touch to your decorations.
As a fun and engaging activity for kids and adults alike to enjoy together.
For creating personalized gifts or party favors for Easter gatherings.
As a creative way to explore different design techniques and experiment with crafting materials.
Anytime you want to add a personal and handmade element to your Easter celebrations.
Examples of How to Use This Product
Here are some use case examples for DIY Easter stickers:
Decorating Other Holiday Decorations
Creating Easter-themed greeting cards or gift tags using the stickers.
Adding stickers to Easter baskets or party favors for a personalized touch.
Decorating Easter-themed crafts or DIY projects with the stickers.
Adapting the Sticker-Making Process
Using the same technique to create stickers for other holidays or special occasions.
Applying stickers to different surfaces such as plastic eggs, glass ornaments, or wooden decorations.
Experimenting with different designs and materials to create unique and custom stickers for various projects.
What Sets Our Product Apart
Our DIY Easter stickers for egg decorating stand out from the rest due to their versatility and ease of use. The materials needed are readily available and affordable, making it accessible to a wide range of crafters. Additionally, our step-by-step guide provides clear instructions for creating beautiful and unique stickers that adhere well to eggs. The tips for successful egg decorating ensure that your creations last longer and look stunning. With our product, you can unleash your creativity and add a personal touch to your Easter decorations effortlessly.
Various Ways to Use Our Product
There are numerous ways to utilize our DIY Easter stickers for egg decorating beyond just decorating eggs. You can use the stickers to create personalized greeting cards, gift tags, or even decorate Easter baskets. The stickers can also be applied to other surfaces like plastic or glass to add a festive touch to your home decor. With a little creativity, you can adapt the sticker-making process to suit different projects and occasions, making our product a versatile and fun crafting tool.
Tips for Maximizing Your Crafting Experience
Experiment with Different Designs
Don't be afraid to get creative and try out various designs when making your DIY Easter stickers. Mix and match colors, shapes, and patterns to create unique and eye-catching stickers for your eggs.
Personalize Your Creations
Add a personal touch to your Easter decorations by incorporating elements that are meaningful to you or your loved ones. Whether it's initials, favorite colors, or special symbols, personalized stickers can make your creations even more special.
Share Your Creations
Show off your DIY Easter stickers and decorated eggs by sharing them with friends and family. You can also join online crafting communities or social media groups to connect with other crafters and get inspired by their creations.
Bringing Your Easter Eggs to Life
Creating DIY Easter stickers for egg decorating is a fun and rewarding activity that allows you to add a personal touch to your holiday decorations. By following the step-by-step guide provided in this article, you can design and create unique stickers to adorn your Easter eggs. From materials needed to tips for successful egg decorating, this article covers everything you need to know to make your Easter eggs stand out. So gather your supplies, unleash your creativity, and bring your Easter eggs to life with homemade stickers!