The holiday season has been upon us now for a month or so and the last few holidays of 2016 are quickly approaching. Well, you know what that means: the inevitable wrapping paper marathon sessions are soon to come. We know all too well at JAM about wrapping paper and such. I mean, have you checked out our collection?! We also know that wrapping paper versatility extends way farther than just presents and boxes. But even when you use some festive wrapping paper, sometimes you still need to add a little…somethin’ somethin’. Or maybe, you just want to make it your own and add a personal touch to that gift bag or box. Well, we’ve got the perfect thing for you! These DIY Paper Cocktail Napkin Poinsettias!
Okay, okay, I know what you’re thinking. “Just another thing I have to add to my long list of things to do before Christmas Eve arrives!” But trust me when I say…these literally take two minutes, tops. After the first 2 attempts, I got the hang of these and busted out a bunch of them. And, the best part: these are made of our favorite cocktail napkins so when you’re done and have extra napkins, throw them on your Christmas dinner table for a pop of festive color, as well as easy clean up. It literally can’t get better than this!
Let’s get started! First off, let’s get some supplies.
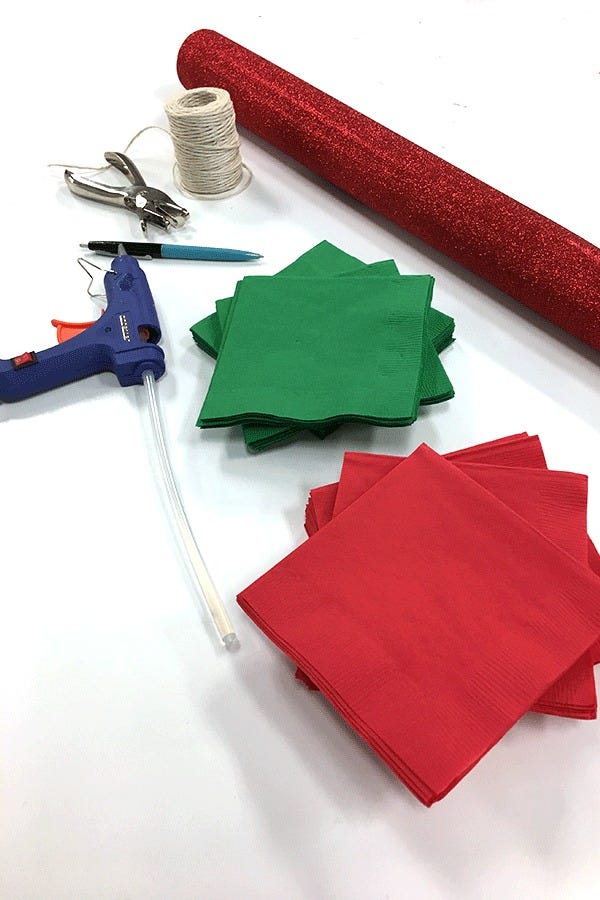
Supplies
JAM Red Small Beverage Napkins
JAM Green Small Beverage Napkins
JAM Kraft Twine
JAM Red Glitter Wrapping Paper
Hot Glue
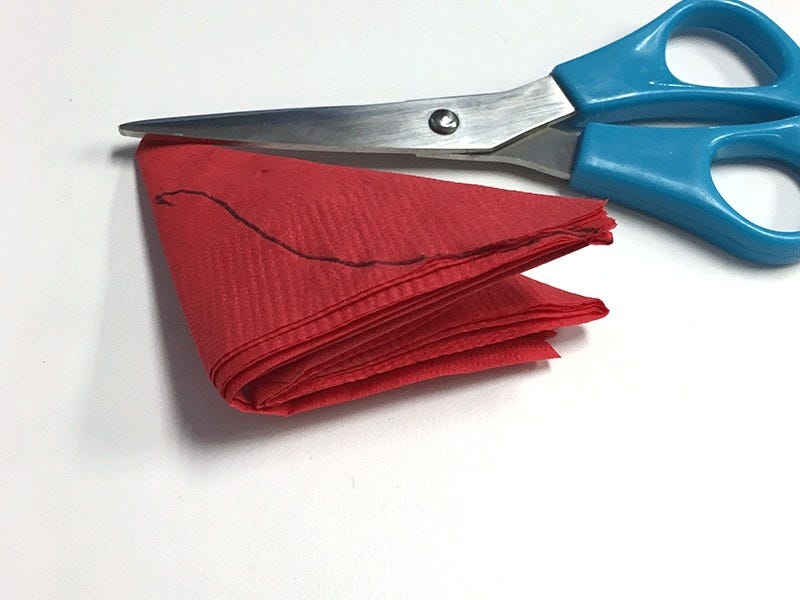
Step 1
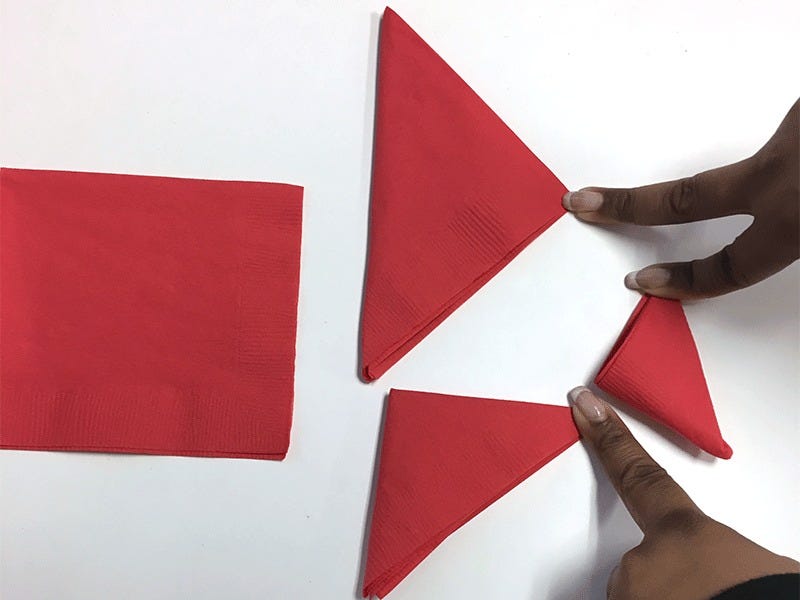
Fold your red napkin into a triangle three times.
Step 2
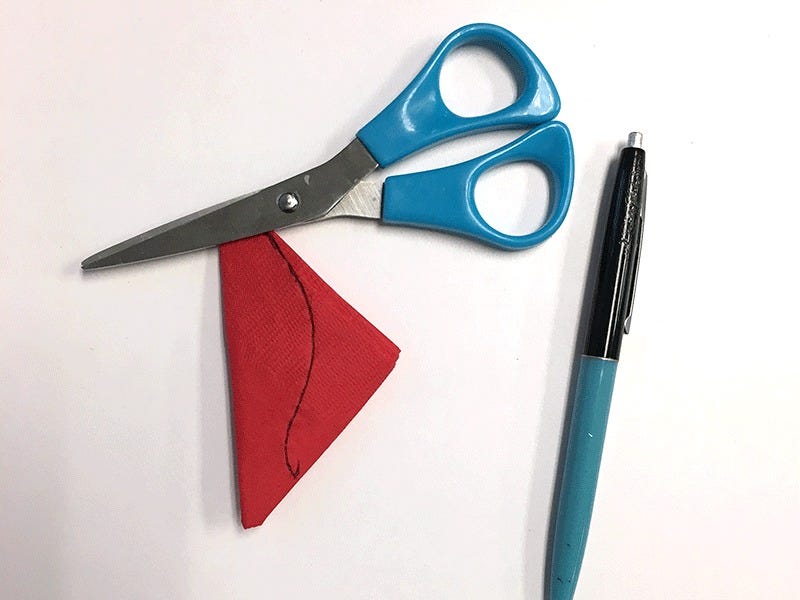
Draw a petal shape onto the napkin.
Tip—The center of your flower will be at the closed edge and the tips of your petals will be the opened edge with layers. Figuring this part out took me a few tries, but once I got it, it was smooth sailing from there.
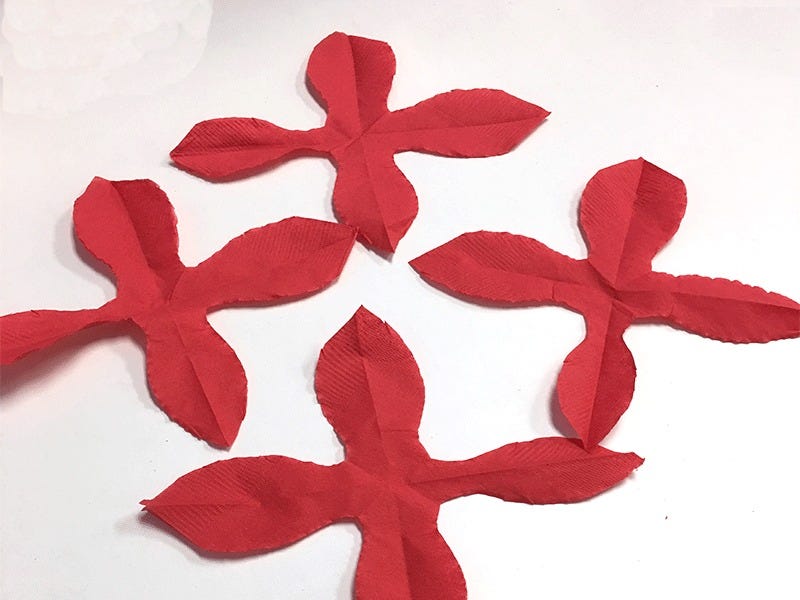
Step 3
Cut out the petals and open the napkin. Peel the layers apart. You should have four flower shapes.
Step 4
Stack up each petal into a pile and rotate them so all the tips are (mostly) showing. This doesn’t have to be totally perfect!
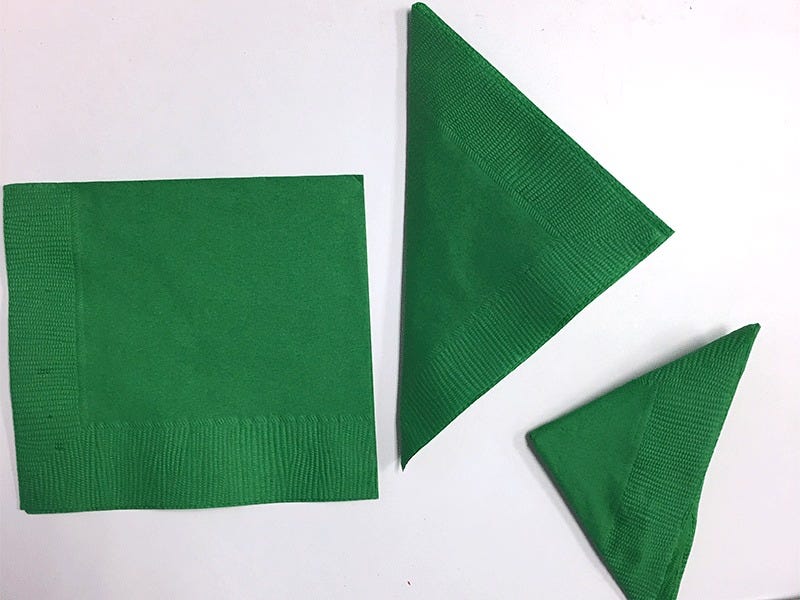
Step 5
Take your green napkins and fold it into two triangles this time around
Step 6
Again, draw your leaf shape on the napkin, orienting it in the same way you did the petals (follow the tip in step 2).
Cut the leaves out.
You will now have four sections of two leaves. Just as you did the petals, layer these so all the leaves are showing.
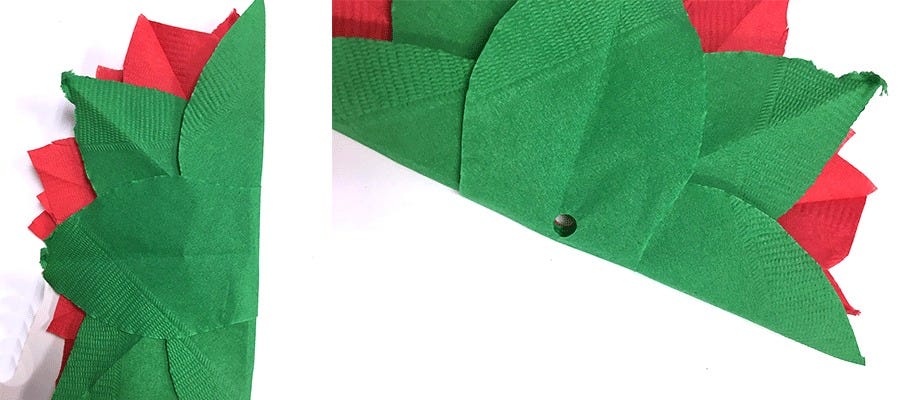
Step 7
Stack these under the petals and arrange in a way that is pleasing to the eye, where you can see the leaves poking through the petals.
Step 8
Fold the pile in half and use a hole puncher to create a hole in the middle. String a length of twine through the hole and tie tightly. I used probably around 12 inches of twine for each.
Step 9
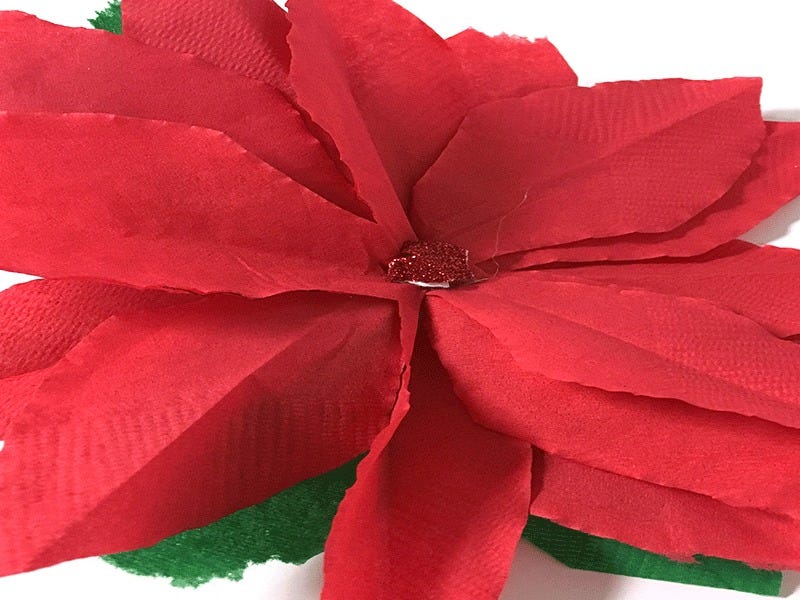
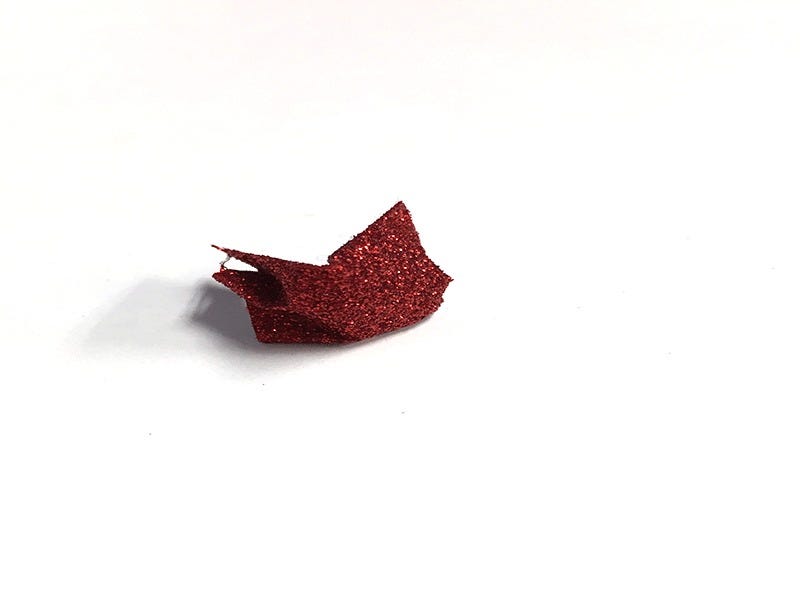
Last step, I promise! Take some of the Glitter Wrapping Paper, cut a small piece and crumple it up into a ball, with the glitter showing as much as you can. Hot glue this in the center of the flower.
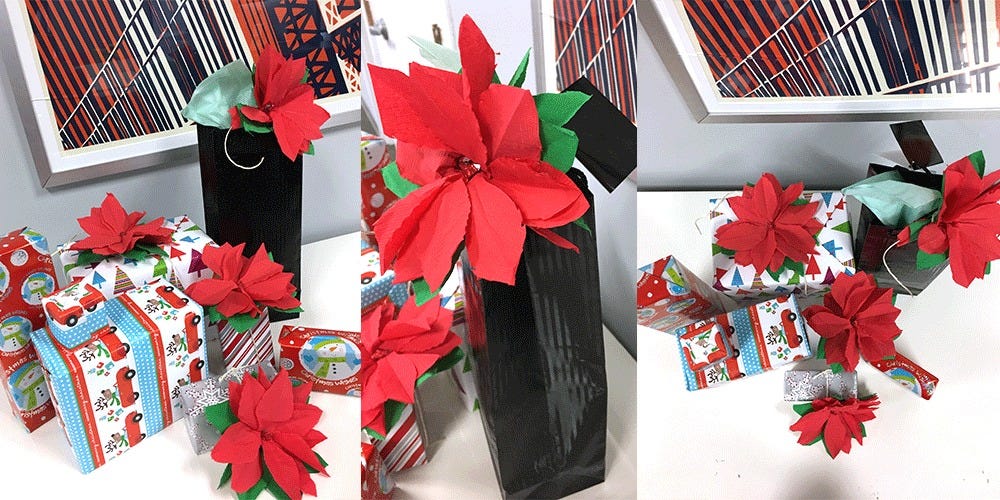
Lastly, just attach your beautiful DIY Paper Cocktail Napkin Poinsettias to any gift! Tie it to bags or boxes to make any gift look beautiful! Or, you can get really creative and make a cute hair embellishment! No matter what you use these for, your personality will shine and anyone will get into the holiday spirit! Enjoy your DIY Paper Cocktail Napkin Poinsettias :)
This article will provide a step-by-step guide on how to create stunning poinsettias using cocktail napkins, perfect for holiday decor.
Poinsettias are a classic symbol of the holiday season, known for their vibrant red color and festive appearance. In this article, we will explore a fun and creative DIY project using paper napkins to create beautiful poinsettias for your holiday decor. Whether you're looking to add a personal touch to your home decorations or create unique gifts for loved ones, this step-by-step guide will walk you through the process of making stunning poinsettias with just a few simple materials. Get ready to unleash your creativity and bring the holiday spirit to life with these DIY paper napkin poinsettias!
Materials Needed
Before starting the DIY project, gather the following materials: cocktail napkins in various colors, scissors, glue, green pipe cleaners, and a pencil. The cocktail napkins will serve as the petals of the poinsettia, while the green pipe cleaners will be used as the stem. The scissors will be used to cut and shape the napkins, and the glue will help assemble the flower.
Step-By-Step Instructions
Begin by laying out a cocktail napkin flat on a surface. Fold the napkin in half diagonally to form a triangle, then fold it in half again to create a smaller triangle. Repeat this process with additional napkins in different colors to create layers for the poinsettia petals. Use scissors to cut small slits along the folded edges of the napkin, being careful not to cut all the way through. Open up the napkin to reveal the intricate design of the petals.
Assembly Process
Once you have all the petals ready, stack them on top of each other in alternating colors to create a layered effect. Secure the petals together at the center with a dab of glue. Take a green pipe cleaner and twist it around the base of the petals to create the stem of the poinsettia. Gently fluff and shape the petals to give the flower a full and realistic appearance.
Additional Tips and Tricks
To enhance the look of your paper napkin poinsettias, consider adding glitter or metallic paint to the edges of the petals for a touch of sparkle. You can also experiment with different napkin sizes and colors to create a variety of poinsettia designs. If you encounter any issues during the assembly process, such as petals tearing or not staying in place, use a small amount of glue to reinforce the connections and hold everything together securely.
Who Should Try This Project
Whether you're a seasoned crafter looking for a new holiday project or a beginner wanting to add a personal touch to your decorations, this DIY paper napkin poinsettia project is perfect for:
DIY enthusiasts who enjoy creating unique decor pieces
Individuals looking for budget-friendly holiday decoration ideas
Parents or teachers seeking a fun and easy craft project for kids
Anyone wanting to add a handmade touch to their holiday gifts
Those who appreciate the beauty of poinsettias and want to incorporate them into their decor
When to Create Paper Napkin Poinsettias
There are many occasions and settings where creating paper napkin poinsettias can add a festive touch to your decor. Consider making these beautiful flowers:
During the holiday season to decorate your home or office
As a fun and creative activity for a holiday party or gathering
For a DIY gift to give to friends, family, or coworkers
As a craft project for kids during winter break or snow days
To add a touch of elegance to your holiday table setting or centerpiece
Creative Ways to Use Paper Napkin Poinsettias
Once you've created your paper napkin poinsettias, there are endless possibilities for incorporating them into your holiday decor. Try these creative ideas:
Create a festive wreath by attaching the poinsettias to a wire frame
Use the poinsettias as gift toppers for presents or gift bags
Arrange the flowers in a vase or mason jar for a simple yet elegant centerpiece
Attach the poinsettias to a garland or string to create a festive banner
Decorate your holiday tree with mini paper napkin poinsettias as ornaments
What Sets Our Product Apart
Our DIY paper napkin poinsettias stand out from other holiday decor projects due to their simplicity and elegance. The use of everyday materials like cocktail napkins and pipe cleaners makes this project accessible to crafters of all skill levels. Additionally, the versatility of the poinsettias allows for endless customization and creativity, making each flower unique and special. The detailed instructions provided ensure a smooth and enjoyable crafting experience, resulting in stunning poinsettias that will impress friends and family. With our product, you can bring the beauty of the holiday season into your home with a personal touch.
Various Ways to Utilize Paper Napkin Poinsettias
One of the most popular ways to use paper napkin poinsettias is as table centerpieces for holiday gatherings. Arrange a cluster of poinsettias in the center of your dining table or sideboard for a festive and eye-catching display. You can mix and match different colors and sizes of poinsettias to create a dynamic centerpiece that complements your decor.
Another creative use for paper napkin poinsettias is to incorporate them into a holiday wreath. Attach the poinsettias to a wire wreath frame using hot glue or floral wire, interspersing them with greenery or other embellishments for a full and festive look. Hang the wreath on your front door or above your fireplace to welcome guests with a touch of holiday cheer.
Make your holiday gifts extra special by using paper napkin poinsettias as unique gift toppers. Attach a poinsettia to the top of a wrapped present or gift bag using double-sided tape or a small dab of glue. The recipient will appreciate the handmade touch and attention to detail, making their gift even more memorable.
Tips for Maximizing Your Experience with Our Product
Don't be afraid to get creative with your paper napkin poinsettias by using different colors and patterns of cocktail napkins. Mix and match shades of red, green, and white to create a vibrant and visually appealing bouquet of flowers. You can also try using patterned napkins for a unique and whimsical look that will stand out in your holiday decor.
Think outside the box when it comes to displaying your paper napkin poinsettias. Consider attaching them to a ribbon and hanging them from your chandelier or light fixtures for a festive and unexpected touch. You can also scatter the poinsettias on your mantel or bookshelves for a pop of color and texture throughout your home.
Spread holiday cheer by sharing your paper napkin poinsettias with friends, family, and neighbors. Consider hosting a crafting party where guests can make their own poinsettias to take home as a keepsake. You can also gift the poinsettias as a thoughtful gesture to brighten someone's day and spread joy during the holiday season.
Bringing Holiday Cheer with DIY Paper Napkin Poinsettias
In conclusion, this article has provided a comprehensive guide on how to create stunning poinsettias using cocktail napkins for your holiday decor. From the materials needed to step-by-step instructions, assembly process, and additional tips and tricks, we have covered everything you need to know to create beautiful paper napkin poinsettias. Real world use cases and examples have shown how versatile and impactful these DIY flowers can be in holiday decorations. So, unleash your creativity, try out this DIY project, and bring the holiday spirit to life with your own handmade paper napkin poinsettias!