


4 Steps to Impress Your Guests: DIY Card Box Banner
- By Rhianna Marie
- Aug 17, 2023
Are you planning a bridal shower, wedding, baby shower, engagement party, or special event and looking to add personalized touches to elevate the ambience and decor? This custom “Cards” banner will do just that. An unforgettable DIY project your loved ones and yourself will absolutely be delighted to see!
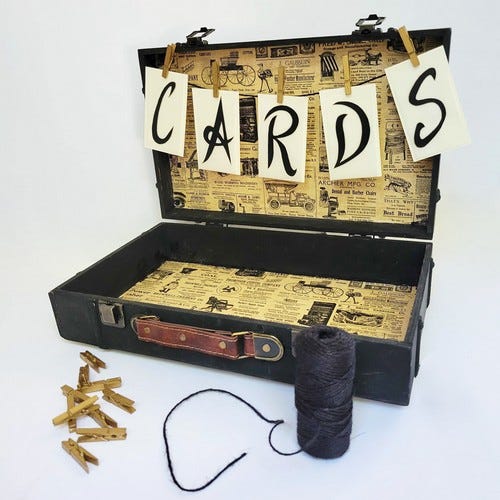
Follow this easy 4-Step photo guide to craft your very own “Cards” banner for your gift table. Get ready to impress your guests and make your party truly one-of-a-kind!
Materials
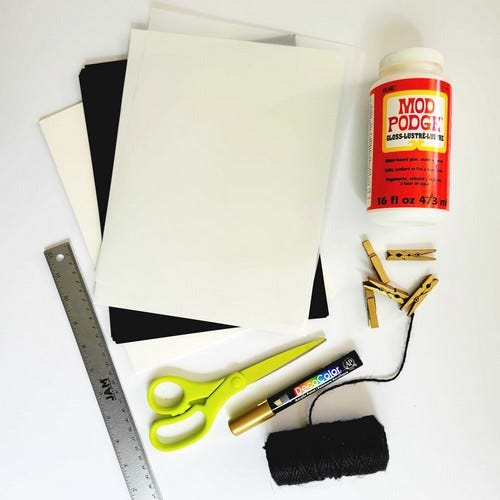
Twine or ribbon
Stencils or printed templates for the letters
Pencil
Glue, Mod Podge, or double-sided tape
Click the materials linked above, to find all your stationerary needs for this craft project on www.JAMpaper.com.
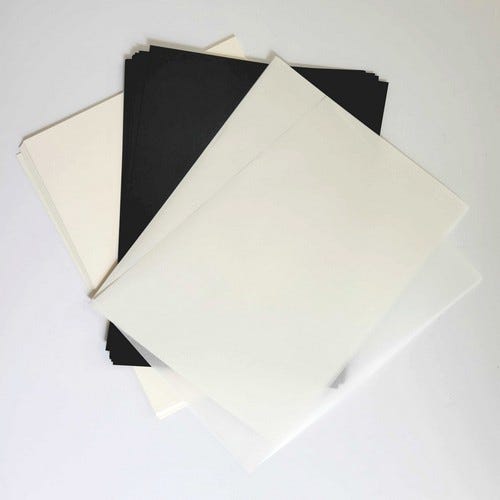
1. Choose Your Colors
Start by deciding which cardstock colors you want to use for this project. You will need a background color and a text color. We went with ivory cardstock for the base and black cardstock for the letters. Depending on the theme of your party, choose colors that complement the overall appearance best.
And you will need translucent paper as the third stationery material for this project.
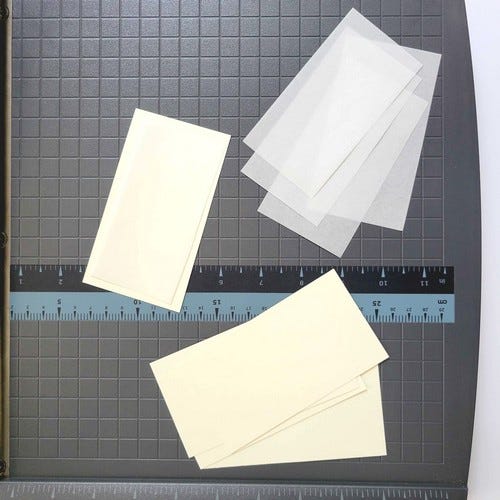
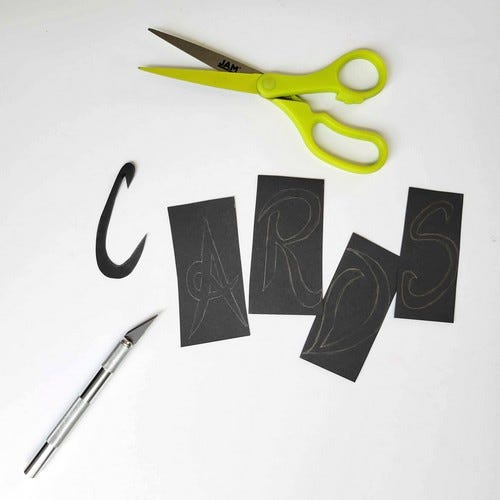
2. Measure & Cut
Cut out 5 rectangular pieces that will roughly fit within your card box display in your background color cardstock. Adjust and trim the length and width to your personal liking.
Little Advice: Start with your rectangular cutouts being a bit on the larger side. You can cut them smaller but not bigger.
Trace one of the rectangular cutouts onto your translucent paper. Trim a bit from the top and a little on one side to make these cutouts a bit smaller than our background pieces. Now, trace and cut out four more of those smaller rectangles.
3. Create the Letters
Using stencils, printed templates, or free-handing, trace each individual letter on your chosen cardstock. You can customize the size and font style of the letters to match your event's aesthetic. Try a few styles and see what you like best if you are unsure.
Tip: You will want your letters to fit onto your translucent paper cutouts.
Carefully cut out each letter. This step may require some precision, especially if you have an intricate font. Take your time and be patient.
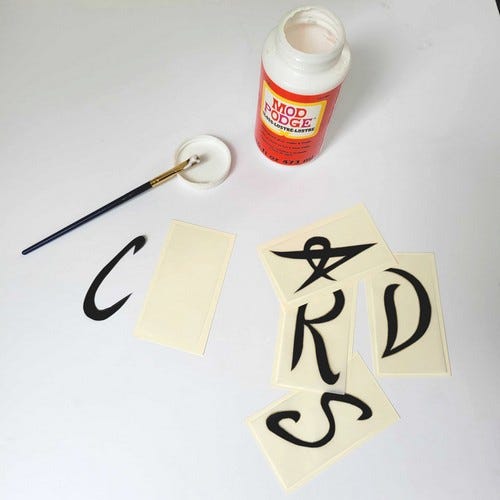
4. Assemble
Now, time to assemble the banner. Glue each individual letter to your cutout pieces of translucent paper. Let dry.
Next, glue a small strip on the upper back of the translucent paper and adhere to the background pieces.
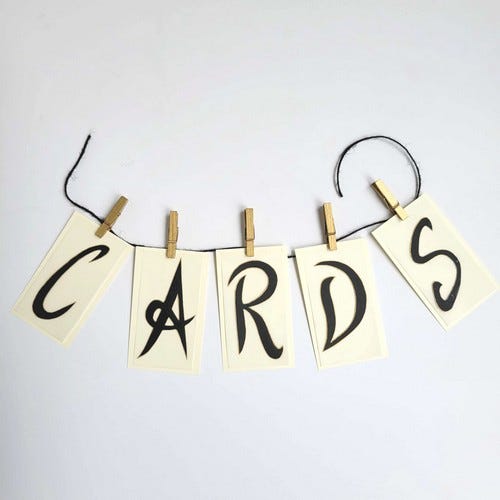
Clip each letter using the wood clothing pins to your kraft twine and hang to your chosen card box or gift table.

Personalization Ideas
Add a touch of sparkle with gems or glitter.
Attach small, artificial flowers or greenery to the corners of the banner for a floral accent.
Consider calligraphy to handwrite the letters for a vintage touch.
If you have a theme or motif for your event, integrate it into the banner's design and colors to have a cohesive look with the party.
Creating a banner for your card box is a fantastic way to add a personal and charming element to your special day. With just a few materials and a dash of creativity, you can craft a unique DIY “Cards” banner that perfectly complements your event. This simple and cute touch will impress your guests and be a cherished keepsake from your unforgettable celebration that will last a lifetime!
Head to www.JAMpaper.com for all your stationery needs and more for this DIY project.
Impress Your Guests with a DIY Card Box Banner
Are you looking for a creative way to impress your guests at your next event? Look no further than a DIY card box banner! This unique and personalized touch will add a special flair to any occasion, whether it's a wedding, birthday party, or baby shower. By following just four simple steps, you can create a stunning and memorable card box banner that will leave a lasting impression on your guests.
What It Is
A DIY card box banner is a decorative and functional piece that serves as a stylish way to collect cards and well wishes from your guests. It typically consists of a banner or sign that is adorned with decorative elements and a designated slot or box for guests to place their cards. This allows you to keep all your cards in one place while adding a personalized touch to your event decor.
Benefits
One of the main benefits of a DIY card box banner is its versatility. It can be customized to match any theme or color scheme, making it suitable for a wide range of events. Additionally, it provides a designated and secure location for guests to place their cards, ensuring that they won't get lost or misplaced during the event.
Use Cases
A DIY card box banner is perfect for weddings, where it can be personalized with the couple's names and wedding date. It's also great for birthday parties, baby showers, and other special occasions where guests may want to offer their well wishes and gifts in the form of cards.
Alternatives
If you're looking for an alternative to a DIY card box banner, consider using a decorative mailbox, vintage suitcase, or ornate birdcage to collect cards from your guests. These options can also be personalized and decorated to suit your event's theme.
Tips for Using
When creating your DIY card box banner, consider using high-quality materials and incorporating elements that reflect the theme of your event. Additionally, make sure to place the card box banner in a visible and accessible location so that guests can easily find it and deposit their cards.
Additional Considerations
For added flair, consider adding embellishments such as flowers, ribbons, or personalized signage to your DIY card box banner. This will further enhance its visual appeal and make it a standout feature at your event.