Did you know that having plants on your desk at work can increase productivity up to 15%? That’s a pretty big percentage…especially towards the end of the week. I don’t know about you, but when 3 p.m. on Friday rolls around, I need as much motivation as possible to make it to 5 o’clock. So, if something as easy as having some plants on my desk would supposedly help do the trick, why wouldn’t I try it out?
Well, I can give you one reason. I have a very not green thumb. I can’t keep a plant alive if it killed me. And trust me, I’ve tried and lost a lot of plants in the process. RIP, my foliage friends. But after reading that statistic, I knew I needed some greenery in my life at work.
So, I did what the internet told me to do: I bought a cute little succulent plant. Apparently, they don’t need to be watered and can adapt to artificial lighting. So obviously, those beautiful florescent lights in the office were the perfect replacement to actual sunshine. Well, after a few weeks, I noticed the thing going limp and leaves starting to dry up and fall off. Really? I was literally killing a plant that was supposedly un-killable.
Well, I started watering it occasionally and that seemed to do the trick but, sorry I didn’t sign up for responsibilities when I got this seemingly self-sufficient succulent. Some people call me lazy – I call it efficient – but regardless of which side you’re on, I wanted to have a plant that I could reap the productivity rewards from, yet have to do nothing to try to keep it alive.
Spurred by my lazy (read: efficient) ways, I decided to make some of those succulents out of….PAPER. You didn’t see that coming did you?
These paper succulents require a bit of drawing, some shapes of which we were inspired by The House That Lars Built. And others, we are excited to announce, are our own creations!
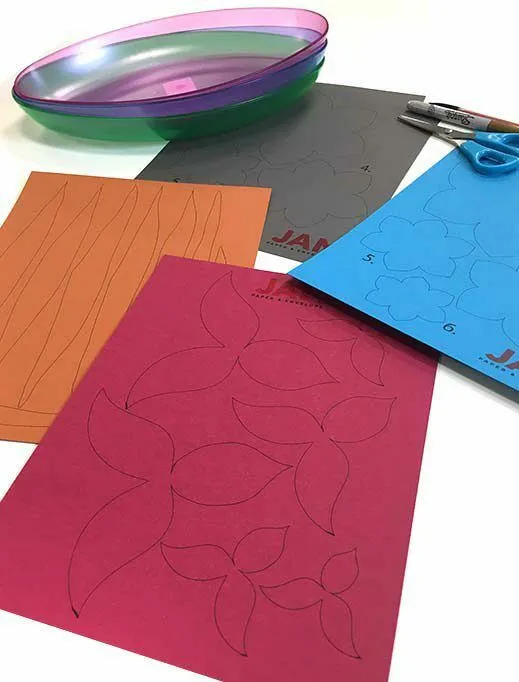
The directions for these are super simple: Draw, cut, curl, glue, display. And the supply list is even simpler: JAM Card stock! Well, and a few more things but check out the list here:
Supplies
1. Leaf Templates (Which you can replicate the image above)
2. JAM Card stock, in various colors
3. JAM Kraft Wrapping Paper
4. Hot glue gun
5. Small dish or pot
6.Pencil
7.Sharpie
Steps:
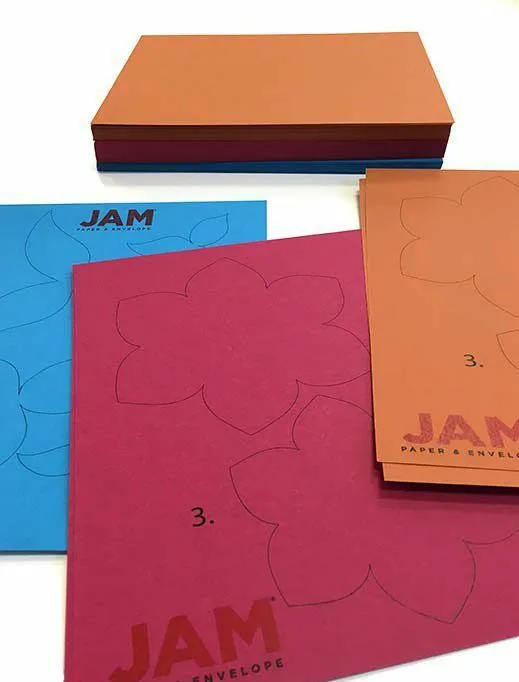
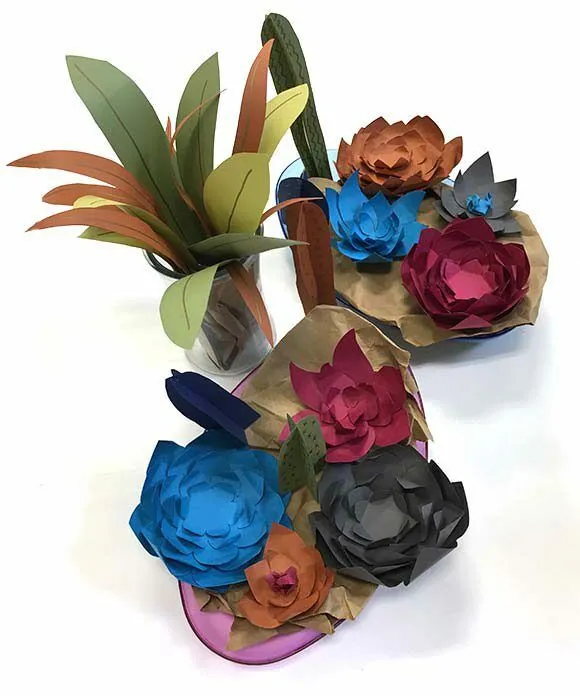
Draw out the leaf shapes on colored cardstock. We chose a variety of our awesome Cardstock in various colors. We used Presidential Blue, Olive Green, Peacock Blue, Dark Orange Base, Dark Grey Base, Bakri Raspberry, and Chartreuse.
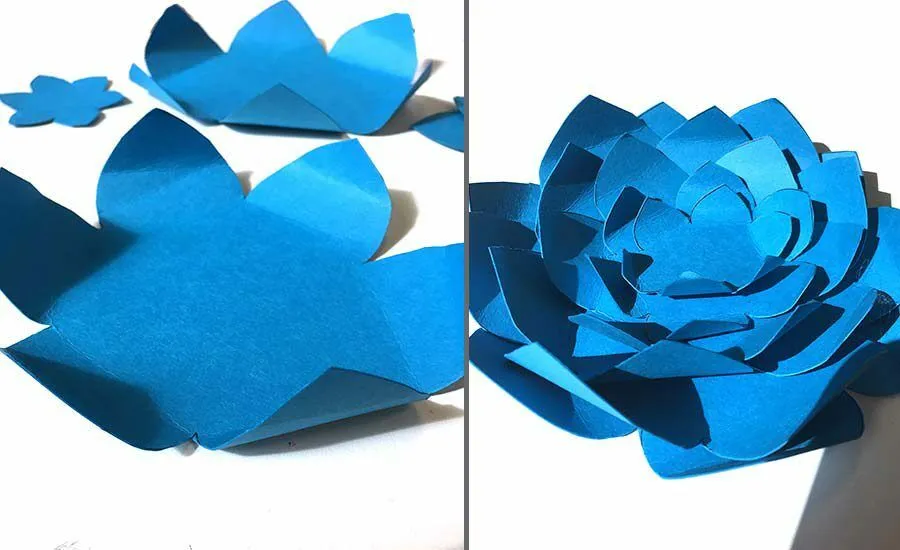
The flower-y succulents all have the same assembly directions. After you cut out your shapes, use your fingers or the edge of a scissor to gently curl your card stock and then glue the pieces in descending size order together, like so:
The cactus shapes are slightly different, but still easy to do. Once you cut the shapes, cut along the line on the template that dissects the middle of the paper. This will create a slit. If you want to, decorate using a Sharpie marker, Assemble the two pieces together and use a bit of hot glue to secure them together. Done.
The leaf ones are the easiest of the bunch to make. Cut, decorate if desired, and stick them in a vessel. Boom. Foliage goals achieved.
When all of your succulents are assembled, it's time to arrange them! We bought low, flat serving platters from the dollar store to display the plants. You can line the plates or pots that you use with anything from paper to rice. I saw a bunch of different options online such as pebbles, moss, rice, dirt, and more. We got creative and used what we had on hand: paper, duh. Kraft Wrapping Paper to be precise.
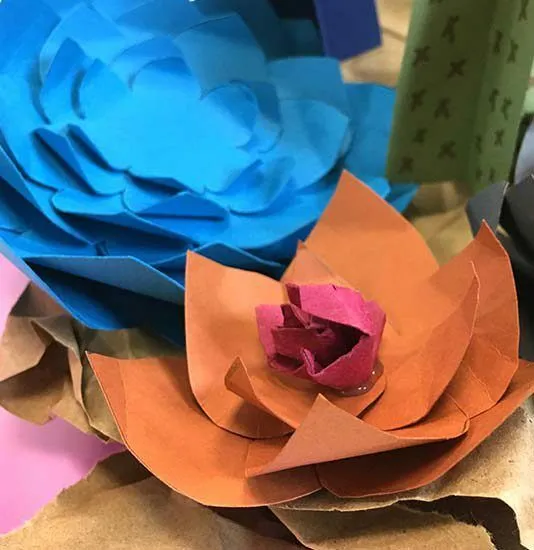
I am so happy with the way these turned out! The bright colors are uplifting for those dreary office days, they still have that cute factor that all succulents seem to have, and the biggest bonus: I have to water zero things or worry about taking a life. A plant life that is. Check out some close ups of these beauties:
I love Bakri Raspberry and Peacock Blue flowers the best. The colors are so vibrant and beautiful and really standout against the Kraft paper and the other succulents!
For the middle of this orange flower and the grey one in the other dish, I simply crushed a small piece of paper and glued it in the middle. Easy peasy.
Beautiful right? And they aren't only for desks or for people who are totally inept at gardening. These would make a beautiful centerpiece at a party, are great to keep on the windowsill in the kitchen, or are absolutely perfect for people with plant allergies! Take a stab at making some of these and tag us on social media so we can see your creations! Follow us on Facebook, Instagram, Twitter and Pinterest!
In love with the real thing? Don't forget to check out Groom + Style's awesome article on 12 Air Purifying Plants That Will Clean Your Air! Choose a favorite and comment! Ours is the umbrella tree!
Paper succulents are a popular DIY craft that allows you to create realistic-looking plants out of paper.
This article will provide a step-by-step guide on how to make paper succulents, perfect for adding a touch of nature to your home decor.
Paper succulents have become a rising trend in the crafting community, offering a cost-effective and low-maintenance way to add a touch of nature to your home decor. In this article, we will provide a detailed guide on how to make paper succulents, including the materials needed, step-by-step instructions, tips and tricks for creating realistic-looking plants, variations for customization, and real-world use cases. Whether you're a seasoned crafter or new to DIY projects, making paper succulents is a fun and creative way to bring the beauty of nature indoors.
Materials Needed
Before you begin making paper succulents, gather the necessary materials. You will need colored paper in various shades to mimic the colors of real succulents. Scissors are essential for cutting out the shapes of the leaves and petals. Glue or adhesive is necessary for assembling the succulent pieces together. Additionally, you may want to use templates to help guide you in cutting out the shapes accurately.
Step-by-Step Instructions
1.
Cutting and shaping the paper
- Start by cutting out the shapes of the succulent leaves and petals from the colored paper. Use templates or freehand cutting to create a variety of shapes and sizes for a realistic look.2.
Assembling the succulent
- Once you have all the pieces cut out, begin assembling the succulent by layering the leaves and petals together. Use glue to secure the pieces in place, building up the succulent shape.3.
Adding details and finishing touches
- To add realism to your paper succulent, consider adding details such as texture or shading. You can use a pencil to create veins on the leaves or add darker shades to mimic shadows.
Tips and Tricks
Creating realistic-looking paper succulents requires attention to detail. One tip is to use different shades of paper to mimic the natural variations in succulent colors. You can also add texture to the paper by crumpling it slightly before shaping the leaves. Experiment with different shapes and sizes to create a variety of succulent types for a more dynamic display.
Variations and Customization
If you want to personalize your paper succulents, consider customizing them with unique touches. You can change the size or shape of the leaves to create different succulent varieties. Try mixing and matching colors to create a vibrant display, or add glitter for a touch of sparkle. The possibilities for customization are endless, so let your creativity guide you in making your paper succulents truly unique.
Who Should Make Paper Succulents
Creating paper succulents is a perfect DIY craft for:
Crafters looking for a new project
Home decor enthusiasts wanting to add a touch of nature
People who enjoy working with paper and crafting
Individuals looking for cost-effective decor options
Those seeking low-maintenance plant alternatives
When to Create Paper Succulents
You can make paper succulents for various occasions and reasons:
As a fun weekend DIY project
To add a natural element to your home decor
For a creative gift idea for friends or family
As a relaxing and therapeutic crafting activity
To personalize your space with unique decor accents
Use Case Scenarios for Paper Succulents
There are many ways to incorporate paper succulents into your home decor:
Wall Art Display
Create a gallery wall with a mix of paper succulents and frames
Arrange the succulents in a visually appealing pattern or design
Use different sizes and shapes to add depth and interest to the display
Combine paper succulents with other wall art pieces for a cohesive look
Change up the arrangement seasonally for a fresh look
Table Centerpiece
Arrange paper succulents in a decorative bowl or tray for a centerpiece
Mix in other elements like candles or decorative rocks for added interest
Place the centerpiece on a dining table, coffee table, or mantel
Customize the succulents to match your existing decor or color scheme
Switch out the succulents for different seasons or occasions
What Sets Our Paper Succulents Apart
Our paper succulents stand out from the rest due to their realistic appearance and attention to detail. Each succulent is carefully crafted to mimic the natural beauty of real plants, making them a stunning addition to any home decor. The use of high-quality colored paper and precise cutting techniques ensures that our paper succulents look lifelike and vibrant. Whether you're a seasoned crafter or new to DIY projects, our paper succulents offer a fun and creative way to bring the beauty of nature indoors.
Potential Use Cases for Paper Succulents
There are endless possibilities for incorporating paper succulents into your home decor:
Bookshelf Decor
Place paper succulents on bookshelves to add a touch of greenery
Mix in with books and other decorative items for a cohesive look
Choose succulents in varying sizes and shapes for visual interest
Rotate the succulents periodically for a fresh display
Customize the colors to match your bookshelf or room decor
Office Desk Accessories
Add paper succulents to your desk for a pop of color and nature
Place in a small pot or container for a mini succulent garden
Use as a paperweight or decorative accent on your workspace
Mix and match different succulent varieties for a dynamic display
Change up the arrangement to keep your desk decor fresh and inspiring
Maximizing Your Paper Succulent Adventure
To get the most out of your experience with our paper succulents, consider the following tips:
Experiment with Different Shapes
Try cutting out unique shapes for your succulent leaves and petals to create one-of-a-kind designs. Mix and match different shapes to create a diverse succulent collection that adds visual interest to your decor.
Play with Color Combinations
Explore different color combinations for your paper succulents to create a vibrant and eye-catching display. Mix and match shades to mimic the natural variations in succulent colors, or opt for bold and unexpected color pairings for a modern twist.
Display Creatively
Think outside the box when it comes to displaying your paper succulents. Consider placing them in unconventional containers, hanging them on walls, or incorporating them into other decor pieces for a unique and personalized touch.
Bringing Nature Indoors with Paper Succulents
From materials needed to step-by-step instructions, tips and tricks, variations for customization, and real-world use cases, this article has covered everything you need to know about making paper succulents. Whether you're a seasoned crafter or new to DIY projects, creating paper succulents is a fun and creative way to add a touch of nature to your home decor. So grab your colored paper, scissors, and glue, and start crafting your own beautiful paper succulents today!