Making Dessert Garland Banners
- By Andrew Jacobs
- Sep 7, 2016
Making Dessert Garland Banners
The other day I learned a lesson: Don’t scour Pinterest when you’re hungry. Or, maybe, since it resulted in these adorable dessert garland banners, it should be always scour Pinterest when you’re hungry, but that’s up for debate.
These dessert garland banners were inspired by my undying love for donuts, my insatiable hunger, and pining for these sweet treats on a Thursday afternoon. I will travel to the ends of the earth for a good donut, but that just wasn’t feasible that day. So instead of tracking down a donut or ice cream cone, I brought them to JAM. And even though they weren’t as good as the real thing, it took my mind off of ripping into a delicious donut for a little while. Key words: a little while. Before I finished we were already contemplating bringing in donuts and cupcakes for pictures…but let’s be real it was more for us to eat then to get some good pictures of.
Anyways, I digress. These strands of garland seriously look good enough to eat and are quick, easy and fun to make! Use them for birthday parties or themed get-togethers. I mean, how much fun would it be to host a donut party or an ice cream bar? Or you can just use them to dress up a dessert table at any party! Whatever the occasion, these garlands are festive and fun…and of course tasty looking!
The supplies and directions are super simple and almost the same across the board. The only difference is that the donuts use JAM’s awesome wrapping paper and the other two use cardstock.
Donut Garland

Supplies:
JAM Wrapping Paper
JAM Stardream Metallic Paper in Gold
Bistro Chalk Markers in various bright colors
Glue
Directions:
Trace a large circle on the Stardream Metallic Gold paper. I used a full roll of paper towels. Trace a smaller circle in the center for the hole. I used a toilet paper roll.
Next, on different colors of wrapping paper, draw a circle with wavy edges that is slightly smaller than the base of the donut.
Glue them together and decorate with the Chalk Markers.
Measure out the twine and clip the donuts to the twine with the Mini Clothes Pins. I used different colors and matched them to the colors of the donut frosting but that’s not totally necessary.
Ice Cream Garland
Supplies:
JAM Cardstock in various pastel colors, brown and red
JAM Translucent Vellum Paper in Gold
Bistro Chalk Markers in various bright colors
Directions:
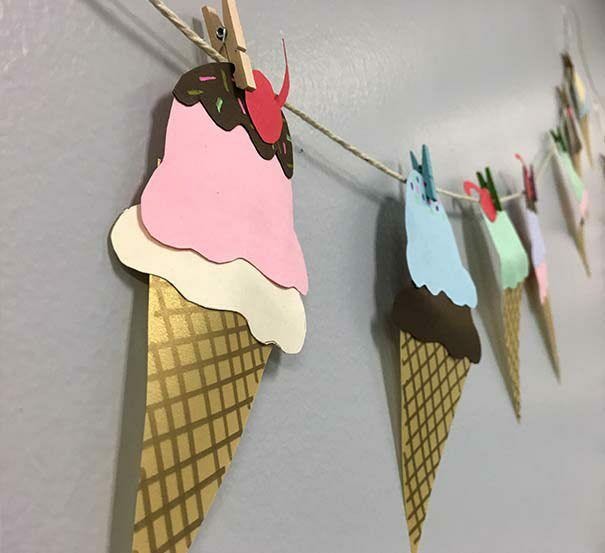
Similarly to the donuts, you’re going to draw each shape onto the appropriate paper or cardstock. I drew a triangle for the cone on the Translucent Vellum Paper and used that to trace more triangles.
On the Pastel and Brown Cardstock, draw the shape of the ice cream and chocolate toppings. Glue these together and then glue them to the cone. If you want, make cherries out the red Cardstock.
Decorate as you please with the Chalk Markers.
Measure the twine and clip the finished cones on with the Mini Clothespins.
Cupcake Garland
Supplies:
JAM Cardstock in various pastel colors
Bistro Chalk Markers in various bright colors
Directions:
The directions for the cupcakes are basically the same as the ice cream cones. I drew the base, drew the top, drew the candles and cut them all out and glued them together. I then decorated them with the markers. It’s really the simplest process ever! Once complete, again, measure the twine and clip them on.
Give these dessert garland banners a shot for your next gathering and get all of your guests drooling over them as if they were the real deal!
Creating Eye-Catching Dessert Garland Banners
When it comes to adding a touch of whimsy and charm to your dessert table, dessert garland banners are the perfect choice. These delightful decorations can be made using a variety of materials, such as paper, fabric, or even felt, and can be customized to suit any theme or color scheme. Whether you're planning a birthday party, baby shower, or wedding reception, dessert garland banners are a simple yet effective way to elevate the look of your dessert display. Not only do they add a pop of color and visual interest, but they also serve as a fun and festive backdrop for photos. Plus, making your own dessert garland banners allows you to unleash your creativity and personalize your event in a unique and memorable way.
The Benefits of Dessert Garland Banners
One of the main benefits of using dessert garland banners is their versatility. They can be hung across the front of a dessert table, draped along the wall behind the table, or even used as a decorative accent on the front of the table itself. Additionally, dessert garland banners are a budget-friendly way to add a touch of elegance to any event. They can be made using inexpensive materials and basic crafting supplies, making them a cost-effective option for those looking to decorate on a budget. Furthermore, dessert garland banners are reusable, allowing you to repurpose them for future events or celebrations.
Use Cases for Dessert Garland Banners
Dessert garland banners can be used in a wide range of settings and events. From children's birthday parties to bridal showers to holiday gatherings, these charming decorations are a versatile addition to any dessert table. They can also be used to add a festive touch to bake sales, charity events, and other special occasions. Additionally, dessert garland banners are a popular choice for professional bakers and event planners looking to enhance the visual appeal of their dessert displays.
Alternatives to Traditional Dessert Garland Banners
While traditional dessert garland banners are typically made from paper or fabric, there are alternative materials that can be used to create unique and eye-catching decorations. For example, you can make dessert garland banners using artificial flowers, pom-poms, or even miniature bunting flags. These alternative materials can add texture and dimension to your dessert table, creating a one-of-a-kind display that is sure to impress your guests.
Tips for Making and Using Dessert Garland Banners
When making dessert garland banners, it's important to consider the overall theme and color scheme of your event. Choose materials and embellishments that complement the rest of your decor to create a cohesive and polished look. Additionally, consider the size and scale of your dessert table when creating your banners. You want them to be visible and impactful without overwhelming the rest of the display. Finally, don't be afraid to get creative and experiment with different shapes, patterns, and designs to make your dessert garland banners truly unique.
Adding a Personal Touch with DIY Dessert Garland Banners
One of the best things about making your own dessert garland banners is the opportunity to infuse your personality and style into your event decor. Whether you're a seasoned crafter or a novice DIY enthusiast, creating custom dessert garland banners allows you to showcase your creativity and attention to detail. By incorporating personal touches such as monograms, custom colors, or themed embellishments, you can make your dessert table truly stand out and leave a lasting impression on your guests.


