The Christmas season is here, and along with it comes the yearly rush to send out and give away holiday cards to your friends and family members. When it comes to Christmas cards, some of us like to go with the old stand-by box sets (JAM offers several lovely options) while others like to take the homemade route. If you are more prone to put yourself into the later category, this post is for you. Those who keep up to date with paper crafting trends are probably familiar with quilling. For those who are not, here is a short explanation. Quilling is the practice of curling ans shaping strips of paper in order to create larger decorative shapes and designs. Here, I will show you how to use quilling to make your own beautiful and decorative Christmas wreath cards! You will need:
One standard quilling tool (A sewing needle will also work.)
Step 1: Cut thin, 11 inch long strips of green paper. These strips should be roughly even in width, but they do not need to be exact.
Step 2:
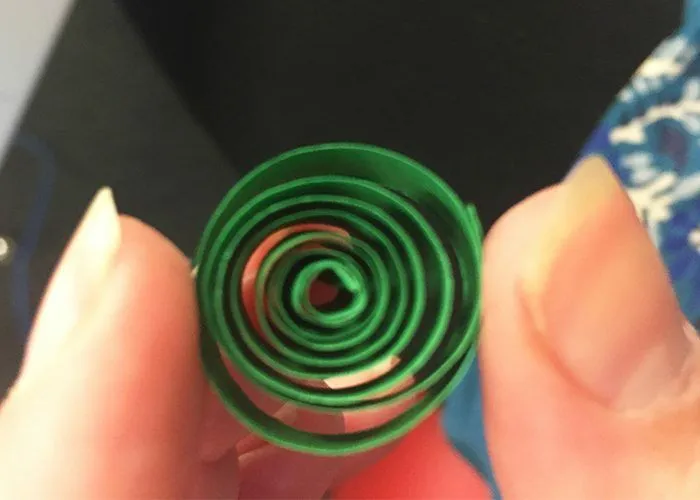
Cut thin, 11 inch long strips of green paper. These strips should be roughly even in width, but they do not need to be exact. -Step 2: Using your quilling tool or needle, roll the first strip of paper into a spiral. After it is fully rolled, remove it from the tool and let it partially unravel. It should look like this.
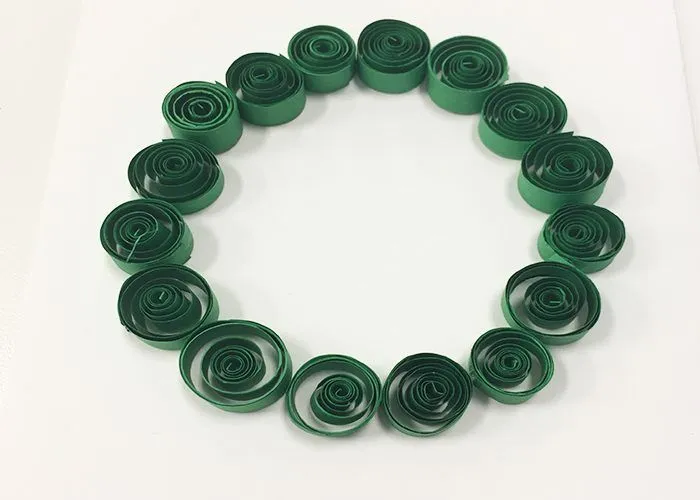
Glue the loose end of the spiral in place with your glue gun. Repeat this step until you have enough green spirals to form a full wreath.
Step 3:
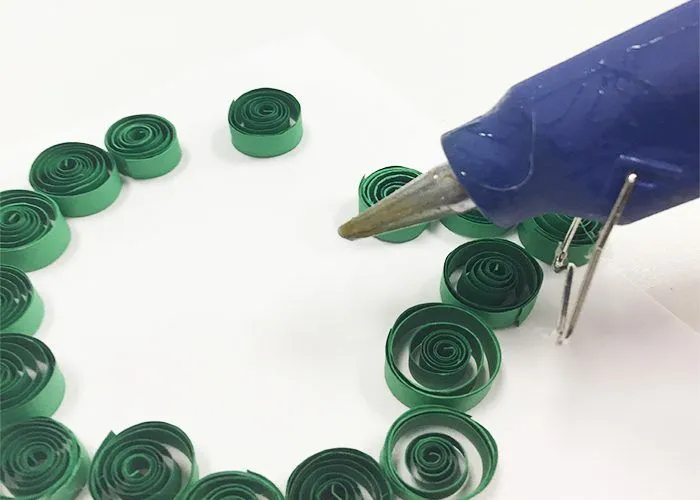
Choose a sheet or paper or card stock to use as the body of your card. For durability, card stock is recommended. Before gluing them in place, lay put your green spirals on your card surface as you would like to appear in your finished product.
After your design has been decided, use your glue gun to glue your wreath together on the card's surface!
Step 4:
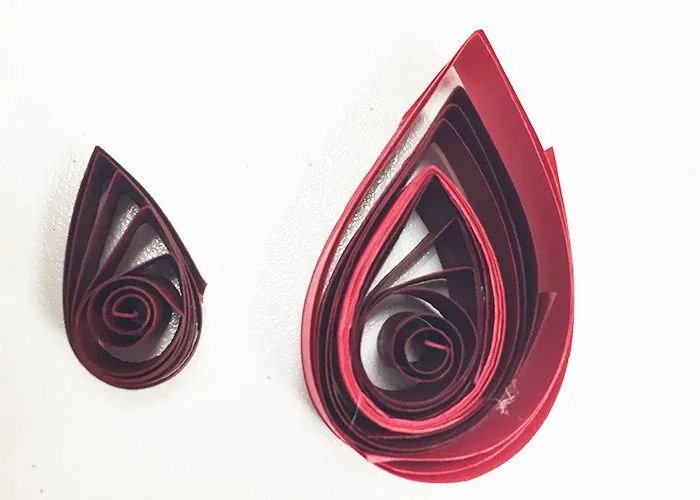
Now that your basic wreath shape is completed, you can move on to making the bow. To begin the bow, cut several strips of red and dark red paper and you did with the green paper in step 1. After these strips have been cut, choose two strips of the same color to make into quilled teardrop shapes. These will become the inner most pieces of the bow.
Step 5:
To create a tear, or raindrop shape, wind your strip of paper around your quilling tool or needle in the same way that you did to create basic circles. When removing the paper from the tool, only allow it to unravel part way instead of letting it go. The degree to which you allow it to unravel will affect the size of your tear shape.
After this spiral has partially loosened, hold the center of this spiral with the index finger and thumb of your non-dominant hand while pulling gently outward and using your dominant hand to pull the outer portion of the spiral in the opposite direction while pinching to form a point (the top of the teardrop). Glue the loose end of the shape in place with your glue gun.
Step 6:
After you have made two tear drop shapes of the same color, take two strips of another shape of red and tightly wrap them around these shapes. Glue the loose ends in place. Next, take two strips of the first shade of red you used and loosely wrap them around the outer surface of the shapes you just wrapped. Pinch the top of each one so that it matches the shapes of the center pieces. To finish the two halves of the top of the bow, do this again with the opposite shade of red. Shown below is the tear-drop shape you started with compared to a fully completed half of a bow.
Step 7:
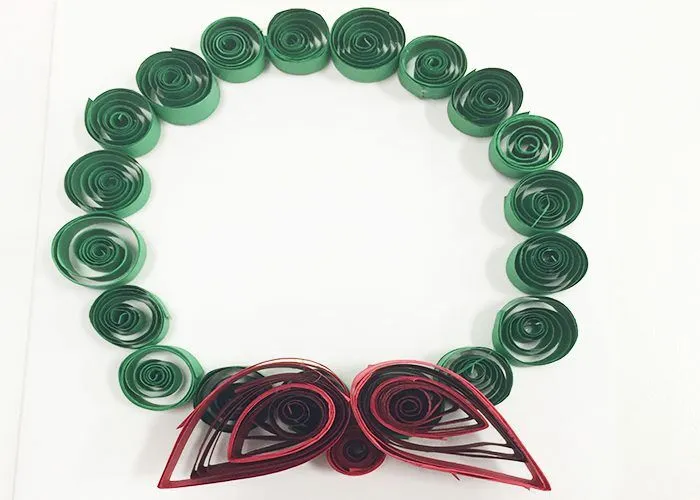
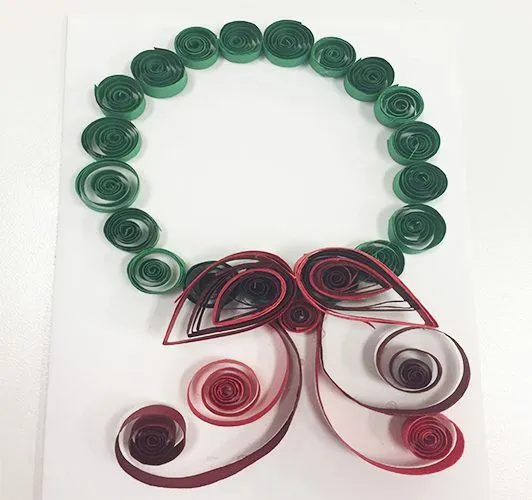
Make a middle for your bow by winding a tight, small circle of red paper and wrapping a strip of the other other red shade around it. Glue this round shape together with your glue gun and then glue all ribbon pieces onto the wreath in any way you would like!
After these are in place, loosely curl a few more red strips of paper and glue them in place to create the bottom/ excess bow strings.
Your wreath card is now complete! If you wish, you may use writing utensils to include a message such as "Merry Christmas", "Happy Holidays", or "Hi, Mom" within the wreath!
We hope that this craft helped to brighten up your season. Happy Holidays from all of us at JAM!
This article will provide a comprehensive guide on how to make a Quilled Christmas Wreath card, perfect for the holiday season.
Learn about the materials needed for quilling and where to purchase them.
Step-by-step instructions, tips, and real-world use cases will be covered to help you create your own quilled Christmas wreath card.
During the holiday season, handmade cards hold a special place in people's hearts. In this article, we will explore the art of quilling and its history, highlighting the importance of creating personalized cards for your loved ones. Whether you're a beginner or experienced crafter, this guide will provide you with all the information you need to create a stunning Quilled Christmas Wreath card that will impress your friends and family.
Materials Needed
Before you begin making your Quilled Christmas Wreath card, you will need a few essential materials. These include quilling paper strips in various colors, a quilling tool, glue, cardstock or blank cards, scissors, and a ruler. You can purchase these materials at your local craft store or online. Make sure to choose high-quality quilling paper to ensure that your card turns out beautifully.
Where to Purchase Materials
If you're unsure where to purchase quilling materials, consider visiting a specialty craft store in your area. Stores that focus on paper crafts or card making are likely to carry a wide selection of quilling supplies. Additionally, you can find a variety of quilling paper strips and tools on online marketplaces such as Amazon or Etsy. Be sure to read reviews and check the quality of the materials before making a purchase.
Step-by-Step Instructions
Creating a Quilled Christmas Wreath card involves several steps that require patience and attention to detail. Follow these step-by-step instructions to make your own beautiful card:
Creating the Base
Start by selecting a blank card or a piece of cardstock as the base for your Quilled Christmas Wreath card. Use a ruler to measure and mark the center of the card, where you will build your wreath design.
Making the Wreath
To create the wreath shape, begin by quilling green paper strips into tight coils. Arrange the coils in a circular pattern on the card, gluing them down as you go. Continue adding coils until you have a full wreath shape.
Adding Decorative Elements
Once you have the wreath shape in place, you can add decorative elements to enhance the design. Consider quilling small red coils to represent holly berries, or add gold or silver coils for a touch of sparkle. Get creative and experiment with different designs to make your card unique.
Finishing Touches
After you have added all the decorative elements, take a step back and assess your Quilled Christmas Wreath card. Make any final adjustments or additions to ensure that the card looks polished and well-crafted. Once you are satisfied with the design, allow the glue to dry completely before sending your handmade card to a loved one.
Who Should Consider Making a Quilled Christmas Wreath Card
Creating a Quilled Christmas Wreath card is a perfect project for individuals who enjoy crafting and want to add a personal touch to their holiday greetings. This activity is suitable for beginners, experienced crafters, people who appreciate handmade cards, individuals who want to impress their friends and family with a unique card, and anyone looking for a creative and relaxing holiday activity.
When to Embark on the Quilled Christmas Wreath Card Project
Timing is crucial when it comes to making a Quilled Christmas Wreath card. Consider starting this project during the holiday season to spread festive cheer, when you have some free time to dedicate to crafting, as a thoughtful gift for a loved one's birthday or special occasion, when you want to add a personal touch to your holiday greetings, or as a creative outlet to relax and unwind after a busy day.
Examples of Using a Quilled Christmas Wreath Card
There are various occasions and scenarios where a Quilled Christmas Wreath card can be a perfect choice. Consider using your handmade card for Christmas greetings, special occasions, or crafting for fun.
What Sets Our Product Apart
Our Quilled Christmas Wreath card guide stands out from the rest due to its detailed step-by-step instructions and helpful tips for beginners. We provide a comprehensive list of materials needed, along with suggestions on where to purchase them, making it easy for crafters of all levels to get started. Additionally, our guide includes real-world use cases and examples to inspire creativity and showcase the versatility of quilled cards.
Occasions to Use Quilled Cards
Quilled Christmas Wreath cards are perfect for a variety of occasions and celebrations. Consider using your handmade card for Christmas greetings, birthday or anniversary wishes, thank you notes for special occasions, teacher appreciation gifts, or seasonal greetings to spread holiday cheer.
Tips for Getting the Most Out of Your Adventure
To ensure that you get the most out of your quilling adventure and create a stunning Quilled Christmas Wreath card, consider practicing patience, experimenting with colors, and embracing imperfections.
Crafting Your Quilled Christmas Wreath Card
As we wrap up this guide, we hope you feel inspired to create your own Quilled Christmas Wreath card. Handmade cards hold a special place in people's hearts, especially during the holiday season. So, gather your materials, follow the instructions, and let your imagination run wild as you design your Quilled Christmas Wreath card. Happy crafting!