DIY Minimalist Christmas Cards
- By Andrew Jacobs
- Dec 11, 2015


One of my favorite parts about Christmas is having the chance to show people you care (now, you might be saying to yourself 'yeah, right' but I mean other than presents, yeah, that's my favorite). You might also be thinking, 'wait, but that's more time out of my schedule.' With these DIY Minimalist Christmas Cards, you'll show how much you care and simultaneously, you won't take too much time out of that busy holiday schedule. It's a win, win! So let's get started with some JAM approved DIY Minimalist Christmas Cards just for you!
Bubble Christmas Wreath
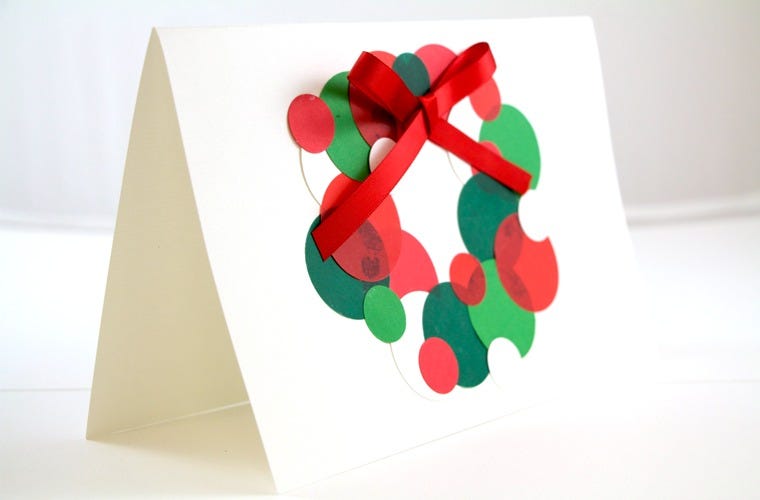
For some reason my mom is obsessed with Christmas wreaths. It takes her longer to pick out the perfect wreath than the perfect tree. This started to make me think ... WWML (What Would Mom Like) for her Christmas card. The best part about this card is that it really doesn't have to be perfect, your layout should be as random as possible! I bet when I give her this for Christmas, she's going to cry. I'll keep you posted.
What You'll Need
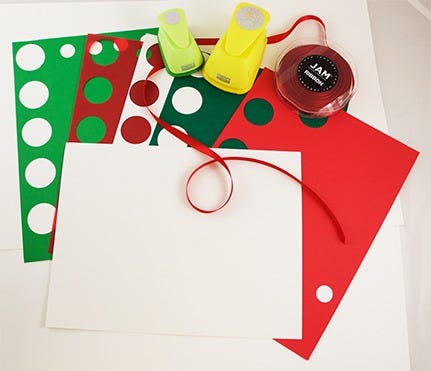
White Laid Paper
Brite Hue Green Cover
Brite Hue Red Cover
Primary Red Translucent Paper
Racing Green Translucent Paper
White Wove Paper
Circle Hole Punchers
Red Satin Ribbon (3/8 Inch)
Steps to Take:
You can use any kind of cover paper for the card itself. We used our White Laid Paper for a sturdy and bright canvas.
Pick out five festive colors (we chose two greens, two reds, and one white) to punch different sized circles out. Use our circle hole punchers for this part. And remember, you can punch out as many as you want and whatever sizes you want !
Paste the circles you made to the card in a circular fashion. Try to balance both sides of the circle but keep the pattern random. This way it'll look like a real wreath.
For the icing on the cake, use our red satin ribbon to tie a bow. Tape it on the top of the wreath and you're done!
Ribbon Christmas Tree
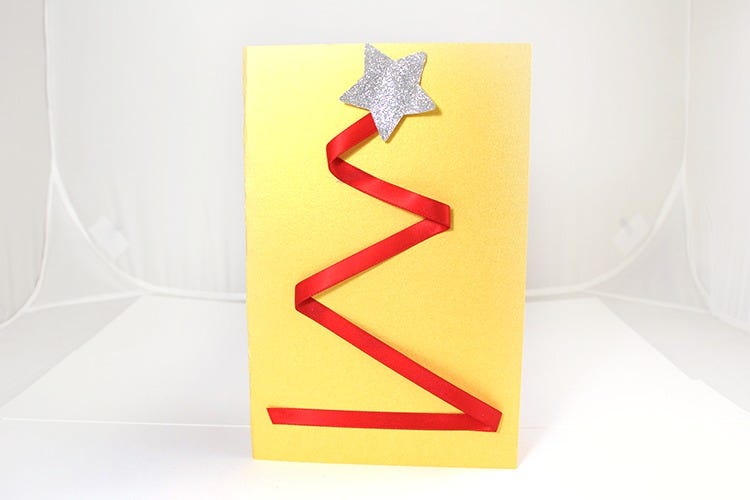
One of our favorite DIY Minimalist Christmas Cards to make! I love how minimal this card is but how much of a statement it makes at the same time. And it's honestly the easiest out of this bunch. So when you're writing your lengthy message to your sister about how much you love her (shout out to mine), the minimal cover will balance that intricate message out. Your sister might get excited to see how simple the front is, thinking it will be an easy read inside so she can FINALLY get to her presents ... but, oh, how wrong she is.
What You'll Need
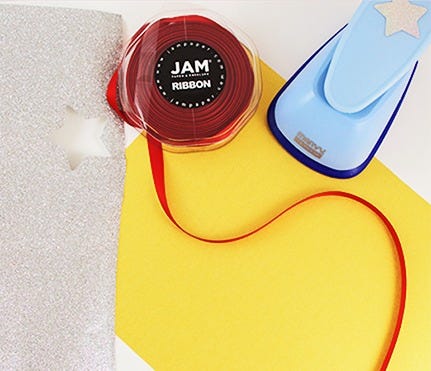
What You Need:
Gold Stardream Metallic Cover
Red Satin Ribbon (3/8 Inch)
2 Inch Star Hole Puncher
Silver Glitter Wrapping Paper
Steps to Take:
Fold the paper of your choice over once, making it vertical. We chose our shiny gold stardream cover to make a loud statement.
Start with the red satin ribbon by taping it to the bottom, pulling it straight across. Then tape the corner on the lower side of the soon-to-be Christmas tree.
As you keep going, taping each corner of the tree, you want to make sure that you give the ribbon a little extra slack. This way, your card will seem more 3-D and less flat. Remember to get smaller and smaller as you reach the top of the tree!
Finish with a cut out star by using our star hole puncher. Choose any kind of wrapping paper you want. We chose silver glitter to make sure the star shines forever.
Hanging Ornaments
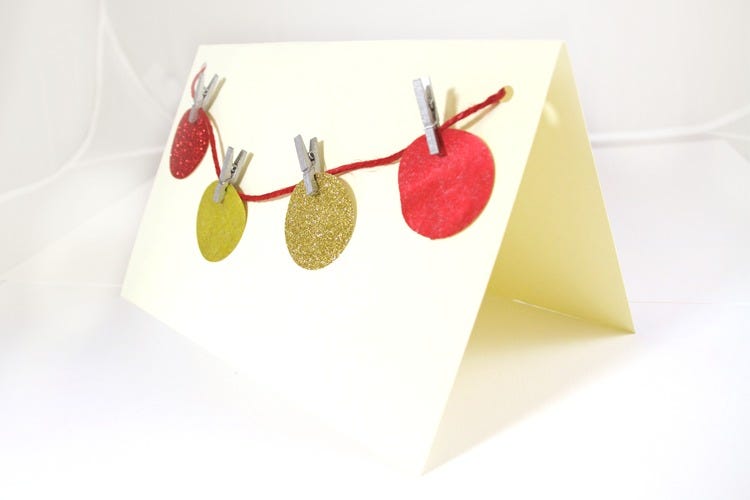
Okay so to keep these descriptions family themed, this one's for my dad. His collection of ornaments is insane (his favorites are Goofy, Snoopy, and those ones that say baby's second Christmas kind of thing - you all know what I'm talking about). For some reason he has this thing against sphere ornaments ... and it's hilarious. So I decided to put the one thing he loves and the one thing he hates in the same card. Super simple and super creative- a wonderful addition to our DIY Minimalist Christmas Cards! By the way, sorry and you're welcome Dad?
What You'll Need
What You Need:
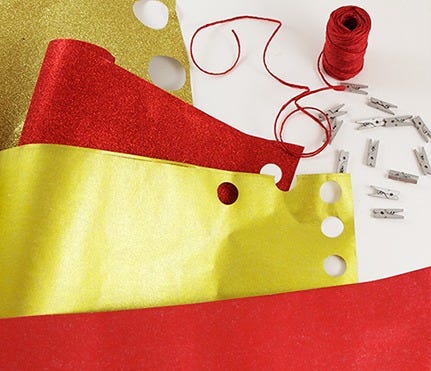
Ivory Laid Paper
Gold Glitter Wrapping Paper
Red Glitter Wrapping Paper
Red Kraft Wrapping Paper
Gold Kraft Wrapping Paper
Mini Wood Clothing Pin Clips
Red Kraft Twine
1 1/2 Circle Hole Puncher
Steps to Take:
Use our standard single hole puncher to punch the top right and left corners of the card. We chose Ivory Laid Paper for a subtle yet elegant look.
Choose four kinds of wrapping paper - we went with red and gold, glitter and kraft - but it's really up to you! Punch holes in the wrapping paper using one of our circle hole punchers and put them to the side. Don't worry, they'll be used soon.
Cut a long piece of our Red Kraft Twine (so much so that it wraps around the card at least twice - you can always cut extra off later). Insert the twine from one hole of the card to the other, making sure there is enough slack to hang your ornaments.
Remember those circles we told you to keep on the side, well here's the step to use them on! Attach our mini wood pin clips to each circle (AKA ornament) and then attach both to the twine. We glued our circles to the card to make sure they stay in place.
Once the ornaments are all set and glued together, tie the two ends of the twine to the inside of the card. After that, just give it to someone you care about and get ready for a smile!
So ...
which one of our DIY Minimalist Christmas Cards are you ready to make?
And if you're really feeling the Christmas spirit,
comment on which one's your favorite! Thanks for reading about DIY Minimalist Christmas Cards with JAM Paper!