Nothing gets people in the Christmas spirit like beautiful, sparkling white snow. Whether it has begun snowing or not this year where you live, you can bring some of the beauty of the winter weather inside without the disadvantage of the cold air. These easy to make geometric paper snowflakes are perfect decorations for winter parties or for hanging in your home!
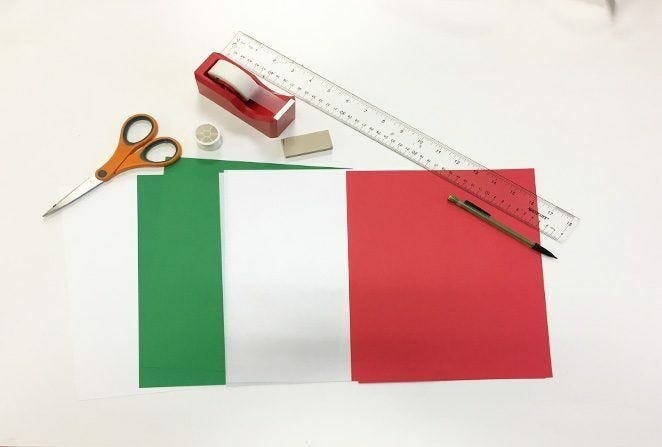
All you need is:
JAM Strathmore Bright White Wove Paper JAM Translucent Platinum Paper JAM Brite Hue Recycled Green Paper (Optional) JAM Brite Hue Recycles Red Paper (Optional) Scissors Tape A ruler Clear Thread or Fishing Line
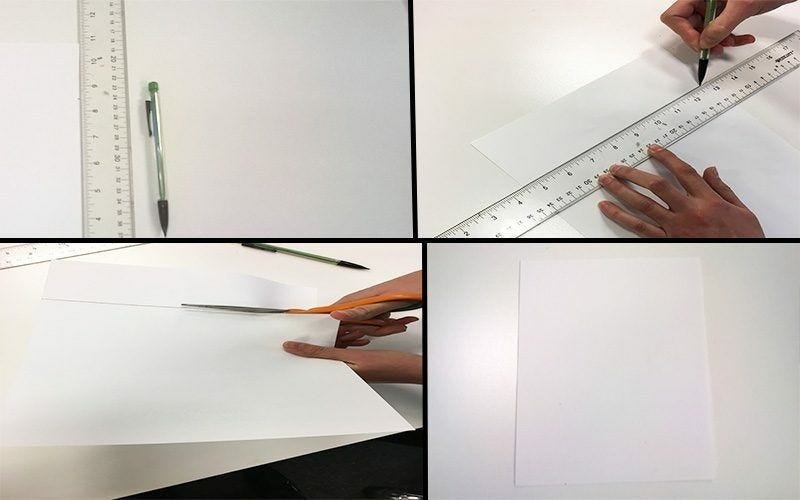
For each section of this snowflake, you will need a perfectly square piece of paper. As we are using standard sized paper here, we will be making 8.5 inch squares.
Step 1: Use the ruler to measure 8 ½ inches up the side of the paper. Trace straight line across the 8 ½ line mark. Cut along this line to create a perfectly square piece of paper. Repeat this step six times until you have six square pieces of paper.
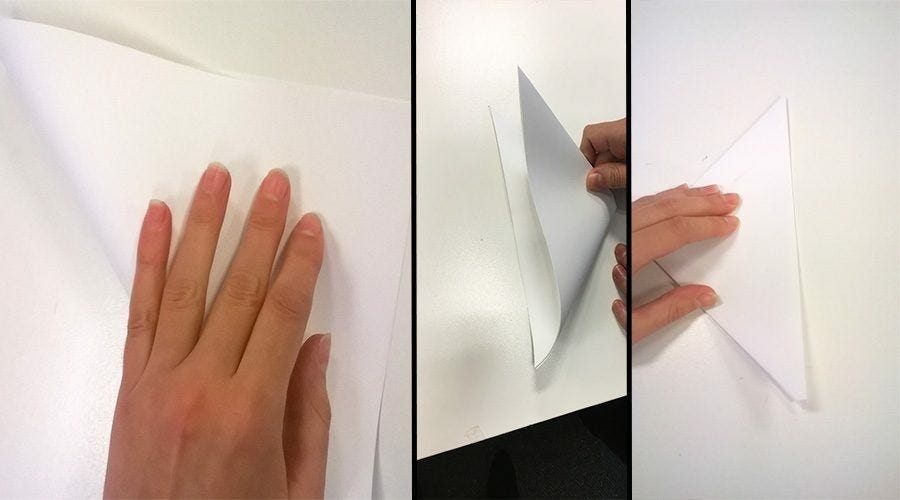
Step 2: Fold the first square into a triangle, making sure that both sided of the triangle are even. Then, fold this triangle to form smaller triangle
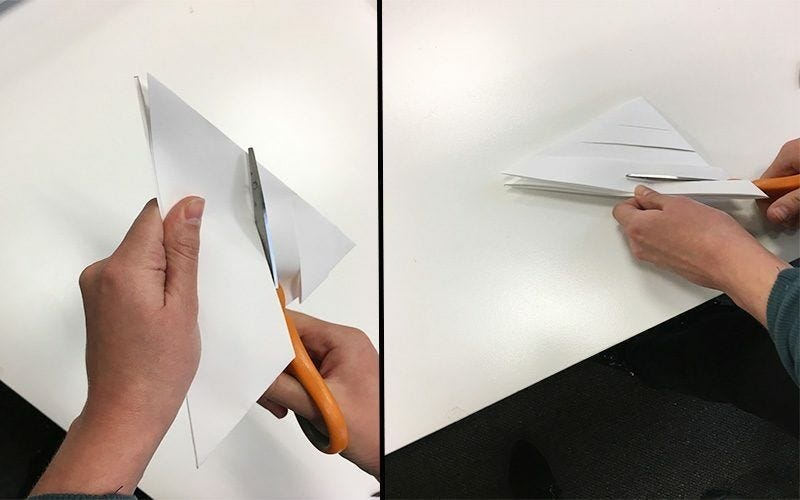
Step 3: Hold the triangle at an angle with its top pointed to the right and its bottom/ double fold facing downward, as seen below.
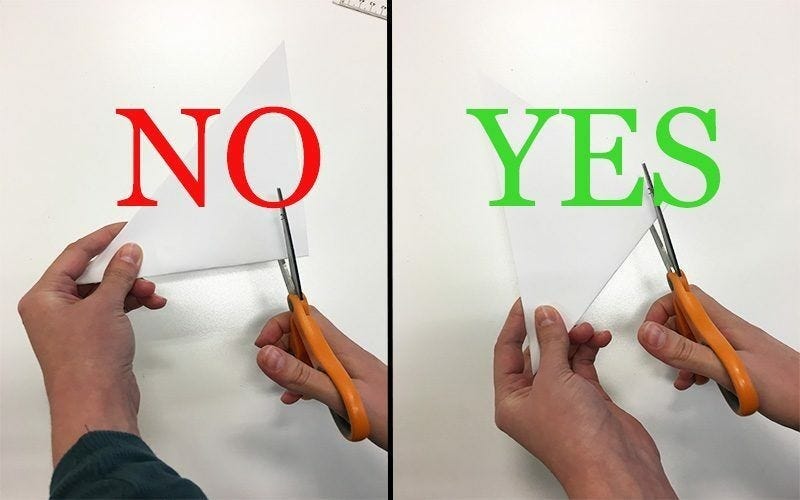
Step 4: Take scissors and make slits in the triangle that are ½ inch apart, beginning near the top pint and working your way to the left. Make sure to make these cuts at an angle. If you hold the triangle with the bottom level, the lines will not be facing in the correct direction. (Incisions should extend as close to the edge of the paper as possible without going all the way though).
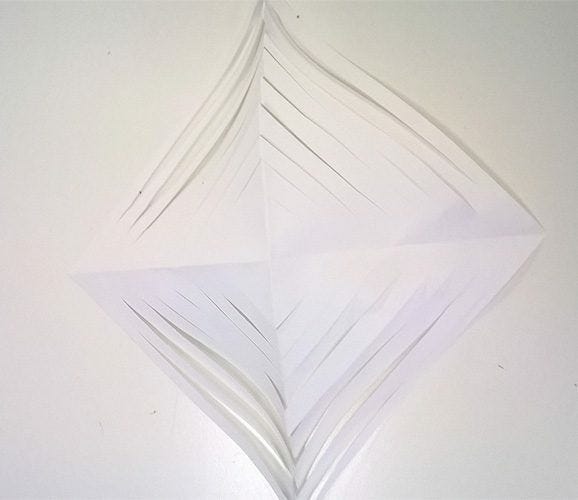
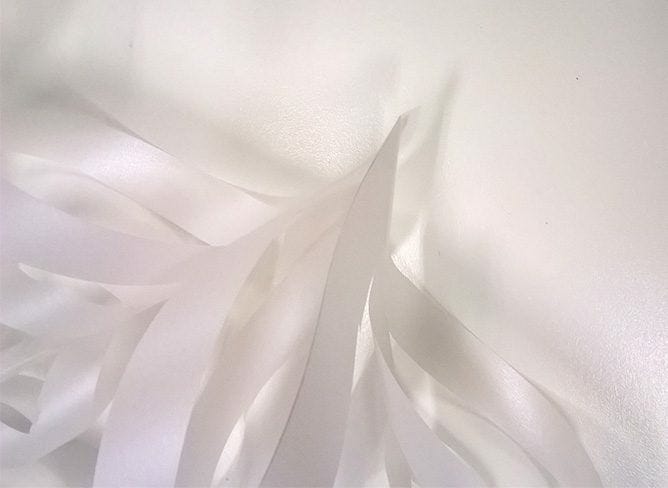
Step 5: Unfold the square. This should be done slowly and carefully as the newly cut thin pieces may get caught on each other which can cause them to rip. Unfolded, the square should now look like this:
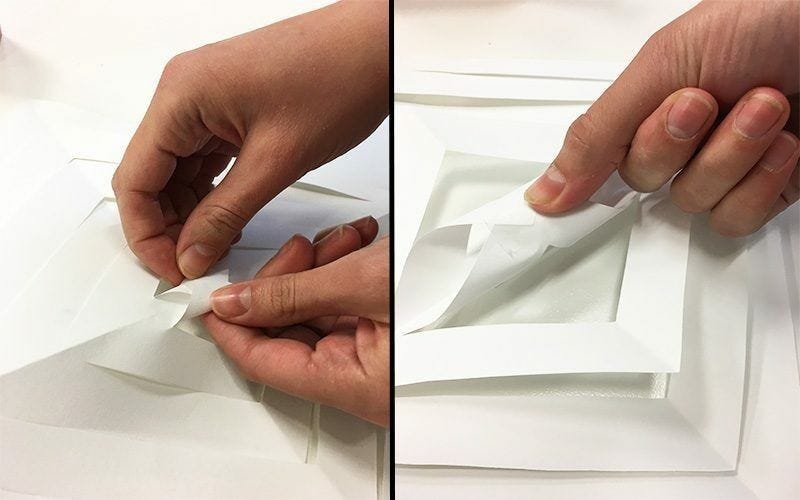
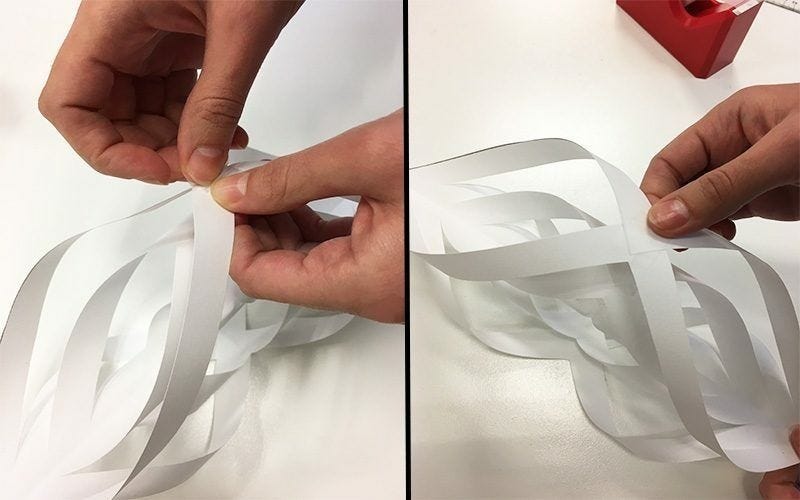
Step 6: Now you will begin folding the paper to form the first section of your snowflake! First, grab a small piece of clear tape. Then, take the middle section the square and fold the two loose corners over each other leaving space on the inside. Use the tape to fasten this fold.
Step 7: Flip the paper over so that the fold you just made is facing the table. Take the next section around the middle of the paper and tape the loose corners together.
Step 8: Flip the paper over again and do the same thing with the next section. Repeat this until all sections are taped. The first section of your snowflake is now complete!
Step 9: Now, take the next square piece of paper and repeat steps 1-8. Do this with the next four pieces as well until you have six snowflake sections.
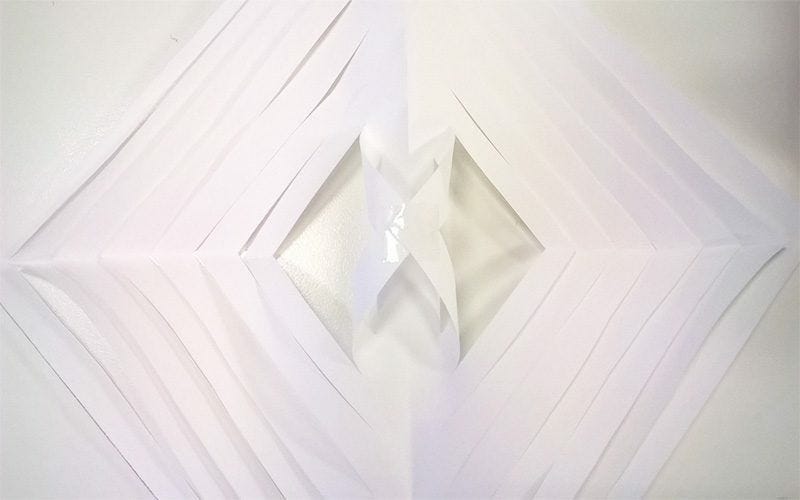
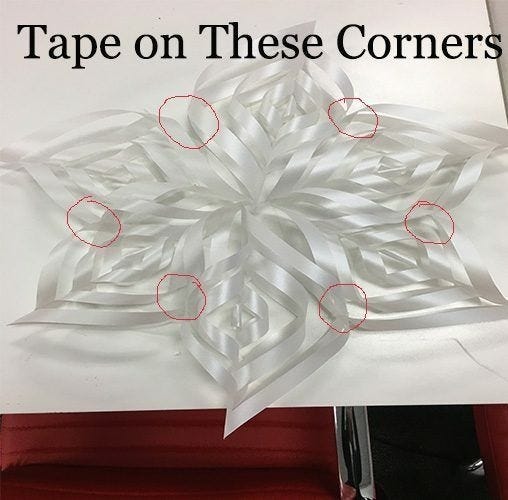
Step 10: Now you will put your snowflake sections together. Begin this process by putting two sections together and taping them at the inner conjoining corners. Add all of the pieces consecutively in the same manner, taping them in the middle as your go.
Step 11: Once your snowflake is fully fastened together in the middle, reinforce it by taping each section together at the corners that touch just before they curve towards the outer points.
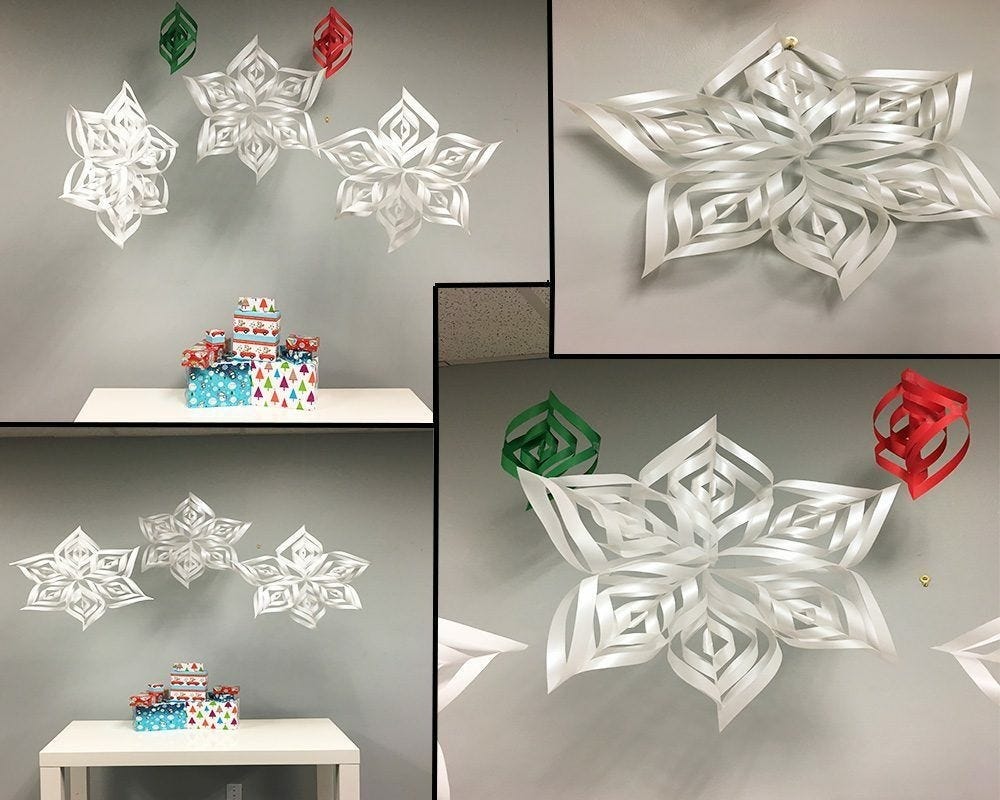
Step 12: Your snowflake is done! Now you just have to hang it up. To do this, take a long piece of clear thread or fishing line and tie it through the outer most loop of any section of the snowflake. (The sections you choose to tie the string through will become the top of the snowflake). If your thread is not tying well, you may reinforce it with tape. After this is done, you can hang your snowflake anywhere by tying or taping the string to a ceiling, window sill, or other fixture.
Optional: Make hanging paper ornament decorations with the red and green paper! Simply take a sheet of either color and repeat steps 1-8. Attach a string and your ornament decoration is complete!
You are now ready to deck the halls with some homemade winter cheer. Make as many or as few snowflakes as you need to decorate your chosen space!
This article will provide a detailed tutorial on how to create stunning geometric paper snowflakes for holiday decorations.
Readers will learn about the materials needed, step-by-step instructions, tips and tricks, real-world use cases, and examples of the topic in action.
The article aims to inspire readers to get creative and add a personal touch to their holiday decor with handmade geometric paper snowflakes.
With the holiday season approaching, DIY decorations have become increasingly popular for adding a personal touch to festive settings. One beloved craft is creating geometric paper snowflakes, which can be a fun and creative activity for individuals of all ages. In this article, we will provide a detailed tutorial on how to make stunning geometric paper snowflakes for holiday decorations. From the materials needed to step-by-step instructions and tips for achieving the best results, readers will learn everything they need to know to create beautiful handmade snowflakes. Get ready to add a touch of whimsy and charm to your holiday decor with these DIY geometric paper snowflakes!
Materials Needed
Creating geometric paper snowflakes requires a few simple materials that are easy to find and inexpensive. You will need colored paper in various shades to add a pop of color to your snowflakes. Additionally, a pair of sharp scissors is essential for cutting intricate patterns in the paper. Lastly, you will need string or thread to hang the finished snowflakes once they are assembled.
Step-By-Step Tutorial
Creating geometric paper snowflakes involves a series of folding, cutting, and assembling steps to achieve the desired shape and design. Let's break down the process into three main steps: folding techniques, cutting patterns, and assembly.
Folding Techniques
Start with a square piece of colored paper and fold it in half diagonally to create a triangle. Then, fold the triangle in half again to form a smaller triangle. Continue folding the triangle in half until you have a small, folded triangle with multiple layers.
Cutting Patterns
Once you have your folded paper triangle, use sharp scissors to cut small shapes and patterns along the edges. Be creative with your cutting to create intricate designs that will form the snowflake's unique shape. Experiment with different patterns and sizes to achieve a variety of snowflake designs.
Assembly
After cutting out the patterns, carefully unfold the paper to reveal the intricate design of your snowflake. Gently separate the layers of paper to create a 3D effect. Finally, attach a piece of string or thread to one of the points of the snowflake to hang it up as a decoration.
Tips and Tricks
When creating geometric paper snowflakes, there are a few tips and tricks to keep in mind to achieve the best results. Use sharp scissors to ensure clean cuts and precise patterns in the paper. Additionally, experiment with different folding techniques and cutting patterns to create unique and eye-catching snowflakes. Don't be afraid to get creative and let your imagination run wild!
Who Can Benefit from this Craft
Creating geometric paper snowflakes is a versatile craft that can be enjoyed by a wide range of individuals, including:
Children looking for a fun and creative holiday activity
Adults seeking a relaxing and meditative crafting experience
DIY enthusiasts who enjoy adding a personal touch to their holiday decor
Teachers looking for a festive and educational craft project for students
Anyone interested in exploring their artistic side and trying something new
When to Engage in this Craft
There are various occasions and settings where creating geometric paper snowflakes can be a delightful and enjoyable activity, such as:
During the holiday season to add a festive touch to your home decor
As a creative and engaging craft project for a winter-themed party or event
As a relaxing and meditative activity to unwind after a busy day
As a fun and educational project for children to learn about geometry and symmetry
Anytime you're in the mood for a creative and hands-on crafting experience
Examples of Creative Uses for Geometric Paper Snowflakes
Once you have mastered the art of creating geometric paper snowflakes, there are numerous ways to incorporate them into your holiday decor and beyond. Some creative use cases include:
Hanging the snowflakes on a Christmas tree for a unique and handmade ornament
Creating a festive garland by stringing multiple snowflakes together
Decorating windows or walls with a display of colorful paper snowflakes
Using the snowflakes as gift toppers or embellishments for holiday presents
Hosting a snowflake-making party with friends or family for a fun and creative gathering
What Sets Our Product Apart
What makes our geometric paper snowflakes special is the attention to detail and precision in the cutting patterns. Each snowflake is carefully crafted to create intricate designs that stand out as unique decorations. Additionally, our use of high-quality colored paper ensures that the snowflakes are vibrant and eye-catching, adding a pop of color to any holiday setting. With our step-by-step tutorial and tips for achieving the best results, creating these geometric paper snowflakes is a fun and rewarding experience for crafters of all skill levels.
Maximizing Your Adventure with Our Product
To get the most out of your experience creating geometric paper snowflakes, we recommend experimenting with different folding techniques and cutting patterns to create a variety of designs. Don't be afraid to mix and match colors and shapes to personalize your snowflakes and make them truly unique. Hosting a snowflake-making party with friends or family can also be a fun way to bond and create lasting memories together. Above all, enjoy the process and let your creativity shine through in each handmade snowflake you create.
Let Your Creativity Snow: Crafting Geometric Paper Snowflakes
As the holiday season approaches, the appeal of DIY decorations continues to grow, offering a personal touch to festive settings. Creating geometric paper snowflakes is a fun and creative activity for all ages, adding whimsy and charm to holiday decor. From materials needed to step-by-step instructions, tips, and real-world use cases, this article has covered everything you need to know to craft stunning handmade snowflakes. So, grab some colored paper, sharp scissors, and string, and let your creativity snow with these beautiful geometric paper snowflakes!