Back to School DIY Memory Book
- By Andrew Jacobs
- Aug 29, 2016
The first day of school is quickly approaching and one of the best ways to celebrate the new school year is to document all of the memories! We thought it’d be a great idea to create a Back to School DIY Memory Book to collect all of the year’s best moments, from the first to the last day of school!
These Back to School DIY Memory Book are perfect for any age from kindergarten to high schoolers. They are totally customizable, so even older kids will like this project as they can make it match their own personal style. They can be used to write down your kid’s favorite things such as teachers, friends and foods or what they learned that day at school. It’s always nice to look back and reminisce about that great teacher or that old friend you haven’t seen in ages.
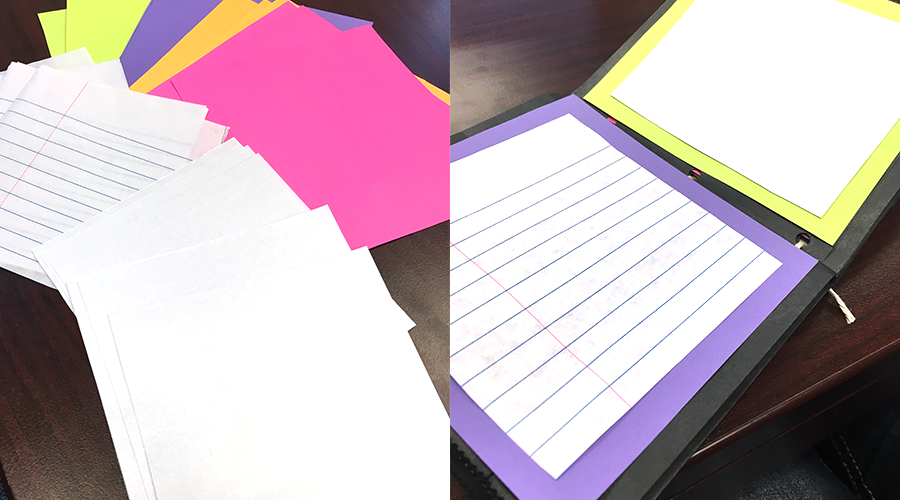
I used lined paper on one side of the page and blank paper on the opposite page so your child can draw a picture of what they wrote about on the lined paper. Or, it’s a great place to paste photographs if it’s for older kids.
Another awesome (and totally unintentional) feature? Because it’s made out of Kraft lunch bags, the open end can function as a place to store papers, awards, pictures and other memories!
So now that I’ve told you all about these fantastic memory books, let’s talk about how to go about making them! It requires only a few things:
Supplies
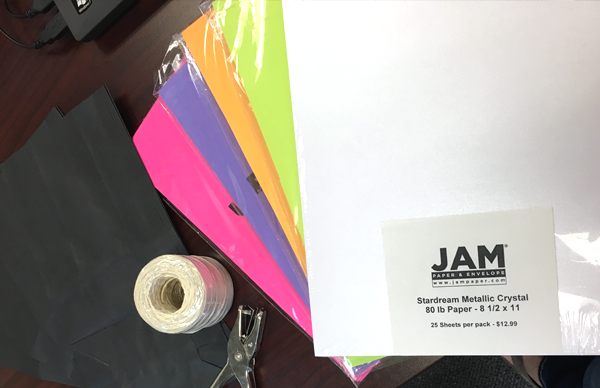
1.Kraft Paper Bags (I used black)
2.JAM Paper in various colors (I used four different Brite Hue colors) 3.JAM Paper Stardream Metallic Paper in White
4.Lined paper
5.Twine
6.Markers to decorate
8.Glue or tape
Step 1
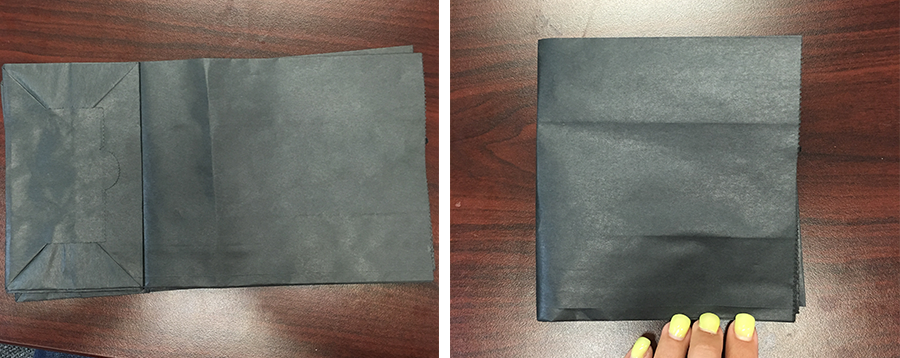
Lay your bags flat down on the table with the flap facing the back. Fold in half from left to right.
Step 2
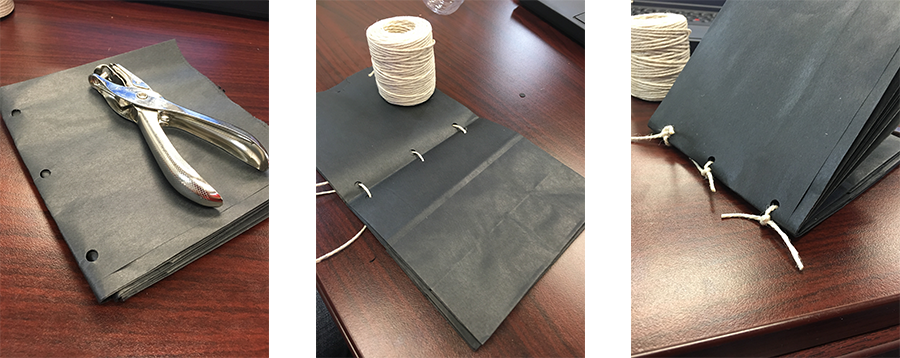
Hole punch three holes along the spine of the book. Lace twine through the holes from the inside of the book and tie in a knot. Cut off the excess
Step 3
Now that you have your book together, it’s time to make the inside. Take your colored paper and measure a 5 x 5 ½” square. You’re going to need 14 different squares, one for each page. Tape or glue one to each page.
Next, you’re going to measure and cut out your white and lined paper. These should measure 4 ½” x 4 ½”. Tape or glue one of each onto the colored paper. I put a lined paper and a white paper on opposite pages.
Step 4
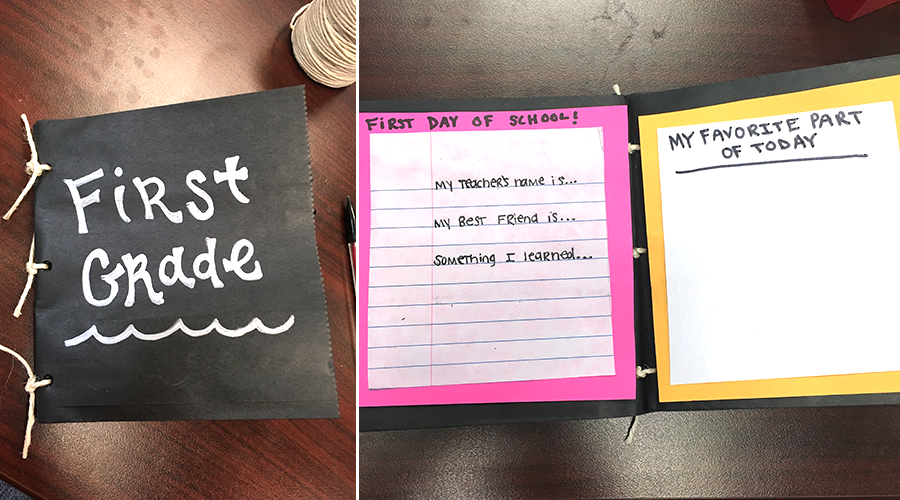
Decorate the front however you please. I also embellished the inside a little bit by adding borders to the colored paper. You can also start filling in the pages if you want. For example, for the first day of school page I wrote things like “Favorite Teacher”, “Best Friend”, and “Something I learned”. The other page is for a drawing of the best part of their day!
I thought that these were important memories that would be nice to look back on each year, especially as your kids grow older. It’s always nice to see how things change each school year and to watch your child grow!
We hope you like this Back to School DIY Memory Book and give it a shot before the school year starts!
Creating Your Own Back to School DIY Memory Book
As the new school year approaches, many students and parents are looking for creative ways to capture and preserve memories. One popular option is to create a DIY memory book. This personalized keepsake allows students to document their favorite moments, friendships, and achievements throughout the school year. By incorporating the focus keyword "back to school DIY memory book," you can design a unique and meaningful project that reflects your individual style and experiences. Whether you're a student looking to showcase your creativity or a parent seeking a fun activity to do with your child, a DIY memory book is a fantastic way to celebrate the upcoming school year.
The Benefits of Making a Back to School DIY Memory Book
There are numerous benefits to creating a back to school DIY memory book. Not only does it provide a creative outlet for self-expression, but it also serves as a tangible reminder of cherished memories. By customizing your memory book, you can showcase your personality and interests, making it a truly unique keepsake. Additionally, the process of designing and assembling the book can be a fun and rewarding experience, allowing you to reflect on the past while looking forward to the future. Whether you're a student, parent, or teacher, a DIY memory book can be a valuable tool for capturing and preserving special moments.
Use Cases for Your Back to School DIY Memory Book
There are countless ways to use a back to school DIY memory book. For students, it can serve as a visual diary of their academic journey, including achievements, challenges, and personal growth. Parents can use the memory book to document their child's milestones and accomplishments throughout the school year. Teachers may also find value in creating a memory book to commemorate their students' achievements and classroom experiences. Regardless of your role in the educational community, a DIY memory book can be a versatile and meaningful tool for capturing and celebrating the school year.
Alternatives to Traditional Back to School DIY Memory Books
While traditional memory books are a popular choice, there are alternative options to consider when creating a back to school DIY keepsake. For example, you could design a digital memory book using online platforms or create a scrapbook-style collage to showcase your favorite memories. Additionally, you may choose to incorporate multimedia elements such as videos, audio recordings, or interactive features to enhance your memory book. Exploring these alternatives can add a unique and personalized touch to your back to school DIY project.
Tips for Creating Your Back to School DIY Memory Book
When embarking on your back to school DIY memory book project, consider the following tips to ensure a successful and enjoyable experience. First, gather all necessary materials and supplies, such as decorative paper, stickers, markers, and photographs. Next, brainstorm themes or concepts that you want to incorporate into your memory book, such as academic achievements, extracurricular activities, or personal reflections. Additionally, don't be afraid to experiment with different design elements and layouts to make your memory book truly unique. Finally, take your time and enjoy the process of creating a personalized keepsake that captures the essence of the upcoming school year.
Preserving Memories with Your Back to School DIY Memory Book
One of the most valuable aspects of creating a back to school DIY memory book is the ability to preserve and cherish memories for years to come. By documenting your experiences, achievements, and personal growth, you can create a lasting memento that reflects the unique journey of each school year. Whether you're a student, parent, or educator, a DIY memory book is a meaningful and creative way to celebrate the back to school season and create a tangible reminder of the moments that matter most.


