


DIY Fun and Functional Corner Bookmarks
- By Andrew Jacobs
- Apr 5, 2017

DIY Fun and Functional Corner Bookmarks
If you're like most people, your personality probably has more than one side. Many of us have both a fun loving side, and a serious side.If you do a lot of reading, you probably like using bookmarks to keep track of your place! Whether you are a student, a parent, a child, a teacher, or someone who just loves to read, these dual sided bookmarks will add some fun and some convenience to your reading experience while allowing you to express both sides of your personality! The front of these bookmarks can be designed in any way you choose. Here, I have created a few beloved cartoon characters. To make these bookmarks, you will need:
Materials
- Colored Paper (colors of your choice, depending on what designs or characters you wish to make)
- A Ruler
- A Pencil
- Scissors
- A Glue Stick
- Markers
Step 1:
Using your ruler and pencil, draw a 6 inch square onto a sheet of paper. Use the scissors to cut out the square.

Step 2:
Fold the square into a triangle shape so that the top two corners are evenly aligned.

Step 3:
Fold the bottom two corners up towards the top so that the paper resembles a diamond shape. Press down along the edges so that the creases are maintained and then unfold the diamond. There will now be the outline of diamond shape in the middle of the paper. Fold the top half of the top layer of the middle downward so that it becomes an inverted triangle. Press down to maintain the crease.

Step 4:
Next, take both triangle shapes on the bottom and fold them down into the pocket that the inverted triangle has created. Do this by folding the pointed ends that are pointing outward up to the point at the top, and then folding them downward into the pocket.

Step 5:
Now that the basic structure of your book mark is finished, you have the option to leave and use it as is, or to decorate it with a face or features! If you choose to do the later, grab your pencil, scissors, glue, markers, and all the colors of paper you will need to create the character of your choice!
For my bookmarks, I Google Image searched images of the characters, and then drew, cut, and glued their features by hand. If it is for you, you may trace objects or even pictures on coloring pages to create your features! All paper features can be applied with your glue stick. Use your markers to draw the smaller details, like eyebrows and pupils. Here are the characters I made!
Reading is an adventure!

For Finn and Flame Princess I used: Strathmore Bright White paper, Aqua paper, and Ivory paper (for Finn) and Ultra Brite Hue Orange paper, Orange Brite Hue Recycled paper, and Red Brite Hue Recycled paper (or Flame Princess). Faces were drawn with black permanent marker.
Love Dr. Seuss?

For Horton I used: Dark Grey paper, Strathmore Bright Wove White paper, Brite Hue Ultra Pink paper, and a bit of Brite Hue Recycled Green paper for the flower stem. Eyebrows and pupils were drawn with black permanent marker.
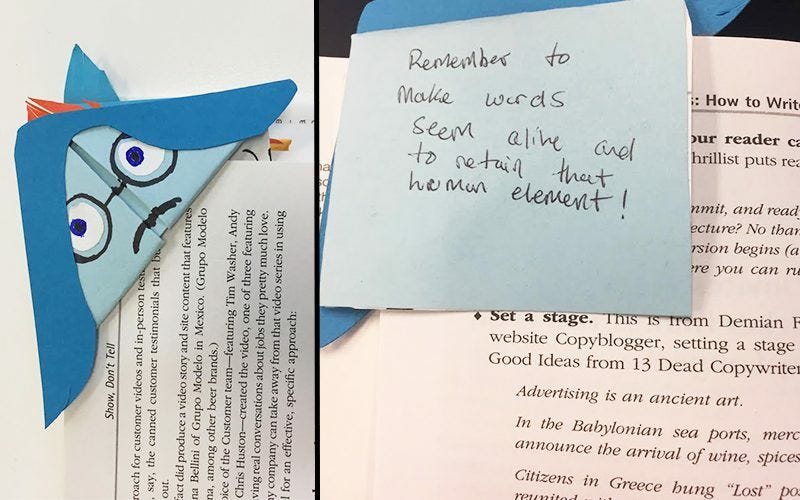
Reading can be so emotional, it turns you inside out.

For Joy and Sadness I used: Vellum Bristol Recycled Blue card stock and Peacock Blue card stock (for Sadness) and Stardream Metallic Gold Paper, Bright Hue Recycled Blue paper and Ultra Pink Bright Hue Recycled Paper (for Joy, and Strathmore White Recycled paper for both. Additional features were drawn with black permanent marker.
Helpful Tips: (1)For features that need to be the same triangular shape as the bookmarks (such as "shirts", the inside of mouths, etc) align the corner of a sheet of paper with the part of the book mark it needs to cover and measure and cut it to size. (2) Coins or buttons can be a useful items to use for tracing eyes. (3) For features that are multiple and need to be even ( ears eyes, etc) fold the paper before cutting them out.
Now you may be wondering about that serious side of these bookmarks that I mentioned earlier. The back of each bookmark, whether the front is decorated or not, is a blank square. As these bookmarks are placed on the top comer of the page you are making, this gives you a clear, clean space to write notes! Whether you are a student or someone who just likes to take notes while reading, these noticeable notes can be of help! Use plain books marks for this, or celebrate dual expression by adding these notes to your character book marks.
Check out some that we made.


Try out some of these corner bookmarks for yourself! Create any designs or characters your mind can imagine and stay organize and entertained as you study, teach, or read for pleasure. The possibilities are endless!

DIY Fun and Functional Corner Bookmarks
Looking for a fun and functional DIY project? Check out these creative corner bookmarks that are perfect for adding a touch of personality to your favorite books. Whether you're an avid reader or just looking for a unique gift idea, these DIY corner bookmarks are a great way to showcase your creativity and add a personal touch to your reading experience. With just a few simple materials and a bit of creativity, you can create custom bookmarks that are both fun and functional.
What It Is
DIY corner bookmarks are a creative and practical way to mark your place in a book. They are typically made from paper or cardstock and can be customized with various designs and decorations. These bookmarks fit neatly over the corner of a page, making them a convenient and stylish alternative to traditional bookmarks.
Benefits
One of the main benefits of DIY corner bookmarks is their versatility. You can create bookmarks in any style or theme, making them perfect for personal use or as thoughtful gifts for friends and family. Additionally, these bookmarks are durable and can withstand regular use, ensuring that your favorite books stay marked and protected.
Use Cases
DIY corner bookmarks are ideal for book lovers of all ages. They can be used to mark pages in novels, textbooks, cookbooks, and more. Additionally, these bookmarks are a great way to add a touch of creativity to reading clubs, book exchanges, and other literary events.
Alternatives
If you're looking for alternative bookmark options, consider using traditional bookmarks, magnetic bookmarks, or even creating your own custom tassel bookmarks. Each option offers its own unique benefits and can be tailored to suit your personal preferences.
Tips for Using
When creating DIY corner bookmarks, consider using durable materials such as cardstock or laminated paper to ensure longevity. Additionally, experiment with different designs, colors, and embellishments to create bookmarks that reflect your personal style and interests.
Additional Considerations
For added durability, consider using adhesive or double-sided tape to secure the corners of your DIY bookmarks. This will help prevent them from slipping or becoming damaged during use. Additionally, consider creating a variety of bookmarks to suit different reading materials and occasions.