


How to Make a 3D Paper Garland You Can Use Anywhere!
- By Andrew Jacobs
- Jan 5, 2018
How to Make a 3D Paper Garland You Can Use Anywhere!
Need a party decoration? Want to make your desk pretty? Deciding on a new look for your dorm room? This 3D Paper Garland is so easy but oh so cute! I always wanted to try this, because I'm kind of obsessed with paper. Trust me, it's better than having a shoe obsession or like a TV obsession - less expensive anyway. Okay, got sidetracked. Here we go.What You Need:

- Needle and Thread
- JAM WRAPPING PAPER, we used our Handmade Wrapping Paper Rolls but pick any! Is it Christmas time? Use our Christmas Wrap for some cute Christmas decorations!
- Hole Puncher (Any size)
- Glue Stick
How to Make a 3D Paper Garland:
Step 1:
Punch 6 circles out of your wrapping paper of choice. 6 circles complete one 3D circle, so get ready for some hard punches ahead!
Step 2:
Fold your circles in half, having the design that you want folding inward. As you can see from the picture, I want the flowers to show so they are on the inside. Then start gluing! Quick Tip: Use a scrap piece of paper on the bottom of your gluing station. This way you can glue the whole surface, and not make a mess on the table!
Step 3:
Glue one side of each and attach them. When you're all done attaching the 6 circles, squeeze the last two together and unfold. You'll find an awesome 3D circle. Quick Tip: count the sides to make sure there are 6. When I was first starting I was noticing 5, and it was because they were still attached together from the extra glue. So don't fret, just see if there are double of any side.
Step 4:
Stick the needle on the top of the circle and push the thread in! This worked for me because I didn't do a huge garland. If you are trying to make a jumbo one, or even a longer one, I would suggest gluing the whole thread to one of the sides. And I would use a thicker thread like our baker's twine or regular twine!
Step 5:
Set it up!
Step 6:
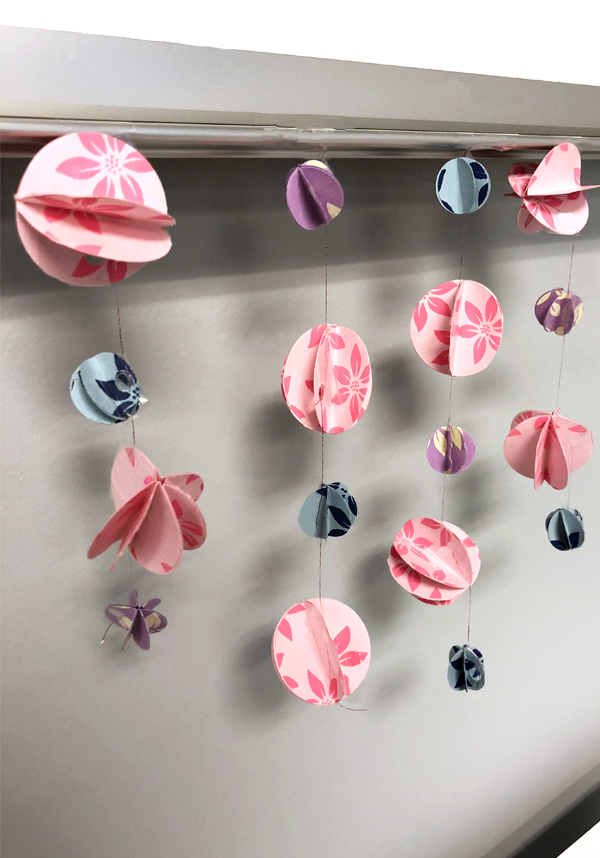
Hang! I did it two ways to show you how versatile this project could be! One way is the typical garland:
 Or a chandelier type of garland (just cut the garland you already made into pieces - this way you can use the same decoration, just in a different way for another occasion!):
 I hope you liked our 'How to Make a 3D Paper Garland'! It might take a while, but it will definitely be worth it. I still have mine up at home! Show us your own creations in our comment section! We'd love to repost!
Creating a Stunning 3D Paper Garland
Learning how to make a 3D paper garland can be a fun and rewarding DIY project that adds a touch of whimsy and charm to any space. Whether you're decorating for a party, sprucing up your home, or adding a festive touch to a special event, a paper garland is a versatile and budget-friendly decor option. With just a few simple materials and a bit of creativity, you can create a stunning 3D paper garland that you can use anywhere.
Benefits of Making Your Own Paper Garland
Making your own paper garland allows you to customize the colors, patterns, and shapes to perfectly suit your decor style and theme. It's also a cost-effective way to add a personalized touch to your space without breaking the bank. Additionally, crafting a 3D paper garland can be a relaxing and enjoyable activity that allows you to express your creativity and create something beautiful with your own hands.
Use Cases for 3D Paper Garland
3D paper garlands can be used in a variety of settings, including parties, weddings, baby showers, and home decor. They can be hung on walls, draped across tables, or used as a backdrop for photo booths. The versatility of paper garlands makes them a popular choice for adding a festive and decorative touch to any occasion.
Alternatives to Paper Garland
If you're looking for alternative decor options, consider using fabric garlands, string lights, or bunting flags. Each of these alternatives offers its own unique aesthetic and can be tailored to suit different styles and preferences.
Tips for Making a 3D Paper Garland
When creating a 3D paper garland, consider using a variety of paper textures and weights to add visual interest. Experiment with different shapes and sizes to create a dynamic and eye-catching design. Additionally, be mindful of where you'll be displaying the garland and adjust the length and color scheme accordingly.
Adding a Personal Touch to Your Decor
By learning how to make a 3D paper garland, you can infuse your decor with a personalized and handmade touch that sets it apart from store-bought options. Whether you're celebrating a special occasion or simply want to add a pop of color to your space, a paper garland is a delightful and versatile decor element that you can use anywhere.