Make Your Own Wrapping Paper Christmas Trees!

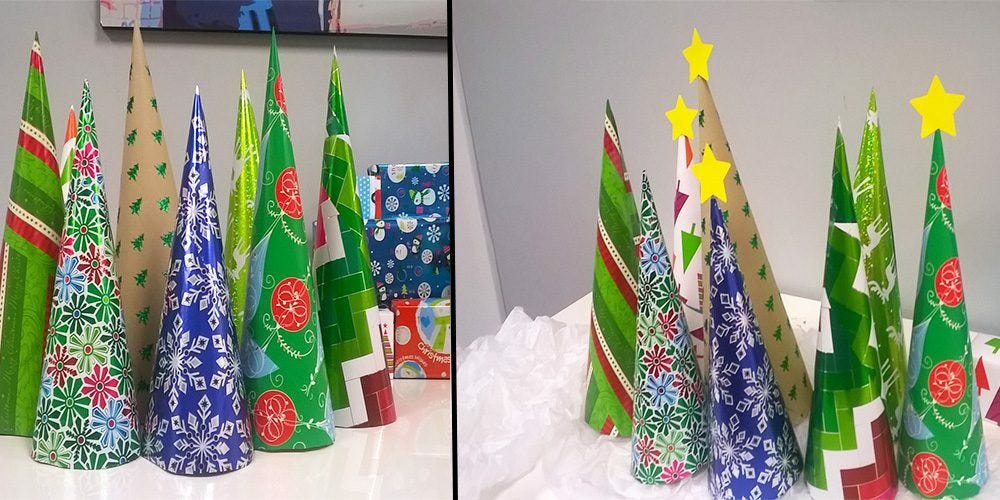
Christmas is only two weeks away! For some of us, this is exciting news. But for others, there is a Christmas party coming right around the corner and our houses are still not decorated!  What can be done? How will your living or office space because holiday ready in such a short time? Take a deep breath. Here at JAM, thanks to our wide variety of festive holiday wrapping paper, we have your solution.  Few things remind people of the holiday season like decorated pine trees do! These bright and shiny evergreens are easy to make and will bring a both cheerful and minimalist appearance to your Christmas décor. Bring a wintry forest scene inside using only four supplies: The JAM wrapping papers used for the trees in this post are: Green with Ornaments, Blue and Silver Snowflakes, Merry Christmas Stripes, Christmas Kraft Glitter Trees, Holiday Zig Zags, Holiday Flowers

Step 1:

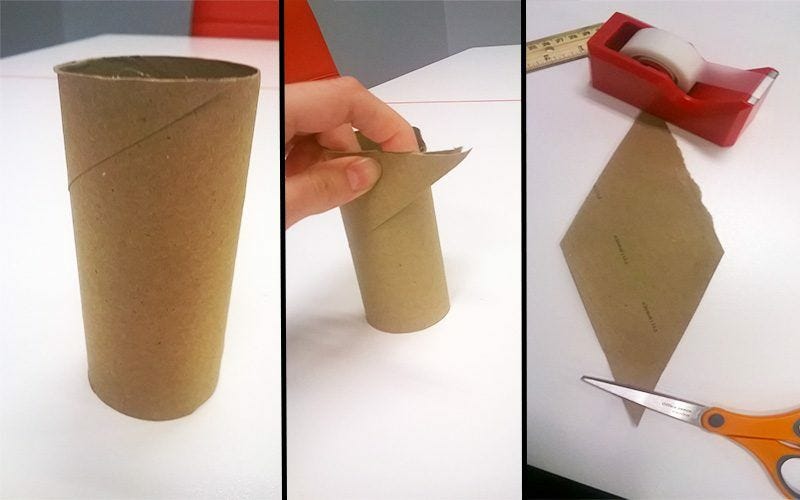
Take a toilet paper roll and carefully unroll it along the seam, making sure it only comes apart where it had previously been glued together.

Toilet paper roll undone, flattened on table

Step 2:

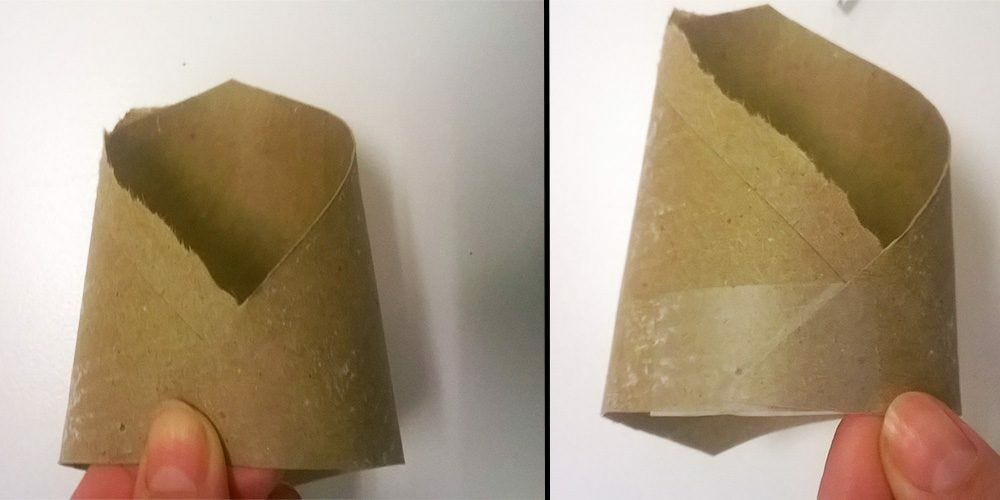
Realign the tube so that the corners overlap and the bottom edges of the corned form a straight line. Tape the corners together like this. Because the tube will try to roll back into its original shape, more than one piece of tape may be necessary.

Toilet paper tube folded and taped at corners

Step 3:

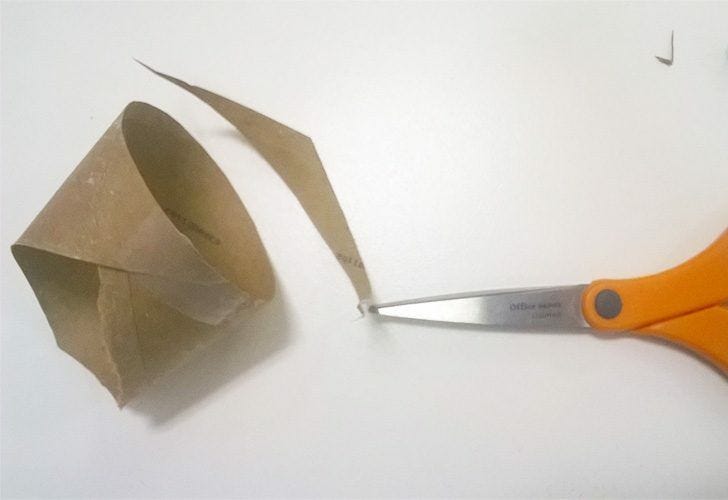
Cut the tube along the straight line where you taped it in the previous step so the entire bottom of the tube is even with this line. It does not have to be perfect, as this part of the finished product will be hidden from view.

Toilet paper tube cut with scissors

Step 4:

Take a wrapping paper roll of your choice and cut a roughly 7 x 10 inch rectangular piece of wrapping paper out of this roll. You may cut a piece larger or smaller, depending on the size of tree you wish to create.

Step 5:

Place the reconfigured toilet paper tube on its side with the bottom edge aligned with the bottom edge of your wrapping paper piece. Tape them together at the bottom with a single piece of tape.

Taped toilet paper tube and wrapping paper

Step 6:

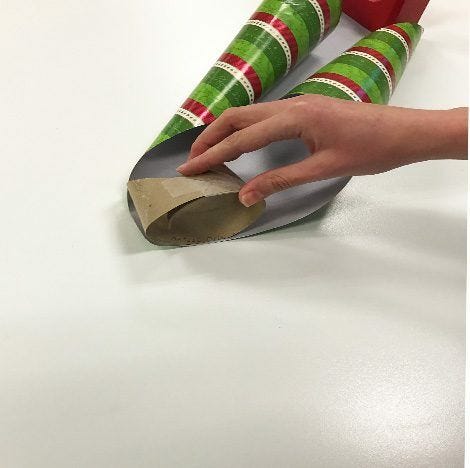
Begin rolling the paper around the tube at an angle so that the paper forms a cone around the tube. Complete this cone by taking the right top corner of the paper and folding it over the cone, pulling gently until no empty space can be seen at the point of the cone.

Gift paper wrapped around toilet paper tube

Step 7:

Holding the outer fold of the cone firmly, tape it in place. When you left go, the wrapping paper should not unroll and should look like this:

Cutting excess wrapping paper from cone with scissors

Step  8:

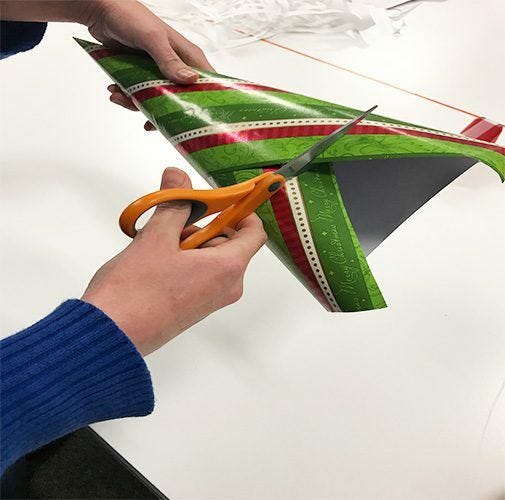
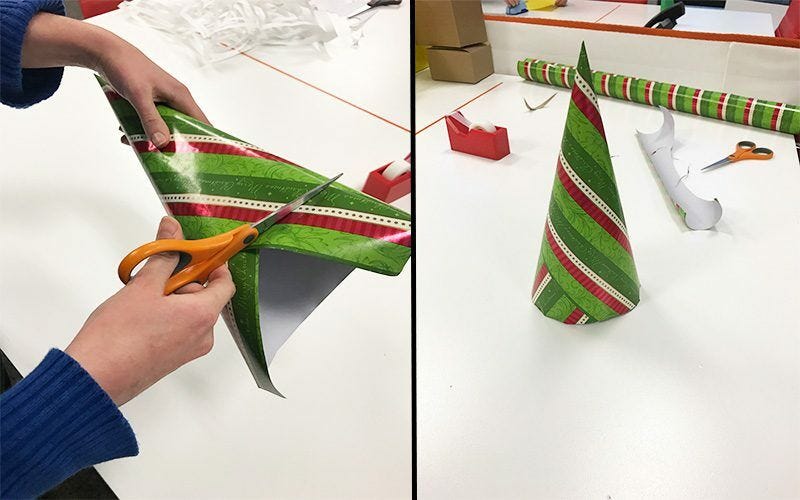
Cut evenly along the bottom of the cone to create a flat tree bottom. It is okay if the line is not perfect, but make it as straight as you can so that the tree will stand upright.

Cutting bottom of cone flat

Step 9:

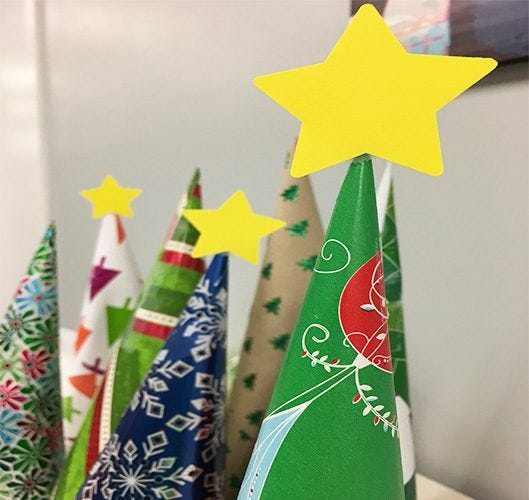
(Optional): To give your tree a finishing touch, you may way to add a star on tap! For my stars, I used a star shaped hole punch and yellow paper. Simply a star out of the yellow paper and tape it to the top of the tree!

Yellow star placed on point of cone

Your tree is now complete! Completed wrapping paper trees

Creating Personalized Christmas Trees with DIY Wrapping Paper


Are you tired of using the same old wrapping paper for your Christmas gifts? Why not try something new and create your own wrapping paper with a festive Christmas tree design! Making your own wrapping paper is not only a fun and creative activity, but it also adds a personal touch to your gifts that your loved ones will appreciate. By incorporating the focus keyword "Make Your Own Wrapping Paper Christmas Trees," you can learn how to make unique and eye-catching wrapping paper that will make your gifts stand out under the tree.


Benefits of DIY Wrapping Paper Christmas Trees


Creating your own wrapping paper allows you to customize the design and colors to perfectly match the recipient's personality or the theme of your gift. It's also a sustainable and eco-friendly option, as you can use recycled materials and reduce waste from store-bought wrapping paper. Additionally, making your own wrapping paper can be a fun and fulfilling activity for both adults and children, adding an extra layer of joy to the gift-giving process.


Use Cases for DIY Wrapping Paper Christmas Trees


DIY wrapping paper with Christmas tree designs can be used for a variety of gifts, from small stocking stuffers to large presents. It's perfect for wrapping gifts for family and friends, as well as for adding a personal touch to corporate or client gifts. You can also use this wrapping paper for holiday crafts and DIY projects, such as creating handmade ornaments or decorating your home for the festive season.


Alternatives to DIY Wrapping Paper Christmas Trees


If you're looking for alternative designs or themes for your DIY wrapping paper, consider using other holiday motifs such as snowflakes, reindeer, or ornaments. You can also experiment with different color schemes and patterns to create a unique and personalized wrapping paper for each gift. Additionally, if you're short on time, consider using pre-made wrapping paper and adding your own embellishments or decorations to customize it.


Tips for Using DIY Wrapping Paper Christmas Trees


When creating your own wrapping paper, consider using materials such as kraft paper, butcher paper, or plain white paper as a base. Use acrylic or tempera paint to create the Christmas tree designs, and consider adding glitter, sequins, or other embellishments for a festive touch. To ensure a cohesive look, coordinate the colors and patterns of your wrapping paper with your other holiday decorations and gift-wrapping accessories.


Adding a Personal Touch with DIY Wrapping Paper Christmas Trees


By making your own wrapping paper with Christmas tree designs, you can add a personal and heartfelt touch to your holiday gifts. Whether you're wrapping presents for family, friends, or colleagues, the effort and creativity put into your DIY wrapping paper will not go unnoticed. Embrace the joy of the holiday season by creating unique and memorable gifts that reflect your thoughtfulness and creativity.


Share:


DIY Wrapping Paper Trees for Festive Holiday Decor


Key Summary:

  • This article will provide a step-by-step guide on how to create festive Christmas trees using wrapping paper.
  • Readers will learn how to make unique and personalized decorations for the holiday season.

Get ready to add a touch of creativity to your holiday decor with DIY wrapping paper trees! In this article, we will guide you through the process of creating festive Christmas trees using wrapping paper. Handmade decorations are a popular trend, and making your own wrapping paper trees will not only add a personal touch to your space but also bring a sense of satisfaction in creating something unique. Let's dive into the world of DIY holiday decor and learn how to make stunning wrapping paper trees for the festive season.


Materials Needed

Before you start creating your DIY wrapping paper trees, gather the necessary materials. You will need wrapping paper in various colors and patterns, scissors, glue, cardboard or foam board, and any embellishments you want to add to your trees. Make sure to choose wrapping paper that is sturdy enough to hold its shape when folded into a tree.


Step-by-Step Instructions

Begin by cutting the wrapping paper into strips of different lengths to create the layers of your tree. Fold each strip accordion-style to create a fan shape, then glue the ends together to form a loop. Repeat this process with each strip, making sure to vary the lengths for a layered effect. Once all the loops are ready, stack them on top of each other from largest to smallest to create the tree shape.


Tips and Tricks

When choosing wrapping paper for your trees, consider the color scheme and patterns that will complement your existing decor. Opt for metallic or glittery paper for a festive touch, or choose pastel colors for a more whimsical look. To add extra sparkle to your trees, sprinkle glitter, sequins, or small beads on the branches before assembling them.


Variations and Customization

Get creative with customizing your wrapping paper trees by adding lights, ornaments, or a tree topper. You can use mini LED string lights to wrap around the tree for a twinkling effect, or attach small ornaments and bows to the branches. For a finishing touch, create a tree topper using a star, ribbon bow, or even a mini gift box.


Who Can Benefit from This Product

DIY wrapping paper trees are perfect for:

  • Crafty individuals who enjoy creating their own holiday decorations
  • People looking to add a personal touch to their holiday decor
  • Families looking for a fun and festive DIY project to do together
  • Those on a budget who want to create unique decorations without breaking the bank
  • Anyone who loves the satisfaction of creating something beautiful with their own hands

  • When to Utilize DIY Wrapping Paper Trees

    You can use DIY wrapping paper trees:

    1. During the holiday season to add a festive touch to your home decor
    2. As a fun and creative activity for a holiday party or gathering
    3. As a personalized gift for friends or family members
    4. As a unique centerpiece for a holiday dinner or event
    5. Anytime you want to add a touch of creativity and handmade charm to your space

    6. Examples of DIY Wrapping Paper Trees in Action

      Here are some use case examples for DIY wrapping paper trees:

      • Home Decor: Use the trees to decorate your mantel, shelves, or tabletops for a festive look
      • Party Decorations: Create a backdrop of wrapping paper trees for a holiday party or event
      • Gifts: Attach a small gift tag to a mini wrapping paper tree for a unique and personalized gift
      • Office Decor: Brighten up your workspace with a mini wrapping paper tree on your desk or shelf
      • Classroom Activities: Use wrapping paper trees as a fun and educational craft project for students

      • What Sets Our Product Apart

        Our DIY wrapping paper trees stand out from the rest because of their customizable nature. With a wide range of materials and embellishments to choose from, you can create a unique and personalized tree that fits your style and decor perfectly. The step-by-step instructions provided make it easy for anyone to create stunning holiday decorations, regardless of their crafting experience. Additionally, our product encourages creativity and experimentation, allowing you to explore different designs and styles to make your wrapping paper trees truly one-of-a-kind.


        List of Potential Uses for DIY Wrapping Paper Trees

        There are endless possibilities for using DIY wrapping paper trees in your holiday decor:

        • Hang them on your front door to welcome guests into your home
        • Create a festive centerpiece for your dining table or coffee table
        • Use them as a backdrop for holiday photos or selfies
        • Gift them to friends and family as a unique and handmade present
        • Display them in your office or workspace to add a touch of holiday cheer

        Tips for Getting the Most Out of Your Adventure with DIY Wrapping Paper Trees

        Choosing the Right Materials

        When selecting wrapping paper for your trees, opt for sturdy paper that can hold its shape when folded. Consider the color scheme and patterns that will complement your existing decor to create a cohesive look.

        Adding Personal Touches

        Enhance your wrapping paper trees with glitter, sequins, beads, or other embellishments to make them sparkle and shine. Get creative with ornaments, lights, and tree toppers to customize your trees to your liking.

        Experimenting with Different Designs

        Don't be afraid to try out new shapes, sizes, and styles when creating your wrapping paper trees. Mix and match colors and patterns to create a visually appealing display that reflects your unique personality and creativity.

        Bringing Festive Cheer with DIY Wrapping Paper Trees

        As we wrap up this article, we have explored the step-by-step process of creating unique and personalized Christmas trees using wrapping paper. By following the detailed instructions, tips, and tricks provided, readers can unleash their creativity and add a special touch to their holiday decor. From choosing the right materials to customizing the trees with embellishments, there are endless possibilities to make your DIY wrapping paper trees stand out.


        Whether you are a crafty individual looking for a fun project or a family seeking a budget-friendly way to decorate, DIY wrapping paper trees offer a creative solution for all. By utilizing these trees during the holiday season or for special occasions, you can bring a touch of handmade charm to your space and create lasting memories with loved ones. So, gather your materials, get creative, and let your festive spirit shine with DIY wrapping paper trees!

Copyrights © 2024, Jam Paper & Envelope. All rights reserved.