


How to Make a Paper Box
- By Andrew Jacobs
- Feb 28, 2014
How to Make a Paper Box
Let's face it, it's Friday, you're bored and you'd love something to keep you occupied for a little bit as the seconds tick closer and closer to the weekend. Well I've got just the project for you, and you wont even have to leave your desk. Here's what you'll need. Paper and scissors. That's it. It can be a post-it note or regular computer paper, it doesn't matter, so let's get to it.
Step 1: Make your paper into a square.
Fold your paper across and then proceed to cut off the excess. Unless of course you're using a sticky-note in which case you already have a square.
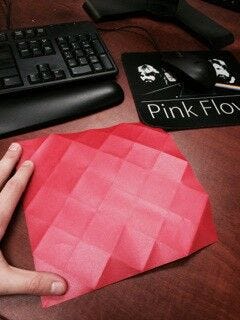
Step 2: Fold your paper from point to point, and then again from the other points.

Step 3: Fold each of your four points to the center.
 It should look like this ^^
Step 4: Fold each point to the first crease.

It should look like this now.

Step 5: Fold each point to the first crease, like so..

Flip it over, it should look like this now.
Step 6: Okay, now you'll want to cut on the crease towards the four center squares (I outlined them for you, DO NOT cut on the outline). You'll be making FOUR cuts on TWO opposite sides.

You can flip the paper back over now, take a look at the four cuts.

Step 7: Fold in to make the sides. Do this to both ends.


Step 8: Fold in the two remaining flaps to create the other sides. All points should meet in the bottom.

 There ya have it folks, a nice paper box for your desk. You can do this with any size paper you'd like. We challenge you to make a paper box with materials at your desk, tweet the final results at us or post them on our Facebook!

Creating Your Own Paper Box
Learning how to make a paper box can be a fun and rewarding experience. Whether you're looking to create personalized gift boxes, storage containers, or party favors, making your own paper boxes allows you to unleash your creativity and customize them to your liking. Not only is it a cost-effective alternative to purchasing pre-made boxes, but it also adds a personal touch to your gifts or storage solutions. Making a paper box is a simple and enjoyable craft that can be done by people of all ages, making it a great activity for families or individuals looking for a creative outlet. With just a few materials and some basic folding techniques, you can create beautiful and functional paper boxes for various purposes.
Benefits of Making Your Own Paper Box
One of the main benefits of making your own paper box is the ability to customize it to your specific needs and preferences. Whether you want to match the box to a specific theme or color scheme, or you need a box of a particular size, making your own paper box allows you to create exactly what you need. Additionally, making paper boxes is an eco-friendly alternative to purchasing plastic or other non-biodegradable materials. By using recycled or sustainable paper, you can reduce your environmental impact while still creating beautiful and functional boxes.
Use Cases for Paper Boxes
Paper boxes have a wide range of use cases, from gift-giving to organization and storage. They can be used to package small gifts, party favors, or homemade treats, adding a personal and thoughtful touch to any occasion. Paper boxes are also great for organizing small items such as jewelry, office supplies, or craft materials. They can be customized to fit specific items and can be labeled for easy identification, making them a versatile and practical storage solution.
Alternatives to Traditional Paper Boxes
While traditional paper boxes are a popular choice for many, there are alternative materials and designs that can be used to create unique and eye-catching boxes. For example, using patterned or textured paper can add visual interest to your boxes, while incorporating embellishments such as ribbons, stickers, or stamps can further personalize them. Additionally, exploring different folding techniques and box designs can result in unconventional and creative alternatives to the standard paper box.
Tips for Making the Perfect Paper Box
When making a paper box, it's important to use high-quality paper that is sturdy enough to hold its shape. Additionally, taking the time to accurately measure and score your paper before folding will ensure that your box turns out neat and professional-looking. Experimenting with different paper weights, colors, and patterns can also add a unique touch to your boxes. Finally, don't be afraid to get creative with embellishments and decorations to make your paper boxes truly stand out.
Exploring Paper Box Designs
There are countless designs and templates available for creating paper boxes, ranging from simple and classic to intricate and decorative. Whether you prefer a traditional square box, a hexagonal box, or a more complex origami-inspired design, there are endless possibilities to explore. By experimenting with different designs and techniques, you can create a collection of paper boxes that are as functional as they are visually appealing.