


Easiest Wedding Banner Ever!
- By Andrew Jacobs
- Jul 11, 2016
Easiest Wedding Banner Ever!
So this weekend, my dad and now stepmom had a backyard wedding party. Cue the aww's and the how sweet's. I know, I know, congrats is in order for the newlyweds. Backyard weddings are hard work. Especially when it's a pig roast party. But again, we're not a cooking company - otherwise I'd tell you it takes about six solid hours to cook a pig that weighs more than 100 pounds. And don't forget to know how much charcoal ... okay I'm getting off topic.
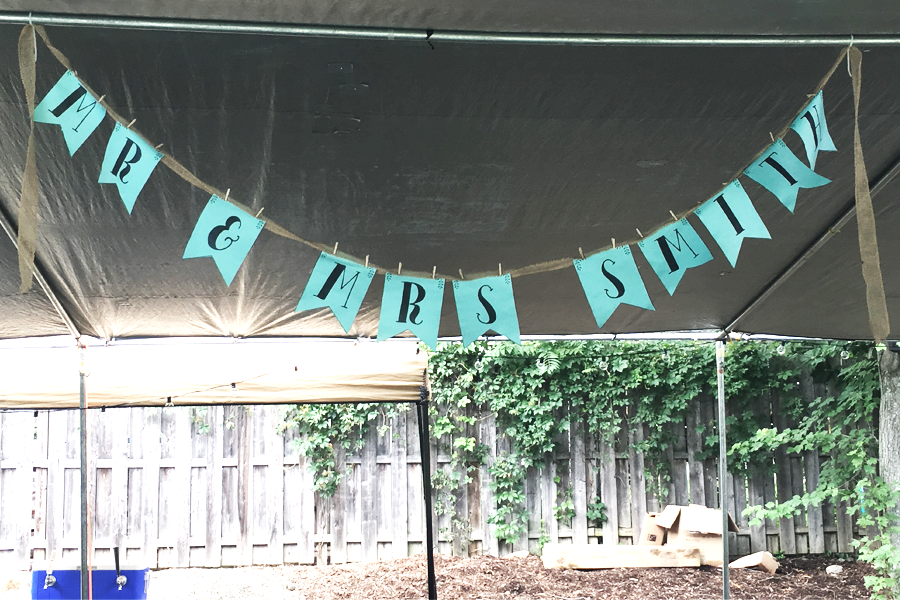
As a little surprise for me two days before the party, my dad decides to call and ask for a banner. Obviously he knew I work for JAM, so he assumed I could manage this big paper banner about ten to twenty feet long (not a big range at all Dad) that says 'Mr. and Mrs. Smith's Wedding Party' with the date they were married and today's date ... and maybe a little bit about them?
I told him oh, totally I'll definitely have time for that at work. And I might not have been too confident in that sentence, but I wanted to do this for my dad.
I got to work and found one of my personal favorite JAM paper colors: Aqua and knew that was the color. Not necessarily because it fit any theme of the party, but that it's just a sweet yet not too sweet color. Great for both guys and gals alike.
And what was my stepmom's first reaction to the banner? 'I love the color!' Thank you JAM, thank you.
Am I rambling?
Backyard weddings are hard work. Especially when it's a pig roast party. But again, we're not a cooking company - otherwise I'd tell you it takes about six solid hours to cook a pig that weighs more than 100 pounds. And don't forget to know how much charcoal ... okay I'm getting off topic.
As a little surprise for me two days before the party, my dad decides to call and ask for a banner. Obviously he knew I work for JAM, so he assumed I could manage this big paper banner about ten to twenty feet long (not a big range at all Dad) that says 'Mr. and Mrs. Smith's Wedding Party' with the date they were married and today's date ... and maybe a little bit about them?
I told him oh, totally I'll definitely have time for that at work. And I might not have been too confident in that sentence, but I wanted to do this for my dad.
I got to work and found one of my personal favorite JAM paper colors: Aqua and knew that was the color. Not necessarily because it fit any theme of the party, but that it's just a sweet yet not too sweet color. Great for both guys and gals alike.
And what was my stepmom's first reaction to the banner? 'I love the color!' Thank you JAM, thank you.
Am I rambling?
How to Make the Easiest Wedding Banner Ever:
 You need four supplies and four supplies only:
- JAM Paper, any color (I chose the beautiful Aqua.)
- JAM Mini Wooden Clips, any color (I chose to go all natural.)
- JAM Burlap Ribbon, any color (do you see the pattern here? yes, we know color.)
- Scissors
Step 1:
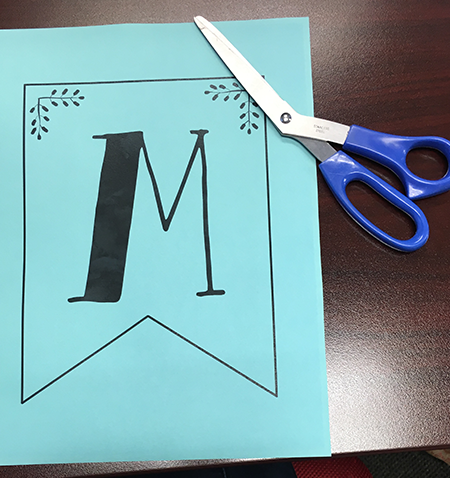 Print out the letters of your choice. I needed three M's, two R's, two S's, an I, a T, and an H. Yes people, my father's real last name is Smith. And no he does not work for the CIA, even though all of my coworkers are convinced of this.
Step 2:
Cut out the letters. Can't really elaborate on this one. How about ... make sure not to cut yourself as you are slicing away?Step 3:
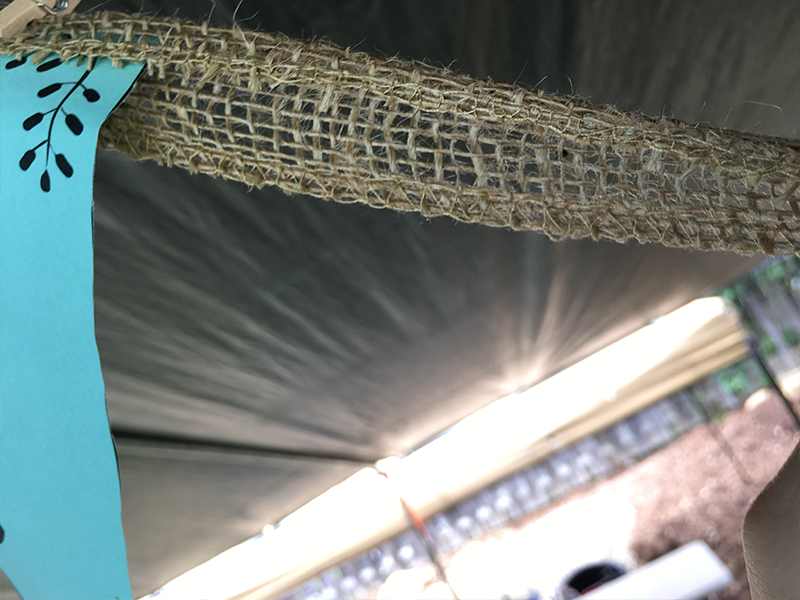 BURLAP! Okay, so I'm a super fan of burlap. It has this natural look to it that makes me feel like I'm home ... even if I never lived in a rural area. Does that make any sense whatsoever? You really want the whole spool of the ribbon to lay out on the ground before cutting it. This way you can really see how long you want your banner (I kept repeating make it to ten feet, ten feet, ten feet) and how much spacing you want in between each letter and thus each word.
Step 4:
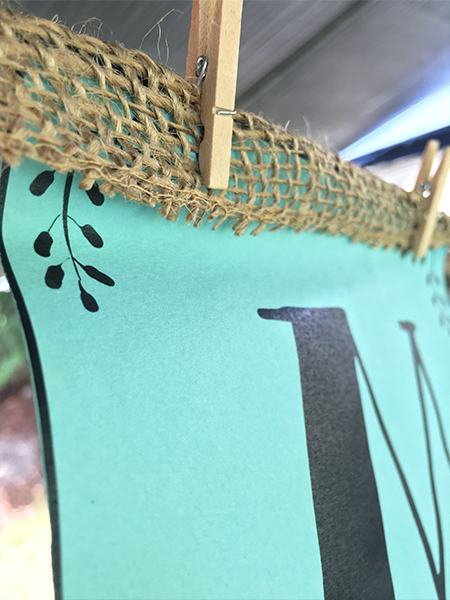 Get your wooden clips ready and start clipping! You want to bend the burlap ribbon over the letter so it's on both sides. Then you want to clip the burlap ribbon and letter together. It's as simple as that! I used two clips per letter for a more secure feel, but you can put one and be fine or five for all of those cautious people out there.
Step 5:
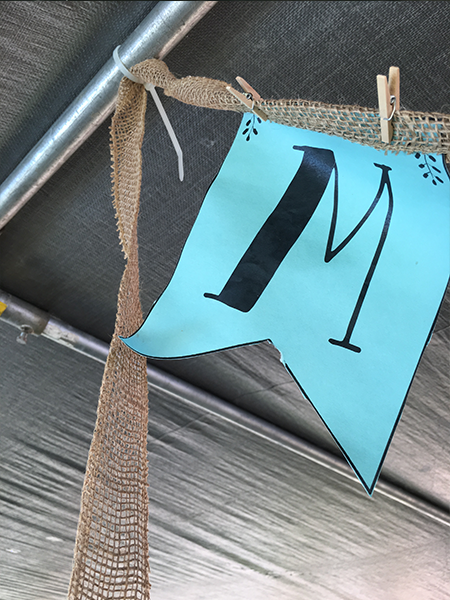 Tie it to a pole or tent or anything really, and you're done. Remember you want some extra burlap ribbon on the ends of the banner so you have room to tie it somewhere. We used zip ties just because it was going to rain that day. And no it didn't JUST rain, it down-poured. And I was thrown in the pool as lightening struck. But as you can read, I'm fine.
Anyway, that's seriously all it takes. An amazing JAM color, some sturdy JAM burlap ribbon, and some cute JAM wooden clips!
Tie it to a pole or tent or anything really, and you're done. Remember you want some extra burlap ribbon on the ends of the banner so you have room to tie it somewhere. We used zip ties just because it was going to rain that day. And no it didn't JUST rain, it down-poured. And I was thrown in the pool as lightening struck. But as you can read, I'm fine.
Anyway, that's seriously all it takes. An amazing JAM color, some sturdy JAM burlap ribbon, and some cute JAM wooden clips!
 I didn't just get complimented on this easy-to-make-but-looks-professional banner, I got a few hugs out of it too.
So when you're in need of a quick and easy way to make a cute banner for a wedding or anything really, just order from JAM, wait for it to ship, and create!
By the way ... all of these pictures were taken the day after the party. After the wind and the rain and the crazy weather. Thanks JAM for making awesome, sturdy, supplies!! My Dad thanks you too.
I didn't just get complimented on this easy-to-make-but-looks-professional banner, I got a few hugs out of it too.
So when you're in need of a quick and easy way to make a cute banner for a wedding or anything really, just order from JAM, wait for it to ship, and create!
By the way ... all of these pictures were taken the day after the party. After the wind and the rain and the crazy weather. Thanks JAM for making awesome, sturdy, supplies!! My Dad thanks you too.Creating the Easiest Wedding Banner Ever!
Planning a wedding can be overwhelming, but creating a beautiful and personalized wedding banner doesn't have to be. At JAM Paper, we understand the importance of adding special touches to your big day without adding unnecessary stress. Our blog post on the easiest wedding banner ever provides step-by-step instructions and creative ideas for making a stunning banner that will impress your guests and add a personal touch to your wedding decor. Whether you're a DIY enthusiast or just looking for a simple yet impactful project, this blog post will guide you through the process and inspire you to create a memorable banner for your special day.
Benefits of a DIY Wedding Banner
Creating your own wedding banner not only adds a personal touch to your decor, but it also allows you to save money and customize the banner to fit your wedding theme and color scheme. By following our easy tutorial, you can create a one-of-a-kind banner that reflects your style and personality, making your wedding even more special and memorable.
Use Cases for Your Wedding Banner
Once you've created the easiest wedding banner ever, there are countless ways to incorporate it into your wedding decor. Hang it behind the head table, use it as a backdrop for photos, or display it at the entrance to your venue to welcome guests. The possibilities are endless, and our blog post will provide you with creative ideas for using your DIY banner to enhance the ambiance of your wedding day.
Alternatives to Traditional Wedding Banners
If you're looking for alternative options to a traditional wedding banner, our blog post also explores unique and creative ideas for adding a personalized touch to your wedding decor. From fabric garlands to floral backdrops, we'll provide you with inspiration and tips for creating a stunning focal point for your special day.
Tips for Using Your DIY Wedding Banner
After creating the easiest wedding banner ever, it's important to know how to effectively incorporate it into your wedding decor. Our blog post offers practical tips for hanging and displaying your banner, as well as ideas for repurposing it after the wedding. We'll ensure that your DIY creation is not only beautiful, but also functional and versatile.
Adding a Personal Touch to Your Wedding Decor
At JAM Paper, we believe that adding a personal touch to your wedding decor can make your special day even more memorable. Our blog post on creating the easiest wedding banner ever is just one example of how you can infuse your wedding with creativity and individuality. We're dedicated to providing you with the inspiration and resources you need to make your wedding day uniquely yours.