Thankful for Burlap Letters
- By Andrew Jacobs
- Nov 10, 2016
Thankful for Burlap Letters
One holiday down! With Halloween out of the way, we have a few more holidays to get through before the end of the year. Thanksgiving is up next – one of my favorite holidays!! The best part is the Macy’s Thanksgiving Day Parade – we watch it every year. It literally brings in the Christmas season!! Being so close to the city, some years we are able to physically go and watch but honestly staying warm inside with my pumpkin spice latte is more appealing to me. I know in my house we go all out after Halloween. Leaves are in the windows, nice autumn tablecovers are positioned around the house. Pumpkins are definitely a big deal in my house – everywhere you look there is a pumpkin! But what I love most is how the Thanksgiving table looks on that food-tacular day! With all different and delicious food placed on nice china, the setup is really stunning. This year I decided to help my mom decorating this year using DIY Burlap Letters! You can use these for any holiday! It truly gives the décor a nice natural, rustic look. It’s pretty simple to do and not too time consuming! And your family will thank you!!
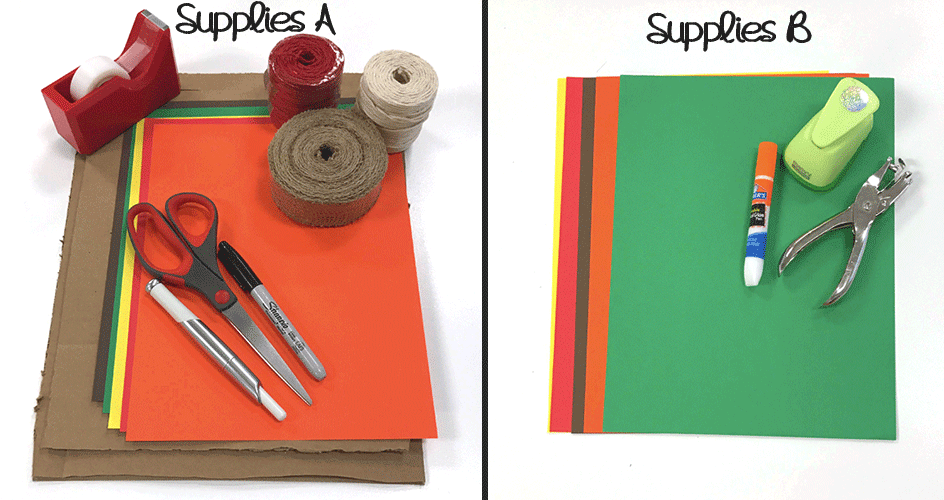
Supplies- JAM Burlap Ribbon
- Kraft Twine
- Hole Puncher
- Autumnal Paper
- Cardboard
- Scissors or Exacto Knife
- Tape
- Glue
- Opaque Paint Markers
- Sharpies
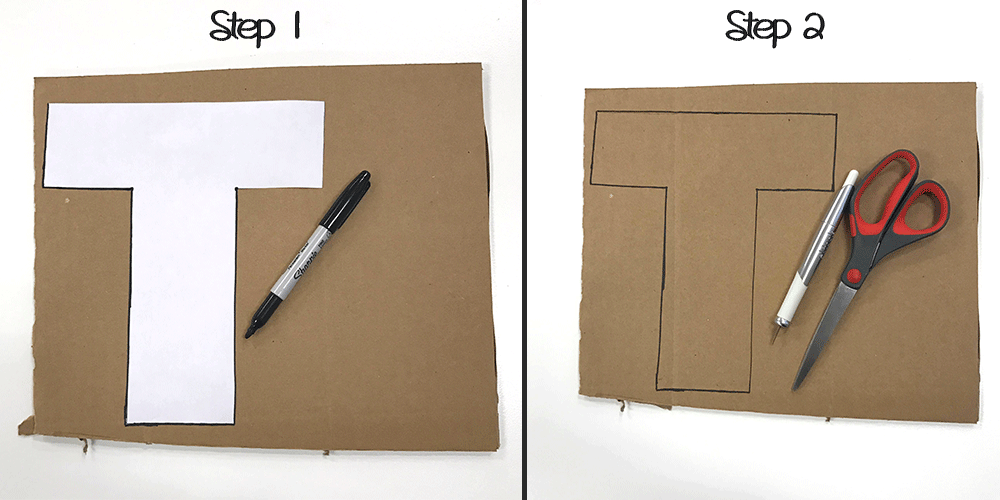
Step 1:
Step one is pretty easy – trace! You can either print out large letters in a Word document or simply freehand using a Sharpie. You can use a pencil too of course, but using a Sharpie was definitely easier for me.
Step 2:
Using your scissors or exacto knife cut out your traced letter. I went back and forth between the two and that’s okay! Sometimes it’s easier to use one over the other – it’s totally up to you.
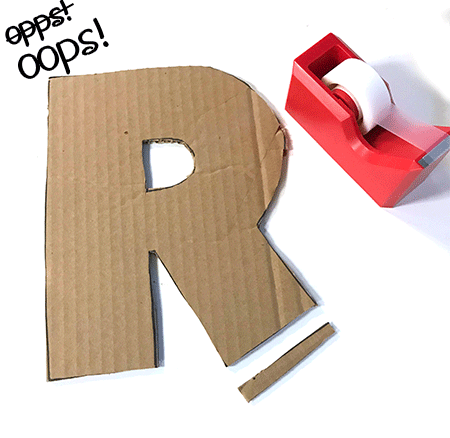
Fun Fact! We are human and we will make mistakes. While you are cutting your letters out you may cut too much – use a scrap of cardboard and tape it to the letter. Don’t worry! It can’t be seen under the burlap.
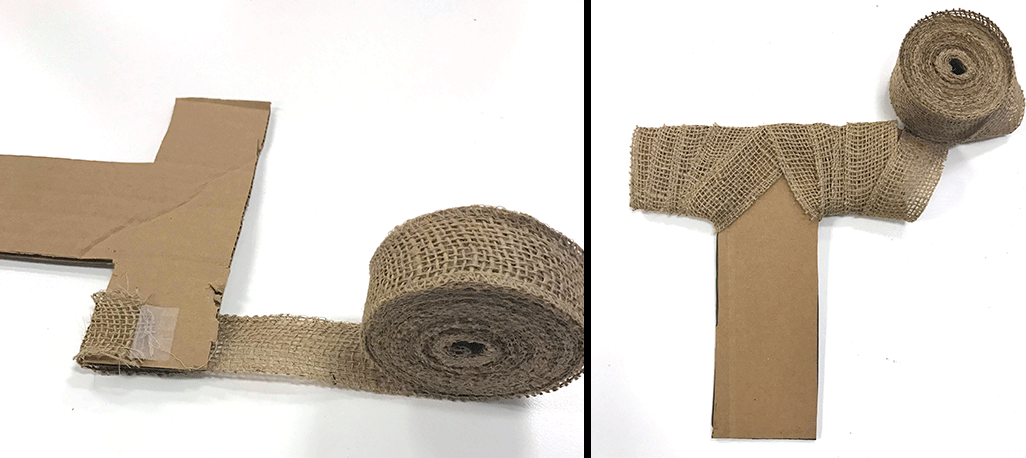
Step 3:
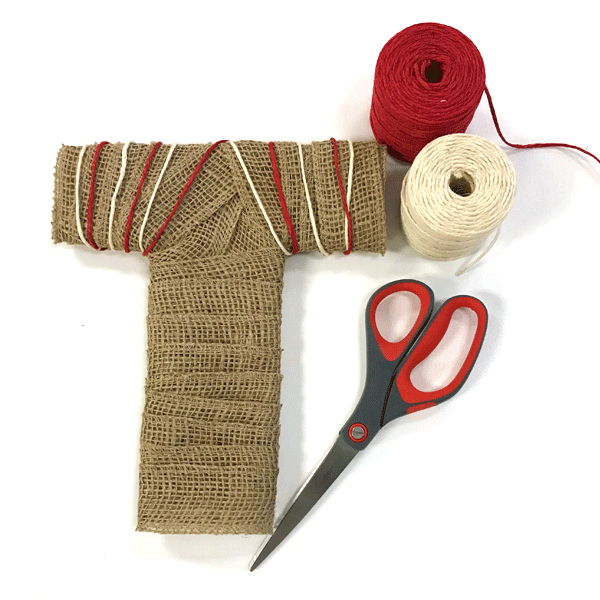
Start unraveling the burlap and tape to one side of the letter. Wrap around the whole cardboard letter until it’s covered. It’s inevitable to overlap (it's kinda part of the look), but try not to be excessive. The more you overlap the less burlap ribbon you’ll have. Once you’re done, tape the end to the back of the letter.
Note: For certain letters you will have to wrap in sections like letter T or Y.
Step 4: Spice it Up!
Once you’re done wrapping all your letters you may think your DIY Burlap Letters look a little plain...whoooomp. But don’t fear, colorful twine is here!! The same way you wrapped the burlap ribbon you can wrap twine around your letters too! You can use one or multiple colors on each letter. You could try alternating colored twine as well.
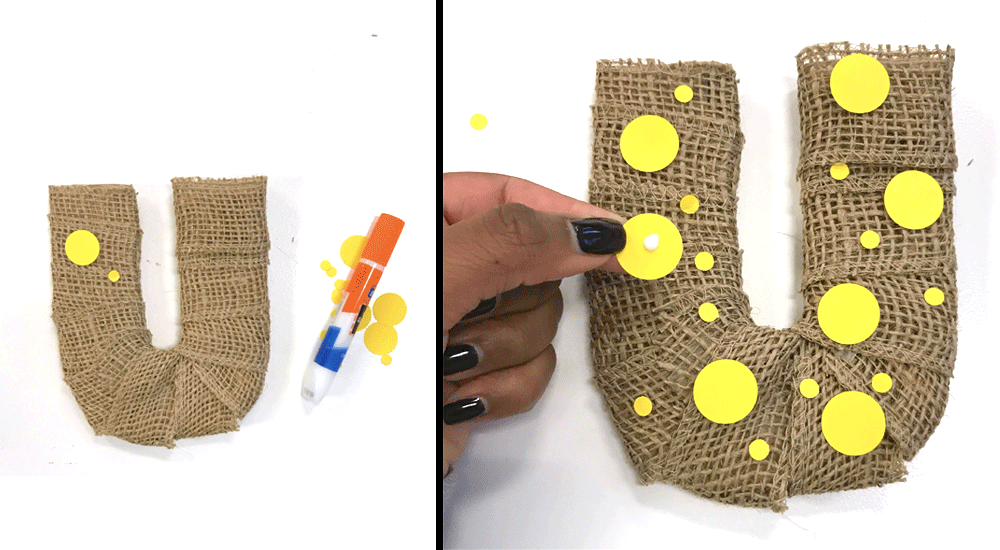
Another option is spicing up your DIY Burlap Letters with paper dots! Using your hole punchers, punch out different sized dots (or any shape) and simply glue it on to the burlap. Something so easy can look so stylish!
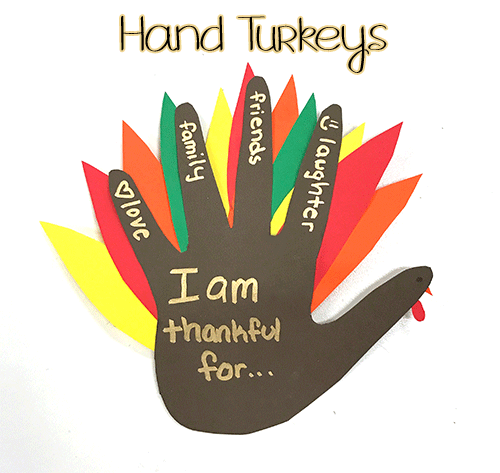
Remember hand turkeys?? We use to do them every year all throughout elementary school. Throowwwbaaacck!! Here is a tribute to the one and only hand turkey!! At first I thought it was so easy…just trace your hand right? Wrong. After that what do you do? Pick out a few autumn, turkey-ish colors and follow these three easy steps to figure out how to make your hand turkey look sophisticated...or at least not like a first grader did it.
Step 1:
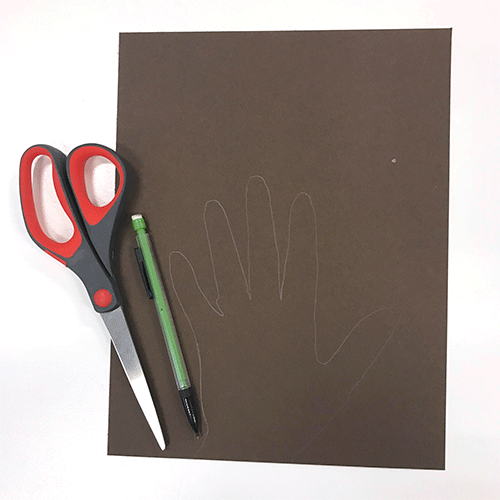
With a pencil, trace your hand on brown paper or cardstock. I used the Chocolate Brown cardstock - it's sturdier so you can stand it up easier. Cut it out once you are done.
Step 2:
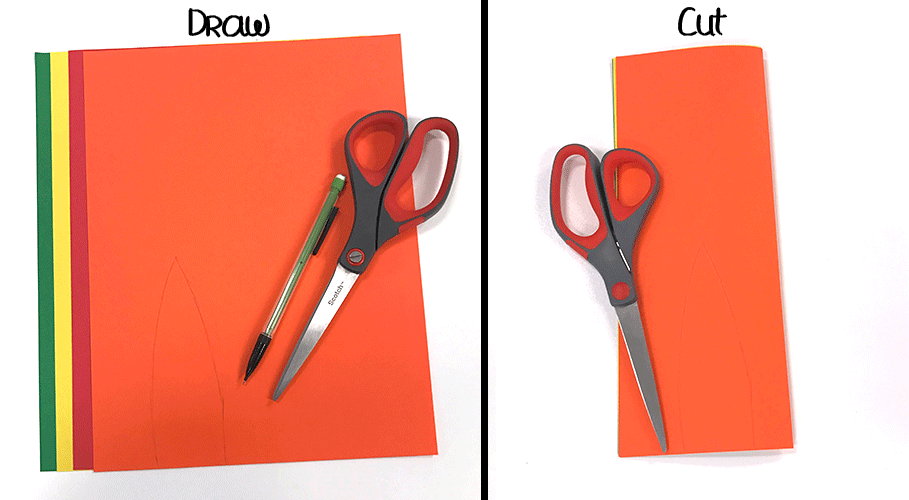
On the colors of your choice (I used Brite Hue Recycled Red, Yellow, Orange, and Green), draw somewhat of a rounded triangle. You could draw whatever shape you want – anything you do will look nice.
Shortcut: draw on one sheet of paper and stack the rest behind it. Fold the papers long ways in half. That way you get two feathers of each color.
Step 3:
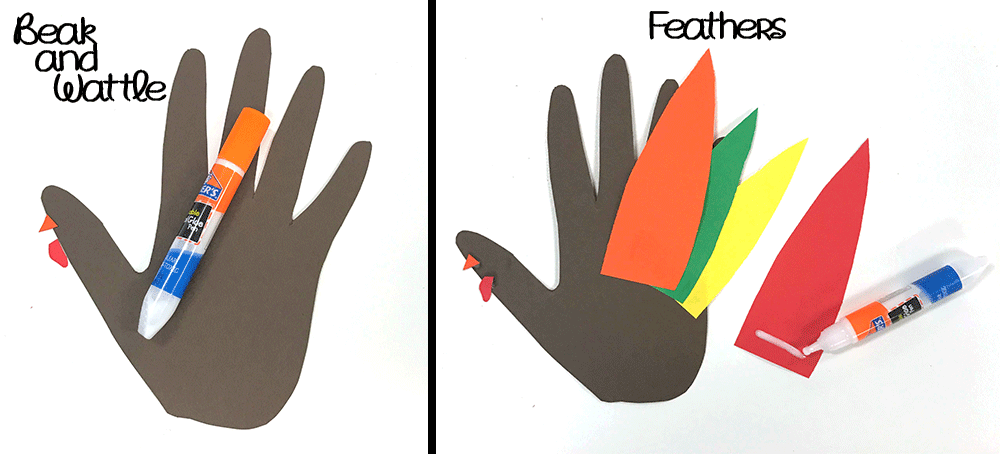
When you are done cutting out your feathers place them to the side. Before you paste the feathers, use your scraps to cut out a small triangle for the beak and a weird oblong shape for the wattle (the red part under the chin of a turkey). When you have those then you can paste both the feathers and the beak and wattle.
Step 4:
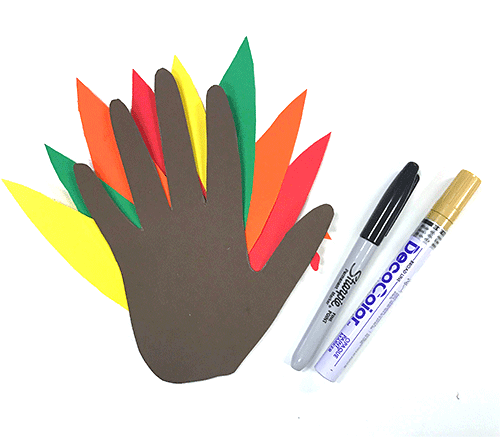
After drying for a minute or two, turn your hand turkey over. Use your black Sharpie to draw an eye and a fine opaque paint marker of your choice to write on it. I used gold to give it an autumnal finish but you can use any color you want. I wrote “I am Thankful for…” and on the fingers I wrote love, family, laughter and friends. Of course you can write whatever you are thankful for. You can even turn this into a fun Thanksgiving activity. Leave it blank and pass it around the dinner table, having your family and friends write what they are thankful for!!
These DIY Burlap Letters will be a hit with your family!! They look elegant without being too pricey. Position them anywhere!! You can place them nicely on the dinner table or on mantle like the fireplace. Remember to have fun with this – decorate your DIY Burlap Letters however you want!! You can choose different shaped hole punchers to add a little something special. Mix up the colors if you want to make your letters stand out!! You don’t even have to necessarily use them for any holiday in particular – they make lovely decorations yearlong but especially for the fall. Anything you do I can assure your friends and family will adore them!! I mean, who can resist burlap?! Don’t forget you share your DIY Burlap Letters on Instagram and Twitter! We’d love to see how you used them during this Thanksgiving season!
Creating Thankful Burlap Letters for Your Home Decor
DIY burlap letters are a charming and rustic way to add a personalized touch to your home decor. Whether you're looking to express gratitude or simply add a cozy, farmhouse feel to your space, burlap letters are a versatile and affordable option. By using burlap, you can achieve a natural and earthy look that complements a variety of interior styles. These letters can be used to spell out words like "thankful" or "grateful," making them a perfect addition to your Thanksgiving or fall decor. With just a few simple materials and a bit of creativity, you can create custom burlap letters that add warmth and character to any room in your home.
The Benefits of Using Burlap Letters in Your Decor
One of the main benefits of using burlap letters in your decor is the unique and charming aesthetic they provide. Burlap has a natural, textured look that adds warmth and character to any space. Additionally, DIY burlap letters are a cost-effective way to personalize your decor and express your creativity. Whether you're decorating for a specific holiday or simply want to add a cozy touch to your home, burlap letters offer a versatile and customizable option. Furthermore, creating your own burlap letters allows you to tailor them to your specific style and color scheme, ensuring they seamlessly integrate into your existing decor.
Use Cases for Burlap Letters
Burlap letters can be used in a variety of ways to enhance your home decor. They make a charming addition to mantels, shelves, or gallery walls, adding a personalized touch to any room. Additionally, burlap letters are a popular choice for seasonal decor, particularly during the fall and Thanksgiving season. Whether you're looking to spell out a specific word or simply add a rustic element to your space, burlap letters offer endless possibilities for customization and creativity.
Alternatives to Burlap Letters
If you're looking for alternatives to burlap letters, consider using other materials such as wood, metal, or fabric. Wooden letters offer a classic and timeless look, while metal letters can add a modern and industrial touch to your decor. Fabric letters, similar to burlap, provide a soft and tactile element that can be customized to suit your style. Exploring different materials allows you to find the perfect option that complements your home decor and personal aesthetic.
Tips for Using DIY Burlap Letters
When creating and using DIY burlap letters, it's important to consider the placement and overall aesthetic of your decor. Ensure that the letters complement the existing color scheme and style of the room, and consider incorporating them into a gallery wall or as part of a larger vignette. Additionally, experiment with different fonts and sizes to create a visually appealing arrangement. To maintain the integrity of the burlap, consider sealing the letters with a clear adhesive to prevent fraying and ensure longevity.
Adding a Personal Touch with Custom Burlap Letters
Custom burlap letters offer a unique and personalized way to enhance your home decor. Whether you're expressing gratitude, celebrating a special occasion, or simply adding a cozy touch to your space, burlap letters provide endless opportunities for creativity. By incorporating these charming and rustic elements into your decor, you can create a warm and inviting atmosphere that reflects your individual style and personality.


